Posts | Comments

Planet Arduino

Archive for the ‘contests’ Category

If you’re writing a screenplay or novel, there will likely be points along the way at which you can’t get enough encouragement from friends and family. While kind words are kind, acts such as [scubabear]’s can provide a push like no other. By commissioning another 3D designer friend to model a character from the first friend’s screenplay so he could print and animate it, [scubabear] fed two birds with one scone, you might say.
Designer friend [Sean] modeled the mighty Braomar in Maya and Z-brush, and [scubabear] did test prints on a Formlabs Form2 as they went along to keep an eye on things. Eventually, they had a discussion about making space for wires and such, so [Sean] took to Blender to make Braomar hollow enough for wires, but not so empty that he would collapse under the stress of being (we presume) the main character.

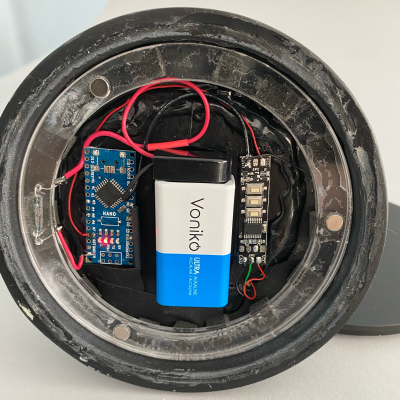
Braomar stands upon a sigil that changes color thanks to an RGB LED ring in the base that’s driven by an Arduino Nano. A single pixel in the fireball is wired through Braomar’s body and flickers with the help of an addressable LED sequencer board.

Our favorite part of this build has to be the power scheme. Not content to have a wire running out from the base or even a remote control for power-draining concerns, [scubabear] used disc magnets in the base to switch on the 9 V battery when Screenplay Friend rotates it.

Of course, if you need inspiration to even thing about beginning to write a screenplay or novel, maybe you should lead with the maquette-building and then construct a story around your creation.


This project was an entry into the 2022 Sci-Fi Contest. Check out all of the winning entries here.

We didn’t include a “Most Ornate” category in this year’s Coin Cell Challenge, but if we had, the environmentally reactive jewelry created by [Maxim Krentovskiy] would certainly be the one to beat. Combining traditional jewelry materials with an Arduino-compatible microcontroller, RGB LEDs, and environmental sensors; the pieces are able to glow and change color based on environmental factors. Sort of like a “mood ring” for the microcontroller generation.

[Maxim] originally looked for a turn-key solution for his reactive jewelry project, but found that everything out there wasn’t quite what he was looking for. It was all either too big or too complicated. His list of requirements was relatively short and existing MCU boards were simply designed for more than what he needed.

On his 30 x 30 mm PCB [Maxim] has included the bare essentials to get an environmentally aware wearable up and running. Alongside the ATtiny85 MCU is a handful of RGB LEDs (with expansion capability to add more), as well as analog light and temperature sensors. With data from the sensors, the ATtiny85 can come up with different colors and blink frequencies for the LEDs, ranging from a randomized light show to a useful interpretation of the local environment.

It’s not much of a stretch to imagine practical applications for this technology. Consider a bracelet that starts flashing red when the wearer’s body temperature gets too high. Making assistive technology visually appealing is always a challenge, and there’s undoubtedly a market for pieces of jewelry that can communicate a person’s physical condition even when they themselves may be unable to.

Form or function, life saving or complete novelty, there’s still time to enter your own project in the 2017 Coin Cell Challenge.


Filed under: Arduino Hacks, ATtiny Hacks, contests, Wearable Hacks

Some of the entries for the 2017 Coin Cell Challenge have already redefined what most would have considered possible just a month ago. From starting cars to welding metal, coin cells are being pushed way outside of their comfort zone with some very clever engineering. But not every entry has to drag a coin cell kicking and screaming into a task it was never intended for; some are hoping to make their mark on the Challenge with elegance rather than brute strength.

A perfect example is the LiquidWatch by [CF]. There’s no fancy high voltage circuitry here, no wireless telemetry. For this entry, a coin cell is simply doing what it’s arguably best known for: powering a wrist watch. But it’s doing it with style.

The LiquidWatch is powered by an Arduino-compatible Atmega328 and uses two concentric rings of LEDs to display the time. Minutes and seconds are represented by the outer ring of 60 LEDs, and the 36 LEDs of the inner ring show hours. The hours ring might sound counter-intuitive with 36 positions, but the idea is to think of the ring as the hour hand of an analog watch rather than a direct representation of the hour. Having 36 LEDs for the hour allows for finer graduation than simply having one LED for each hour of the day. Plus it looks cool, so there’s that.

Square and round versions of the LiquidWatch’s are in development, with some nice production images of [CF] laser cutting the square version out of some apple wood. The wooden case and leather band give the LiquidWatch a very organic vibe which contrasts nicely with the high-tech look of the exposed PCB display. Even if you are one of the legion that are no longer inclined to wear a timepiece on their wrist, you’ve got to admit this one is pretty slick.

Whether you’re looking to break new ground or simply refine a classic, there’s still plenty of time to enter your project in the 2017 Coin Cell Challenge.


Filed under: Arduino Hacks, clock hacks, contests
Jan
24

Trinket uses RF to track you through the house

arduino hacks, contests, hackaday.io, radar, Radicalization, Trinket EDC contest Comments Off on Trinket uses RF to track you through the house 

If you carry a cell phone with GPS, you always know where you are on the planet. But what about inside buildings or even your own home? Knowing if you’re in the kitchen or the living room would be a great feature for home automation systems. Lights could come on as you enter the room and your music could follow you on the home audio system. This is exactly the what [Eric] is working on with his Radiolocation using a Pocket Size Transceiver project. [Eric] started this project as an entry in the Trinket Everyday Carry Contest. He didn’t make the top 3, but was one of the fierce competitors who made the competition very hard to judge!

The heart of the project is determining Time Of Flight (TOF) for a radio signal. Since radio waves move at the speed of light, this is no small feat for an Arduino based design! [Eric] isn’t re-inventing the wheel though – he’s basing his design on several research papers, which he’s linked to his project description. Time of flight calculations get easier to handle when calculating round trip times rather than one way. To handle this, one or more base stations send out pings, which are received and returned by small transponders worn by a user. By averaging over many round trip transmissions, a distance estimation can be calculated.

[Eric] used a Pro Trinket as his mobile transponder, while an Arduino Micro with it’s 16 bit counter acted as the base station. For RF, he used the popular  Nordic nRF24L01+ 2.4 GHz transceiver modules. Even with this simple hardware, he’s achieved great results. So far he can display distance between base and transponder on a graph. Not bad for a DIY transponder so small if fits in a 2xAAA battery case! [Eric’s] next task is working through multipath issues, and testing out multiple base stations.

Click past the break to see [Eric’s] project in action!


Filed under: Arduino Hacks, contests
Oct
23

Rewiring a free carnival sign

arduino hacks, carnival, centrifuge, contests, Maker Faire, red bull, Relay, sign Comments Off on Rewiring a free carnival sign 

Late last September, Hackaday along with other hackerspaces including North Street Labs, 1.21 Jigawatts, Maker Twins, made their way to the NYC Maker Faire via the Red Bull Creation contest. The objectives of the contest were simple: build a game in 72 hours, have people vote on it, and join the Red Bull crew in Queens for a carnival-like atmosphere.

When the Maker Faire was over, Red Bull had some leftover props from their Midway at Maker Faire setup, including a few illuminated carnival signs. Without any use for them, they graciously gave Hackaday, North Street, Maker Twins and the Jigawatts the signs to their respective rides.

Now that things have settled down and the rides have returned to their home base, the folks over at North Street decided to improve their sign. At Maker Fair, these signs were illuminated by 50 incandescent bulbs, all wired on the same circuit. [Steve] over at North Street had the awesome idea of adding a persistence of vision aspect to the sign, so work began on wiring every fourth bulb in series.

To drive the light circuits, North Street repurposed the Arduino Relay shield originally used for the lights on the Centrifury, their competitive centrifuge and spinning hell of a game. In the video after the break, you can see the addition of POV lights really brings out the carnival atmosphere. A literally brilliant build, and a wonderful addition to the scariest game ever made.


Filed under: arduino hacks, contests


  • Newsletter

    Sign up for the PlanetArduino Newsletter, which delivers the most popular articles via e-mail to your inbox every week. Just fill in the information below and submit.

  • Like Us on Facebook