Posts | Comments

Planet Arduino

Archive for the ‘sign’ Category

Oct
30

Wireless Warning Sign

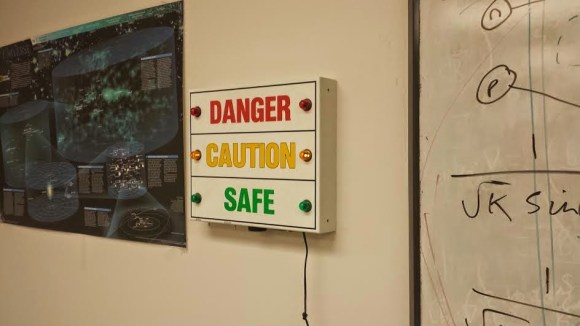
[A Raymond] had some free time at work, and decided to spend it on creating a wireless warning sign. According to his blog profile, he is a PhD student in Applied Physics. His lab utilizes a high-powered laser system. His job is to use said system, but only after it’s brought online by faculty scientists. The status of the laser system is changed by a manual switchbox that controls the warning signs wired around the lab entrances. Unfortunately, if you were in the upstairs office, you only knew this after running downstairs to check. [A Raymond's] admitted laziness finally got the better of him – he wanted a sign that displayed the laser’s status from the comfort of the office. He had an old sign he could use, but he wanted a way for it to communicate with the switchbox downstairs. After some thought, he decided Bluetooth was the way to go, using a pair of BlueSMiRF Bluetooth modules from Sparkfun and Arduino Uno R3’s.

He constructed a metal box that intercepted the cable from the main switchbox, mounting one BlueSMiRF and Uno into it. Upon learning that the switchbox sends 12V AC signals over three individual status wires, he half-wave rectified the wires and divided their voltages so that the Uno wouldn’t fry. Instead, it determined which status wire that had active voltage. and sent a “g(reen)”, “y(ellow)”, or “r(ed)” signal continuously via Bluetooth. On the receiving end, [A Raymond] gutted the sign and mounted the other BlueSMiRF and Uno into it along with some green, yellow, and red LEDs. The LEDs light up in response to the corresponding Bluetooth signal.

The result is a warning sign that is always up-to-date with the switchbox’s status. We’ve covered projects using Bluetooth before, from plush birds to cameras- [A Raymond's] wireless sign is in good company. He notes that it’s “missing” a high pitched whining noise when the “Danger” lights are on. If he decides to add an accompanying (annoying) sound, he couldn’t go wrong with something like this. Regardless, we’re sure [A Raymond] is happy that he no longer has to go back and forth between floors before he can use the laser.


Filed under: Arduino Hacks, wireless hacks
Jan
05

Retro Chaser Sign Lights Up Your Life

arduino, arduino hacks, Incandescent light bulb, las vegas, misc hacks, sign Comments Off on Retro Chaser Sign Lights Up Your Life 

lighted-sign

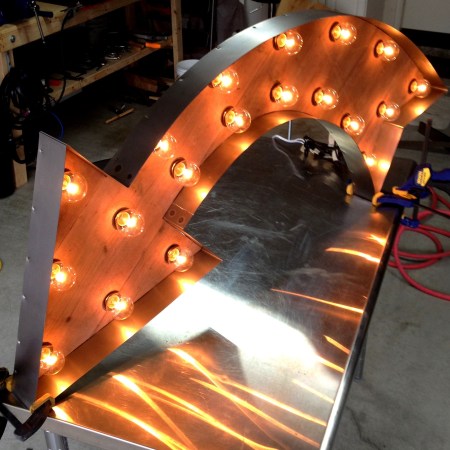
[Gnsart] builds props often used in the film industry. He’s created an amazing retro Vegas style light chaser sign. The sign was started as a job a few years ago. While [Gnsart] could handle the physical assembly, the cost of a mechanical light chaser pushed the project over budget. The sign project was cancelled back then, but he never forgot it.

Fast forward to a few weeks ago. [Gnsart] happened upon the Arduino community. He realized that with an Arduino Uno and a commonly available relay board, he could finally build the sign. He started with some leftover cedar fence pickets. The pickets were glued up and then cut into an arrow shape. The holes for the lights were then laid out and drilled with a paddle bit. [Gnsart] wanted the wood to look a bit aged, so he created an ebonizing stain. 0000 steel wool, submerged and allowed to rust in vinegar for a few days, created a liquid which was perfect for the task. The solution is brushed on and removed just like stain, resulting in an aged wood. We’ve seen this technique used before with tea, stain, and other materials to achieve the desired effect.

[Gnsart] then built his edging. 22 gauge steel sheet metal was bent to fit the outline in a bending brake. The steel sheet was stapled to the wood, then spot welded to create one continuous piece. Finally, the light sockets were installed and wired up to the Arduino. [Gnsart] first experimented with mechanical relays, and while we love the sound, we’re not sure how long they’d last. He wisely decided to go with solid state relays for the final implementation. The result speaks for itself. LEDs are great – but there is just something about the warm glow of low-wattage incandescent lights.


Filed under: Arduino Hacks, misc hacks
Oct
23

Rewiring a free carnival sign

arduino hacks, carnival, centrifuge, contests, Maker Faire, red bull, Relay, sign Comments Off on Rewiring a free carnival sign 

Late last September, Hackaday along with other hackerspaces including North Street Labs, 1.21 Jigawatts, Maker Twins, made their way to the NYC Maker Faire via the Red Bull Creation contest. The objectives of the contest were simple: build a game in 72 hours, have people vote on it, and join the Red Bull crew in Queens for a carnival-like atmosphere.

When the Maker Faire was over, Red Bull had some leftover props from their Midway at Maker Faire setup, including a few illuminated carnival signs. Without any use for them, they graciously gave Hackaday, North Street, Maker Twins and the Jigawatts the signs to their respective rides.

Now that things have settled down and the rides have returned to their home base, the folks over at North Street decided to improve their sign. At Maker Fair, these signs were illuminated by 50 incandescent bulbs, all wired on the same circuit. [Steve] over at North Street had the awesome idea of adding a persistence of vision aspect to the sign, so work began on wiring every fourth bulb in series.

To drive the light circuits, North Street repurposed the Arduino Relay shield originally used for the lights on the Centrifury, their competitive centrifuge and spinning hell of a game. In the video after the break, you can see the addition of POV lights really brings out the carnival atmosphere. A literally brilliant build, and a wonderful addition to the scariest game ever made.


Filed under: arduino hacks, contests


  • Newsletter

    Sign up for the PlanetArduino Newsletter, which delivers the most popular articles via e-mail to your inbox every week. Just fill in the information below and submit.

  • Like Us on Facebook