Posts | Comments

Planet Arduino

Archive for the ‘Software Development’ Category

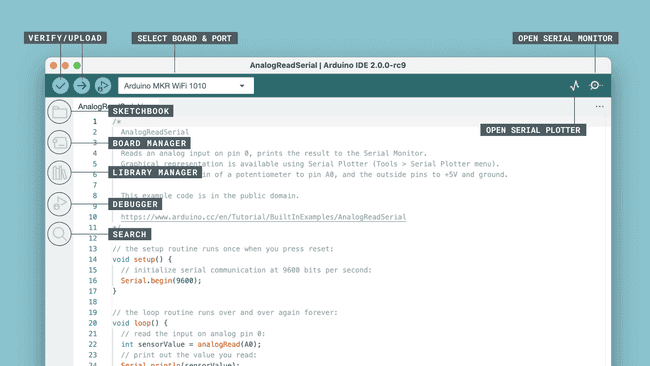
Arduino IDE v2.0 screen with callout tags to identify features

Arduino have released the latest version of their Integrated Development Environment (IDE), Version 2.0 and it is a big step up from the previous release, boasting plenty of new features to help you to develop your code more easily.

As the de-facto way for beginners to get into programming hardware, more experienced users have sometimes complained about what they see as the over-simplistic IDE — even lacking relatively basic features such as autocomplete. The new version provides this, and much more besides.

The press-release from Arduino offers a few clues to the main features, but the real detail is tucked away in a range of new tutorials, designed to get you up to speed with the new look.

Arduino IDE v2.0 remote sketchbook

The main screen is organised differently, to show off the new capabilities and to make development faster and easier. The new “Remote Sketchbook” has been integrated closely with the Arduino Cloud, to allow for easy switching between computers during development. V2.0 will pick up any Cloud sketches automatically, while computers using the previous versions of the IDE can still access the sketches via the Web Editor as before.

The Serial Plotter can now be used at the same time as the text Serial Monitor, rather than having to choose one or the other. In addition, there is a host of new Debug functionality for those devices that support it. This works with the usual In-Circuit Emulators (such as the Atmel ICE), but also natively with newer Arduino boards like the Arduino Zero without any additional hardware. The debugger gives you access to powerful features like Breakpoints, Step-Into and Step-Over to really understand what your code is doing.
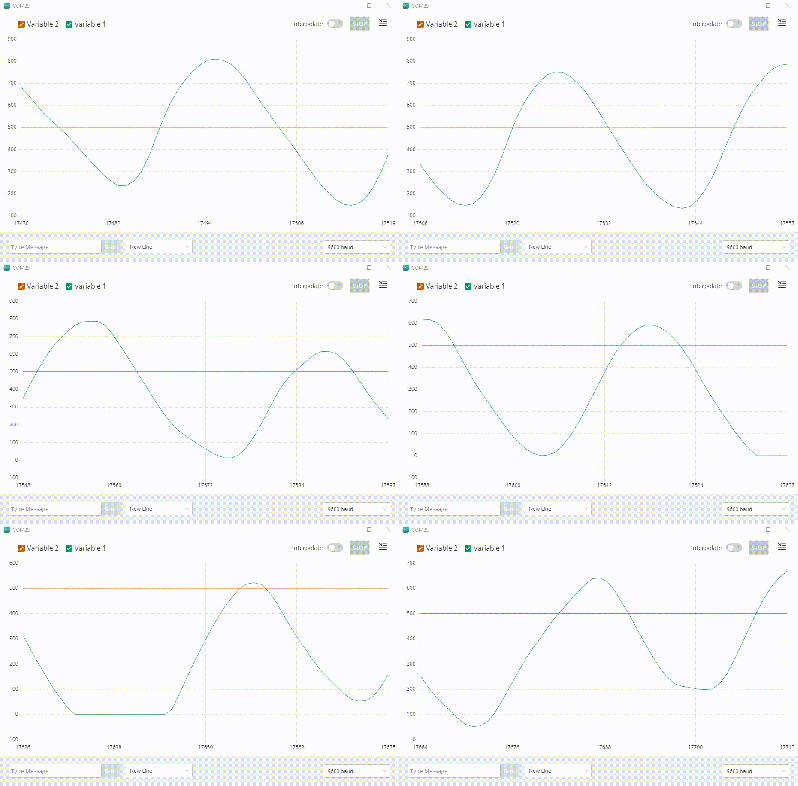
Arduino IDE v2.0 serial plotterInstallation is straightforward, and will automatically pull in any libraries and sketches that you created in previous versions of the Arduino software to ease the transition.

There’s a lot to like in the new IDE, but we expect it will take a little while to discover and use all the new features effectively.  Some of them are carry-overs from the “Arduino Pro IDE” that we covered a few years ago, but it’s great to see the software evolve and improve over time.

Have you tried new new IDE yet?  What are your thoughts on how it compares to the older version, or other development environments?  Let us know in the comments.

Thanks to [cardboardBaron] for the tip.

You can’t do much development without running into Git, the version control management system. Part of that is because so much code lives on GitHub which uses Git, although you don’t need to know anything about that if all you want to do is download code. [Dr. Torq] has a good primer on using Git with the Arduino IDE, if you need to get your toes wet.

You might think if you develop by yourself you don’t need something like Git. However, using a version control system is a great convenience, especially if you use it correctly. There’s a bug out in the field? What version of the firmware? You can immediately get a copy of the source code at that point in time using Git. A feature is broken? It is very easy to see exactly what changed. So even if you don’t work in a team, there are advantages to having source code under control.

If you are already using a more advanced IDE, Git is probably integrated into your environment, or, at least, it could be. If you are allergic to the command line, there are plenty of GUI tools to use Git, also. One nice thing about Git is that your local repository is just a directory. You don’t need to stand up a special server or anything to use it.

We don’t think it is directly related, but [Andreas] recently had a video on Git and Arduino. It isn’t as detailed, but it does have some good stuff and is worth the time to watch. You can see it below.

We’ve used Git for some odd things in the past. Note that Git is the version control system while GitHub is a website. However, if you are a hardcore command line user, you can manipulate GitHub from there, too.

Go — a modern programming language with roots at Google — is one of the new generation languages that would like to unseat C (and C++) for what we think of as traditional programming. It is only for PCs, though, right? Not so fast! TinyGo provides a compiler that — in their words — is for small places. How small? They can target code for the Arduino Uno or the BBC micro:bit. It can also produce code for x86 or ARM Linux (both 32- and 64-bit) as well as WebAssembly. They claim that a recent project to add ESP8266 and EPS32 support to LLVM will eventually enable TinyGo to target those platforms, too.

As you would expect, there are some subtle differences between TinyGo and the full-blown version. The compiler handles the entire program at once which is slower but offers more for optimization. Certain optimizations for interface methods are not used in TinyGo, and global variable handling changes to accommodate moving data from flash to RAM efficiently. TinyGo passes parameters in registers.

Other changes are more profound. For example, there’s no garbage collection yet, so you are urged to not perform heap allocations after initialization. There are also a few other major features not supported. Concurrency in the form of goroutines and channels, cgo, reflection, and three index slices won’t work. Maps are available, but only with certain key types. Because of the missing pieces, many of the packages in the standard library won’t build.

Of course, the other modern language in the same position is Rust and if you were wondering why Go instead of Rust, there’s an FAQ for that. Do you need Go on the Arduino? Maybe not. However, if you are a Go programmer, maybe this opens up some possibilities for you.

We remember a hacker jukebox that used Go. We also remember someone using it on the ill-fated Intel Edison.

A neat little hacker project that’s flying off the workbenches recently is the Arduboy. This tiny game console looks like a miniaturized version of the O.G. Game Boy, but it is explicitly designed to be hacked. It’s basically an Arduino board with a display and a few buttons, anyway.

[rv6502] got their hands on an Arduboy and realized that while there were some 3D games, there was nothing that had filled polygons, or really anything resembling a modern 3D engine. This had to be rectified, and the result is pretty close to Star Fox on a microcontroller.

This project began with a simple test on the Arduboy to see if it would be even possible to render 3D objects at any reasonable speed. This test was just a rotating cube, and everything looked good. Then began a long process of figuring out how fast the engine could go, what kind of display would suit the OLED best, and how to interact in a 3D world with limited controls.

Considering this is a fairly significant engineering project, the fastest way to produce code isn’t to debug code on a microcontroller. This project demanded a native PC port, so all the testing could happen on the PC without having to program the Flash every time. That allowed [rv] to throw out the Arduino IDE and USB library; if you’re writing everything on a PC and only uploading a hex file to a microcontroller at the end, you simply don’t need it.

One of the significant advances of the graphics capability of the Arduboy comes from exploring the addressing modes of the OLED. By default, the display is in a ‘horizontal mode’ which works for 2D blitting, but not for rasterizing polygons. The ‘vertical addressing mode’, on the other hand, allows for a block of memory, 8 x 128 bytes, that maps directly to the display. Shove those bytes over, and there’s no math necessary to display an image.

This is, simply, one of the best software development builds we’ve seen. It’s full of clever tricks (like simply not doing math if you’ll never need the result) and stuffing animations into far fewer bytes than you would expect. You can check out the demo video below.

It’s hard not to be impressed by the Arduboy. In just a few short years, [Kevin Bates] went from proof of concept to a successful commercial product without compromising on his original open source goals. Today, anyone can develop a game for the Arduboy and have it distributed to owners all over the world for free. If you’ve ever dreamt of being a game developer, the Arduboy community is for you.

Realizing the low-cost hardware and open source software of the Arduboy makes it an excellent way to learn programming, [Kevin] is now trying to turn his creation into a legitimate teaching tool. He’s kicking off this new chapter in the Arduboy’s life with a generous offer: giving out free hardware to educators all over the world. Anyone who wants to be considered for the program just needs to write-up a few paragraphs on how they’d plan on using the handheld game system to teach programming.

[Kevin] already knows the Arduboy has been used to teach programming, but those have all been one-off endeavours. They relied on a teacher that was passionate enough about the Arduboy to put in their own time and effort to create a lesson plan around it. So one of the main goals right now is getting an official curriculum put together so educators won’t have to start from scratch. The community has already developed 16 free lessons, but they’re looking for help in creating more and translating them into other languages.

While the details are still up in the air, [Kevin] also plans to travel to schools personally and help them get their Arduboy classes off the ground. He’s especially interested in developing countries and other areas that are disadvantaged educationally. Believing that the Arduboy is as much a way to teach effective leadership and teambuilding as it is programming, he thinks this program can truly make a difference.

Since [Kevin] first Rickrolled us with his prototype in 2014, we’ve seen the Arduboy project spread like wildfire through the hacker community. From figuring out how to play its games on other gadgets to developing an expansion cartridge for the real thing, the Arduboy has already done its fair share of inspiring. Here’s hoping it has just as much of an impact on the next generation of hackers once they get their hands on it.

What do you program the Arduino in? C? Actually, the Arduino’s byzantine build processes uses C++. All the features you get from the normal libraries are actually C++ classes. The problem is many people write C and ignore the C++ features other than using object already made for them. Just like traders often used pidgin English as a simplified language to talk to non-English speakers, many Arduino coders use pidgin C++ to effectively code C in a C++ environment. [Bert Hubert] has a two-part post that isn’t about the Arduino in particular, but is about moving from C to a more modern C++.

Even those of us who use C++ often use what we think of as “classic” C++. More or less the C++ that started life as a preprocessor in front of the C compiler. C++ has changed a lot since then, though. [Bert] looks mostly at useful features from the C++ 2014 standard which is widely available in compilers now. He only talks a little about some 2017 features. He doesn’t, however, talk about super new features or very specialized features that probably won’t be your first stop in a transition from C.

In particular, [Bert] doesn’t cover multiple inheritance, template metaprogramming, a big chunk of iostreams, C++ locales, user-defined literals, or exotics. Just to motivate you, he shows an example where calling the C library to sort a large array is slower than the code using C++ templates that take advantage of parallelism. While this is a special case, it does show that C++ isn’t just “another way to write the same thing.” You could write a faster sort in C, but you’d be writing a lot of code, not just pulling in a library.

What he does cover is strings, namespaces, classes, smart pointers, threads and error handling. Some of these will be more useful on the Arduino than others, but if you are writing for other platforms like a PC or a Raspberry Pi you could use all of them. He’s planning on adding more items in future installments of the series.

Meanwhile, we had our own story about modern C++ and the Arduino last year. If you want to know more about templates, we’ve talked about that, too.

As every Hackaday reader knows, and tells us at every opportunity in the comments, adding an Arduino to your project instantly makes it twice as cool. But what if, in the course of adding an Arduino to your project, you run into a problem and need to debug the code? What if you could use a second Arduino to debug the first? That would bring your project up to two Arduinos, instantly making it four times as awesome as before you started! Who could say no to such exponential gains?

Debugging an ATTiny85

Not [Wayne Holder], that’s for sure. He writes in to let us know about a project he’s been working on for a while that allows you to debug the execution of code on an Arduino with a second Arduino. In fact, the target chip could even be another AVR series microcontroller such as a the ATTiny85. With his software you can single-step through the code, view and modify values in memory, set breakpoints, and even disassemble the code. Not everything is working fully yet, but what he has so far is very impressive.

The trick is exploiting a feature known as “debugWIRE” that’s included in many AVR microcontrollers. Unfortunately documentation on this feature is hard to come by, but with some work [Wayne] has managed to figure out how most of it works and create an Arduino Sketch that lets the user interact with the target chip using a simple menu system over the serial monitor, similar to the Bus Pirate.

[Wayne] goes into plenty of detail on his site and in the video included after the break, showing many of the functions he’s got working so far in his software against an ATTiny85. If you spend a lot of time working on AVR projects, this looks like something you might want to keep installed on an Arduino in your tool bag for the future.

Debugging microcontroller projects can be a huge time saver when your code starts running on real hardware, but often takes some hacking to get working.

If you’ve ever been curious if there’s a way to program microcontrollers without actually writing software, you might be interested in FlowCode. It isn’t a free product, but there is a free demo available. [Web learning] did a demo of programming a Nucleo board using the system. You can check it out below.

The product looks slick and it supports a dizzying number of processors ranging from AVR (yes, it will do Arduino), PIC, and ARM targets. However, the pricing can add up if you actually want to target all of those processors as you wind up paying for the CPU as well as components. For example, the non-commercial starter pack costs about $75 and supports a few popular processors and components like LEDs, PWM, rotary encoders, and so on.

Price aside, we have serious concerns about building applications with GUIs. It sounds seductive and for simple projects, it is easy and intuitive. However, complex problems get messy quickly when you have flowcharts. This is the same reason complex logic designs moved away from schematics — another form of graphical representation — and went to Verilog and VHDL.

Still, looking at how this is done might give you some ideas and it might be just the ticket for the right application. It isn’t the only graphical game in town, of course. There’s ArduBlock, for example. Another one we’ve looked at is MiniBloq. You can even use Scratch on the Arduino or Raspberry Pi.


Filed under: Arduino Hacks, ARM, Software Development

Codebender.cc was a cloud based IDE for Arduino development. It was made for hackers by a few fellows in Greece. Unfortunately, while they saw some serious success, they were never able to convert it all the way into a viable business.

By November 31st Codebender.cc will be completely shut down. They assure users that the site will be in read-only mode for as long as the end of the year, but longer if the traffic justifies it. Codebender made it all the way to 10,000 monthly active users, but hosting and administration overshadowed this success to the tune of 25,000 dollars a month. Not so much as far as businesses go, but without revenue it’s more than enough to shut down a site. Their business plan aimed to tailor their services for specific chip manufacturers and other companies but those deals never came together.

It’s a pity, we were excited to see if Codebender could continue to grow. They were certainly doing some really interesting stuff like remote code upload. As the comments on the site show, many users, especially educators and Chromebook users, loved Codebender — your code isn’t stuck on one computer and where there was a browser there was an IDE.

Two paid services will remain (starting at $10/month) at addresses with different TLDs. But the post does mention that the Codebender project started as Open Source. Their GitHub repo isn’t a clear path for rolling your own, but if you do manage to hack together a working Codebender implementation we’d love to hear about it.


Filed under: Arduino Hacks, news, Software Development


  • Newsletter

    Sign up for the PlanetArduino Newsletter, which delivers the most popular articles via e-mail to your inbox every week. Just fill in the information below and submit.

  • Like Us on Facebook