Posts | Comments

Planet Arduino

Archive for the ‘beer hacks’ Category

It’s the end of the academic semester for many students around the globe, so here comes the flurry of DIY projects. Always a great time to check out all the cool hacks from our readers all over the world. One project that piques our interest comes courtesy of [Jason Ummel] and his Auto-Bartender.

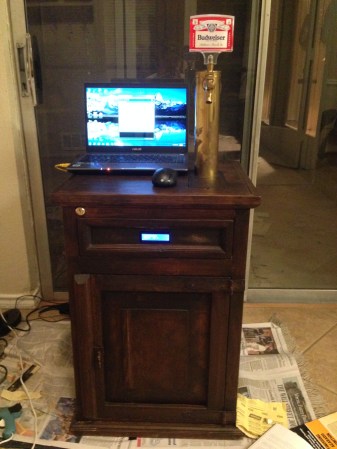
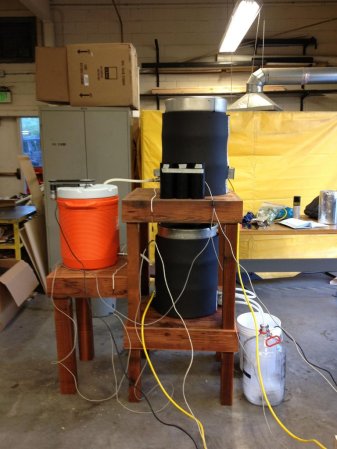
[Jason] developed this project as a part of his robotics class taught by Professor Martinez, one of our friends at FlexiLab. Powered by one of our favorite microcontrollers, the ATmega328, the Auto-Bartender is driven by a single 12 V motor coupled with 10 individual valves for separate drinks. Drinks are pumped into a cup sitting on top of a scale, allowing the device to know how much of each drink has been dispensed. The entire setup is controlled using a smartphone application developed in MIT App Inventor, a super-easy way to prototype Android applications.

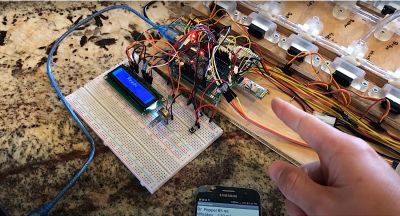
Furthermore, [Jason] incorporated a number of user-centered design considerations into his project. These include an LCD to display updates, a green LED to indicate the device is in progress, and a buzzer to let the user know the drink is complete.

We really like the combination of craftsmanship, electronics hardware design, and software development that [Jason] put into his project. It’s the kind of project we know our readers will enjoy.

It looks like Jason substituted tap water for Whiskey and Dr. Pepper for his demo. Not exactly what we had in mind, but I guess he still has exams to finish.

Cool project [Jason]! We can’t wait to see Auto-Bartender on Hackaday.io.

Bottoms up!

Usually, when we are talking about homebrew around here, we mean building your own equipment. However, most other people probably mean brewing beer, something that’s become increasingly popular as one goes from microbreweries to home kitchen breweries. People have been making beer for centuries so you can imagine it doesn’t take sophisticated equipment, but a little automation can go a long way to making it easier. When [LeapingLamb] made a batch using only a cooler, a stock pot, and a propane burner, he knew he had to do something better. That’s how Brew|LOGIC was born.

There are many ways to make beer, but Brew|LOGIC focuses on a single vessel process and [LeapingLamb] mentions that the system is akin to a sous vide cooker, keeping the contents of the pot at a specific temperature.

Honestly, though, we think he’s selling himself a bit short. The system has a remote application for control and is well-constructed. This isn’t just a temperature controller thrown into a pot. There’s also a pump for recirculation.

The common stock pot gets some serious modifications to hold the heating element and temperature probe. It also gets some spring-loaded clamps to hold the lid down. Expect to do a lot of drilling.

The electronics uses an Arduino, a Bluetooth board, and some relays (including a solid state relay). The finished system can brew between 5 and 15 gallons of beer at a time. While the system seems pretty good to us, he did list some ideas he has for future expansion, including valves, sensors for water level and specific gravity, and some software changes.

After reading that the system was similar to a sous vide cooker, we wondered if you could use a standard one. Turns out, you can. If you want to make better beer without electronic hacking, there’s always the genetic kind.

[ChrisN219] has an antique Coke machine that used to hold glass bottles. Now it holds around 30 tall boy cans of his favorite post-work suds. The only problem is that [Chris] has no idea how many cans are in it without opening up the door or keeping tally on a nearby slate board. Enter the Arduino.

He wanted to make something completely non-invasive to the machine (phew!) while using as many parts he already had as possible. The result is a simple circuit that uses an ultrasonic sensor mounted inside the machine to ping the depths, and a Nano in a nifty 3D printed box up top to do some math and display the number of cans remaining as a simple bar graph. The sensor reads one bay, and the code multiplies by two to get the total. It was touch and go there for a minute as he wasn’t sure that the HC-SR04s would get a good response from the cylindrical cans. Not only did they give a good reading, the first test was quite accurate.

[Chris] recently finished Mk. II, which replaces the momentary (and the Coke logo) with a second HC-SR04. The first version required the push of a button to do inventory, but now he simply walks up to the machine and knows at a glance if it’s time to make a beer run.

Okay, so maybe you don’t have cool old Coke machine problems. But surely you can find something that needs pinging, like an inconvenient rain barrel.

Oct
16

Goldilocks Climate Box Keeps Lager Fermentation Environment Just Right

arduino hacks, beer, beer hacks, brewing, fermentation, lager, maltbolche, mondo spider, peltier Comments Off on Goldilocks Climate Box Keeps Lager Fermentation Environment Just Right 

Climate box for lager brewingSeptember was warmish in many places around the world including [Ole]‘s native Denmark. But that did not stop him from brewing lager flavored with plums from his own garden, and neither did his indifference to lagers in general.

Lager fermentation requires a consistent, low temperature. While many homebrewers might modify an electric refrigerator, [Ole] wasn’t interested in the cost of running a second one just for brewing beer. Instead, he built a climate box to work with the cool temperature in his garage. Starting with scrap wood from other projects, he lined the walls with polystyrene and put a layer of wood on the floor to help support the fermentation bucket.

Maintaining a consistent temperature in the box called for both heating and cooling. He pulled the Peltier from a 12V cooler meant to run off a car’s cigarette lighter, and used a spare ceramic heater that was lying around in case his primary reptile warmer went on the fritz.

An Arduino and a custom shield drive separate PID controllers for the Peltier and the heater. The shield has a temperature probe, and he extended the USB outside the climate box so the PIDs can be adjusted without disturbing the inside temperature. The schematic, board file, and code are all available in a zip you can get from his post.

The Peltier couldn’t quite compensate for the overly warm weather and the heat caused by the fermentation, but it was stable enough to produce a nice, plum-flavored lager he has dubbed Lektor Blom­mes malt­bol­che, which is a triple Danish pun he explains in the write-up.


Filed under: Arduino Hacks, Beer Hacks
Oct
15

Margarita Drip Infuser Ensures a Perfect Mix

arduino hacks, barbot, beer hacks, chemistry hacks, drip infuser Comments Off on Margarita Drip Infuser Ensures a Perfect Mix 

Margarita Drip Infuser!

In order to get a margarita just right, the various ingredients need to be mixed together quite vigorously to over-come the different viscosity of the fluids. Looking to create his own barbot of sorts, [TVMiller] decided to make a Margarita Drip Infuser to help make margaritas a bit easier.

Using various chem lab supplies, [TVMiller] has cobbled together something pretty awesome. The Infuser can take up to 8 different ingredients into its test tube reserves, and after the drink ingredients are programmed on the computer, the magic begins.

An Arduino Uno controls a bank of 8 relays which control small fluid solenoids, with each control pulse releasing just a single droplet of fluid. An LED for each valve is run in parallel adding a bit of a light show to the mixing experience. If that’s not enough, he’s also created a copper cooling coil to chill the drink as it is poured.

For a slightly more advanced build, check out the Inebriatior.


Filed under: Arduino Hacks, Beer Hacks, chemistry hacks
Sep
08

End Table Kegerator Hides the Tap when You’re Not Looking

arduino, arduino hacks, beer, beer hacks, Furniture, kegerator, LCD, refrigerator, table, temperature Comments Off on End Table Kegerator Hides the Tap when You’re Not Looking 

kegerator

What’s better than an ordinary end table? How about an end table that can serve you beer? [Sam] had this exact idea and used his skills to make it a reality. The first step of the build was to acquire an end table that was big enough to hold all of the components for a functional kegerator. This proved to be a bit tricky, but [Sam] got lucky and scored a proper end table from a garage sale for only $5.00.

Next, [Sam] used bathroom sealant to seal up all of the cracks in the end table. This step is important to keep the inside cold. Good insulation will keep the beer colder, while using less electricity. Next, a hole was cut into the top of the table for the draft tower.

The draft tower is mounted to a couple of drawer slides. This allows the tower to raise up and down, keeping it out of sight when you don’t want it. The tower raises and lowers using a simple pulley system. A thin, high strength rope is attached to the tower. The other end is attached to a spool and a small motor. The motor can wind or unwind the spool in order to raise and lower the tower.

The table houses an Arduino, which controls the motor via a homemade H bridge. The Arduino is hooked up to a temperature sensor and a small LCD screen. This way, the users can see how cold their beer will be before they drink it.

To actually keep the beer cold, [Sam] ripped apart a mini fridge. He moved the compressor and condenser coils to the new table. He had to bend the coils to fit, taking care not to kink them. Finally he threw in the small keg, co2 tank and regulator. The final product is a livingroom gem that provides beer on demand.

Demo video (which is going the wrong way) can be found after the break.


Filed under: Arduino Hacks, Beer Hacks
Dec
14

Arduino Controlled Beer Brewing Machine!

arduino hacks, beer brewing machine, beer hacks, homebrew Comments Off on Arduino Controlled Beer Brewing Machine! 

automated beer brewing

[the_meatloaf] just put the final touches on his fully automated beer brewing machine using an Arduino.

The project was part of his computer engineering degree, and it took [the_meatloaf] and two mechanical engineer friends a year to design and build the entire system from scratch. An Arduino Mega with a 4-button interface allows you to program, save, load, rename, and run up to 26 different recipes saved to the EEPROM.

An automated system like this removes most of the guesswork from an otherwise complex brewing process. The machine starts by heating the water in the first keg using a 2000W heating element, after which the water transfers into the mash vessel via servo valves, where it’s stirred by a mixing motor. The machine then drains the wort (the resulting liquid after mashing) and sparges (adds more water to the mash tun) the grains as programmed: thanks, [Chris,] for clarification! The wort is brought to a boil for the programmed amount of time, while a servo-controlled “hopper” automatically adds the hops.  Finally, a counter-flow heat exchanger rapidly cools the solution to room temperature using ice water, then dispenses the solution for fermentation.

Though [the_meatloaf's] biggest project to date was quite the accomplishment, he unfortunately won’t get to enjoy it. The sponsors who covered the $1000 budget reclaimed the machine. Drat.

[via Reddit]


Filed under: Arduino Hacks, Beer Hacks
Oct
11

HaDuino: Open Your Beer Using Arduino

arduino hacks, ATmega168, beer hacks, bottle opener, fail, Featured, HaDuino, osh park Comments Off on HaDuino: Open Your Beer Using Arduino 

Frankly we’re tired of Arduino having a bad name here at Hackaday. So [Brian Benchoff] came up with a way to make it useful to a wider audience. His creation, which we call the HaDuino, lets you use the Arduino clone to open a tasty bottle of beer.

HaDuino-boards-front-and-back

This is an absolutely beautiful board. Click on the image to the left for a high-res view. [Brian] did a fantastic job with the pixellated logo on the back of the board. The top includes some of his snarky comments to help you with populating the components. Beware of the decoupling capacitors on either side of the chip. We think it’s probably a bad idea to use 1k resistors as indicated in those footprints. (Brian’s edit: I screwed up the labels. They’re fixed in the current version) This isn’t the only thing wrong with the design so make sure you keep reading.

Your eyes have probably already picked out the Open Hardware logo. We like to hold open source as a core concept and have made the design files available at our GitHub repository. Hardware is weird to track with Git, but if you are planning to monkey with the board we’d love it if you forked just so other readers (us included) can see the cool stuff you come up with.

This is a farce

HaDuino-broken

As much as we love the idea, the PCB broke after opening just one bottle of beer. The image above shows the broken populated board next to a pristine copy. But since we thought the idea was hilarious we kept going with the video. All three of the demonstration bottles had the caps “loosened” before filming. In fact you can see the key chain with a bottle opener on it in some of the shots. While we’re spilling the beans, these bottles didn’t even have beer in them. We simply filled empties with water and capped them with a black capper which you can also see in some of the shots. We did this because we’re not in the habit of drinking in the middle of the day. To top that off, this isn’t even an Arduino clone, as we made the lights flash by programming bare metal on the ATmega168.

But enough blabbering. The concept of a PCB shape that can reliably open a bottle of beer isn’t all that far-fetched. We think part of the problem is lack of an appropriately place fulcrum. Also, a more robust protrusion needs to be designed to latch on the underside of the cap. Because the design files are available, this is just screaming for someone to hack up a better version. What are you waiting for?


Filed under: Arduino Hacks, Beer Hacks, Featured
Nov
08

KegDroid makes drinking beer more fun

Android, android hacks, arduino, arduino hacks, beer, beer hacks, kegdroid Comments Off on KegDroid makes drinking beer more fun 

KegDroid beer arduino

Are you bored with just drinking beer? Are your friends constantly sneaking into your house and stealing your sacred beverages? If so, perhaps you need KegDroid – the Android controlled beer tap created by [Paul Carff].

Looking for a way to add more excitement to drinking his beer, [Paul] spiced up his tap with a little extra technology. He added an Android tablet for touchscreen navigation of the menus, an Arduino to control the flow sensors and solenoid valves, and an NFC reader to act as security for restricted access.  Users must be authenticated before they are allowed to pour any alcohol.

Your name and photo are pulled from your Google+ account as you’re logged in, then you simply select your beverage of choice, and if you’d like a one, eight, or twelve ounce pour. Flow sensors automatically shut off when you have the desired quantity.

Seems like you get more foam than beer, but all in all it’s a cool bar top app.

Check out the video after the break.


Filed under: android hacks, arduino hacks, beer hacks
Oct
19

Hacking Beer Cans for Fun and Publicity

arduino, arduino hacks, beer, beer hacks, Raspberry Pi, Staropramen Comments Off on Hacking Beer Cans for Fun and Publicity 

beer-keyboard

Although beer is generally a good way to get people to come to your trade show booth, [Robofun.ru] decided to put a new spin on things. Instead of (or possibly in addition to) giving out beer, they decided to turn 40 Staropramen beer cans into a keyboard.

This was done using an Arduino hooked up to four Sparkfun MPR121 Capacitive Touch Sensor Breakout Boards, allowing them to act as keys. These inputs are translated via the Arduino into a standard output (we assume USB) that can be plugged into any computer.  Additionally, a Sparkfun MP3 trigger board was used to control the sound effects.  Rounding out the build, a Raspberry Pi computer was used to run the human machine interface, a large plasma display.

Be sure to check out this keyboard in action after the break. If this isn’t enough alternative input fun, why not check our post about how to make a banana piano and giant NES controller.


Filed under: arduino hacks, beer hacks, Raspberry Pi


  • Newsletter

    Sign up for the PlanetArduino Newsletter, which delivers the most popular articles via e-mail to your inbox every week. Just fill in the information below and submit.

  • Like Us on Facebook