Posts | Comments

Planet Arduino

Archive for the ‘arduino mega’ Category

A small keyboard form factor retrocomputer with blue keys on a black background sits in front of a display and a LEGO model of the Space Shuttle. There are a number of jumper wires and a breadboard coming from an open panel on the right side of the machine.

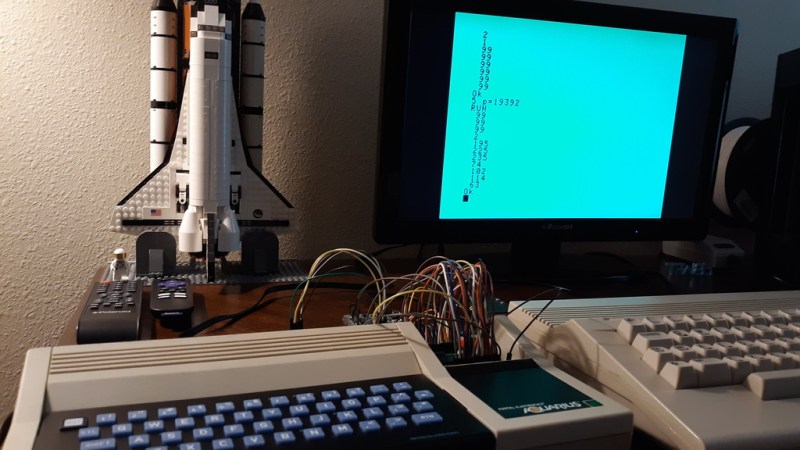
In case you weren’t around in the 80s, or you happened to blink, you may have missed the Mattel Aquarius computer. [Nick Bild] has a soft spot in his heart for the machine though and built the Aqua cartridge to make the Aquarius into a more usable machine.

Originally equipped with a mere 4 KB of RAM and a small, rubbery keyboard, it’s not too surprising that the Aquarius only lasted five months on the market. [Nick] decided on the cartridge slot to beef up the specs of this little machine given the small number of expansion ports on the device. Adding 32 KB of RAM certainly gives it a boost, and he also designed an SD card interface called Aqua Write that connects to the Aqua cartridge for easily transferring files from a more modern machine.

The Aqua Write uses an Arduino Mega 2560 to handle moving data between the SD card and the system’s memory. This is complicated somewhat because a “PLA sits between the Z80 and data bus that XORs data with a software lock code (initialized to a random value on startup).” [Nick] gets around this by running a small program to overwrite the lock code to zero after startup.

Getting data on and off retrocomputers can certainly be a challenge. If you’re trying to get files on or off another old machine, check out this Simple Universal Modem or consider Using a Raspberry Pi as a Virtual Floppy Drive.

The oldest form of television used a spinning disk with a progression of holes — a Nipkow disk — to slice the image into lines for display. They’re surprisingly simple machines and capable of unexpectedly high-quality images despite their relatively low resolution. Even better, in an age of microcontrollers and bright LEDs, making one that works is not the chore it might once have been. [James Provost] has created one that uses an Arduino Mega and a set of 3D printed parts, so there’s no excuse for not having a spinning disk TV on your shelf.

The Arduino Mega is chosen because it has enough lines to drive three six-bit DACs for each of red, green, and blue. The disk is driven by a PWM motor controller, and synchronisation is taken care of by a piece of reflective tape and an IR proximity sensor. Images and video are read from an SD card and displayed on the screen in glorious 32-line colour. The full build process can be seen in the video below the break.

A surprise when viewing mechanical TV is that its quality is much better than the meager resolution would have you believe, and this one with its colour display is much better than the usual monochrome devices. It’s hardly HDTV, but it acquits itself well and would provide an excellent talking point.

If you’re curious about Nipkow disks, they’re a subject we’ve examined in the past.

A Hackvent calendar made of LEDs!

Who says it’s too early to get in the holiday spirit? We say it’s not. After all, people need time to get in the spirit before it comes and goes. And what better way to count down the days until Christmas than an electronic Advent calendar?

Soldering up a bunch of LEDs to nails, old school style.[Tom Goff]’s kids had some pretty cool ideas for building a decoration, like a musical, lighted sleigh complete with robotic Santa Claus. While that’s a little much to pull off for this year, they did salvage the music and lights part for their Hackvent calendar.

There are 24 small LEDs for December 1st through the 24th, and a big white star for December 25th. Each day, the kids just push the button and the day’s LED lights up. On the big day, all the small lights cascade off and the white one lights up, then it plays Jingle Bells through a sound playback module.

Each LED is connected directly to an input on an Arduino Mega. While there are several ways of lighting up 25 LEDs, this one is pretty kid-friendly. We think the coolest part of this build is that [Tom] and the kids did it old school, with nails hammered into the laser-cut plywood and used as connection terminals. Be sure to check it out in action after the break.

The more time you have, the more you can put into your Advent calendar build. Like chocolates, for instance.

Ever since we saw the movie Big, we’ve wanted a floor piano. Still do, actually. We sometimes wonder how many floor pianos that movie has sold. It’s definitely launched some builds, too, but perhaps none as robust as this acrylic and wooden beauty by [FredTSL]. If you want more technical detail, check out the project on IO.

The best part is that this piano is modular and easily expands from 1 to 8 octaves. Each octave runs on an Arduino Mega, with the first octave set up as a primary and the others as secondaries. When [FredTSL] turns it on, the primary octave sends a message to find out how many octaves are out there, and then it assigns each one a number. Whenever a note is played via conductive fabric and sensor, the program fetches the key number and octave number and sends the message back to the primary Mega, which plays the note through a MIDI music shield.

We think this looks fantastic and super fun to dance around on. Be sure to check out the build log in photos, and stick around after the break, because you’d better believe they busted out some Heart and Soul on this baby. After all, it’s pretty much mandatory at this point.

Wish you could build a floor piano but don’t have the space or woodworking skills? Here’s a smaller, wireless version that was built in 24 hours.

A lot of electronic busy boxes that are built for children are simply that — a mess of meaningless knobs and switches that don’t do much beyond actuating back and forth (which, let’s be honest, is still pretty fun to do). But this Mission Control Center by [gcall1979] knocks them all out of orbit. The simulation runs through a complete mission, including a 10-minute countdown with pre-flight system checks, 8.5 minutes of powered flight to get out of the atmosphere that includes another four tasks, and 90 minutes to orbit the Earth while passing through nine tracking stations across the world map.

That’s a lot time to keep anyone’s attention, but fortunately [gcall1979] included a simulation speed knob that can make everything go up to 15 times faster than real-time. This knob can be twiddled at any time, in case you want to savor the countdown but get into space faster, or you don’t have 90 minutes to watch the world map light up.

The main brain of this well-built box is an Arduino Mega, which controls everything but the launch systems’ mainframe computer — this is represented by bank of active LEDs that blink along with the voice in the sound clips and runs on an Arduino Uno and a couple of shift registers. To keep things relatively simple, [gcall1979] used an Adafruit sound board for the clips.

We love everything about this build, especially the attention to detail — the more important pre-flight tasks are given covered toggle switches, and there’s a Shuttle diagram that lights up as each of these are completed. And what Shuttle launch simulator would be complete without mushroom buttons for launch and abort? Grab your victory cigar and check out the demo video after the break.

Is your child too young to be launching the Shuttle? Here’s an equally cool busy box with toddler brains in mind.

It’s 2021. Everyone and their mother is filming themselves doing stuff, and a lot of it is super cool content. But since most of us have to also work the video capture devices ourselves, it can be difficult to make compelling footage with a single, stationary overhead view, especially when there are a lot of steps involved. A slider rig is a good start, but the ability to move the camera in three dimensions programmatically is really where it’s at.

[KronBjorn]’s excellent automated overhead camera assistant runs on an Arduino Mega and is operated by typing commands in the serial monitor. It can pan ±20° from straight down and moves in three axes on NEMA-17 stepper motors. It moves really smoothly, which you can see in the videos after the break. The plastic-minimal design is interesting and reminds us a bit of an ophthalmoscope — that’s that main rig at the eye doctor. There’s only one thing that would make this better, and that’s a dedicated macro pad.

If you want to build your own, you’re in luck — there’s quite a lot of detail to this project, including a complete BOM, all the STLs, code, and even assembly videos of the 3D-printed parts and the electronics. Slide past the break to check out a couple of brief demo videos.

Not enough room for a setup like this one? Try the pantograph version.

If you want to waste time in a meaningful way, get yourself an hourglass. It’s simultaneously mesmerizing and terrifying to sit there and watch the seconds slip through the threshold that separates possibility from missed opportunity.

[Ty and Gig]’s LED hourglass is equally beautiful to watch. It doesn’t actually tell time, but that’s perfectly fine by us. What it does do is animate the LEDs to approximate grains of sand in gravity, no matter how the hourglass is tilted.

In either vertical orientation, the sand falls as long as there is some in the top. When the hourglass is horizontal, the LEDs settle just like real sand does. [Ty and Gig] achieved this with a whole lot of code that breaks the animation frames into structure arrays.

By contrast, the hardware part of this build is fairly simple: all that’s needed to replicate this build is some RGB LEDs a beefy power supply to drive them, an accelerometer, and a microcontroller.

[Ty and Gig] were planning to use an ESP8266, but misplaced it and went with an Arduino Mega instead. (You know what they say — buy a replacement and the one you lost will turn up almost immediately.) The beautiful frame is made from leftover purpleheart, a hardwood that turns purple with exposure to air. Check out the build video after the break.

Too lazy to reset your hourglass every hour? Here’s one that flips itself.

What keeps people from playing music? For one thing, it’s hard. But why is it hard? In theory, it’s because theory is confusing. In practice, it’s largely because of accidentals, or notes that sound sour compared to the others because they aren’t from the same key or a complementary key.

What if there were no accidentals? Instruments like this exist, like the harmonica and the autoharp. But none of them look as fun to play as [Bardable]’s Starshine, the instrument intended to be playable by everyone. The note buttons on the outside are laid out and programmed such that [Bardable] will never play off-key.

We love the game controller form factor, which was also a functional choice. On the side that faces the player, there’s a PSP joystick and two potentiometers for adding expression with your thumbs. The twelve buttons on this side serve several functions like choosing the key and the scale type depending on the rocker switch position. A second rocker lets [Bardable] go up or down an octave on the fly. There’s also an OLED to show everything from the note being played to the positions of the potentiometers. If you want to know more, [Bardable] made a subreddit for this and other future instruments, and has a full tour video after the break.

If this beginner-friendly MIDI controller isn’t big enough for you, check out Harmonicade’s field of arcade buttons.

Bowling is great and all, but the unpredictability of that little ball jump in Skee-Ball is so much more exciting. You can play it straight, or spend a bunch of time perfecting the 100-point shot. And unlike bowling, there’s nothing to reset, because gravity gives you the balls back.

In one of [gcall1979]’s earlier Skee-Ball machines, gravity assisted the scoring mechanism, too: each ball rolls back to the player and lands in a lane labeled with the corresponding score, which is an interesting engineering challenge in its own right. He decided to build automatic scoring into his newest Skee-Ball machine.

At the bottom of each cylinder is an arcade machine coin door switch with a long wire actuator. These had to be mounted so they’re close enough to the hole, but out of the way of the balls.

Each switch is wired up to an Arduino Mega along with four large 7-segments for the score, and a giant 7-segment to show the number of balls played. Whenever the game is reset, a servo drops a door to release the balls, just like a commercial machine.

The arcade switches work pretty well, especially once he bent the wire into hook shape to cover more area. But they do fail once in a while, maybe because the targets are full-size, but the balls are half regulation size. For the next one, [gcall1979] is planning to use IR break-beam targets which ought to work with any size ball. If you prefer bowling, you won’t strike out with break-beam targets there, either.

With events of all sizes on hold and live sports mostly up in the air, it’s a great time to think of new ways to entertain ourselves within our local circles. Bonus points if the activity involves running around outside, and/or secretly doubles as a team-building exercise, like [KarelBousson]’s modernized version of Capture the Flag.

Much like the original, the point of this game is to capture the case and keep it for as long as possible before the other team steals it away. Here, the approach is much more scientific: the box knows exactly who has it and for how long, and the teams get points based on the time the case spends in any player’s possession.

Each player carries an RFID tag to distinguish them from each other. Inside the case is an Arduino Mega with a LoRa shield and a GPS unit. Whenever the game is afoot, the case communicates its position to an external Raspi running the game server.

If you haven’t met LoRa yet, check out this seven-part introductory tutorial.


  • Newsletter

    Sign up for the PlanetArduino Newsletter, which delivers the most popular articles via e-mail to your inbox every week. Just fill in the information below and submit.

  • Like Us on Facebook