Posts | Comments

Planet Arduino

Archive for the ‘Raspi’ Category

If you treat your Pi as a wearable or a tablet, you will already have a battery. If you treat your Pi as a desktop you will already have a plug-in power supply, but how about if you live where mains power is unreliable? Like [jwhart1], you may consider building an uninterruptible power supply into a USB cable. UPSs became a staple of office workers when one-too-many IT headaches were traced back to power outages. The idea is that a battery will keep your computer running while the power gets its legs back. In the case of a commercial UPS, most generate an AC waveform which your computer’s power supply converts it back to DC, but if you can create the right DC voltage right to the board, you skip the inverting and converting steps.

Cheap batteries develop a memory if they’re drained often, but if you have enough space consider supercapacitors which can take that abuse. They have a lower energy density rating than lithium batteries, but that should not be an issue for short power losses. According to [jwhart1], this quick-and-dirty approach will power a full-sized Pi, keyboard, and mouse for over a minute. If power is restored, you get to keep on trucking. If your power doesn’t come back, you have time to save your work and shut down. Spending an afternoon on a power cable could save a weekend’s worth of work, not a bad time-gamble.

We see what a supercap UPS looks like, but what about one built into a lightbulb or a feature-rich programmable UPS?


Wafer level chips are cheap and very tiny, but as [Kevin Darrah] shows, vulnerable to bright light without the protective plastic casings standard on other chip packages.

We covered a similar phenomenon when the Raspberry Pi 2 came out. A user was taking photos of his Pi to document a project. Whenever his camera flash went off, it would reset the board.

[Kevin] got a new Arduino 101 board into his lab. The board has a processor from Intel, an accelerometer, and Bluetooth Low Energy out of the box while staying within the same relative price bracket as the Atmel versions. He was admiring the board, when he noticed that one of the components glittered under the light. Curious, he pulled open the schematic for the board, and found that it was the chip that switched power between the barrel jack and the USB. Not only that, it was a wafer level package.

So, he got out his camera and a laser. Sure enough, both would cause the power to drop off for as long as the package was exposed to the strong light. The Raspberry Pi foundation later wrote about this phenomenon in more detail. They say it won’t affect normal use, but if you’re going to expose your device to high energy light, simply put it inside a case or cover the chip with tape, Sugru, or a non-conductive paint to shield it.


Filed under: Arduino Hacks

[Sigurd] manage to obtain an old vending machine from his dorm. The only problem was that the micocontroller on the main board was broken. He and his friend decided they could most likely get the machine back into working order, but they also knew they could probably give it a few upgrades.

This system uses two Arduino Pro Minis and an Electric Imp to cram in all of the new features. One Arduino is connected to the machine’s original main board. The Arduino interfaces with some of the shift registers, relays, and voltage regulators. This microcontroller also lights up the buttons on the machine as long as that particular beverage is not empty. It controls the seven segment LED display, as well as reading the coin validator.

The team had to reverse engineer the original coin validator in order to figure out how the machine detected and counted the coins. Once they figured out how to read the state of the coins, they also built a custom driver board to drive the solenoids.

A second Arduino is used to read NFC and RFID cards using a Mifare RC522 reader. The system uses its own credit system, so a user can be issued a card with a certain amount of pre-paid credit. It will then deduct credit appropriately once a beverage is vended. The two Arduinos communicate via Serial.

The team also wanted this machine to have the ability to communicate with the outside world. In this case, that meant sending cheeky tweets. They originally used a Raspberry Pi for this, but found that the SD card kept getting corrupted. They eventually switched to an Electric Imp, which worked well. The Arduino sends a status update to the Imp every minute. If the status changes, for example if a beverage was dispensed, then the Imp will send a tweet to let the world know. It will also send a tweet to the maintenance person if there is a jam or if a particular slot becomes empty.


Filed under: Arduino Hacks
Sep
15

Subway radar

Public transit can be a wonderful thing. It can also be annoying if the trains are running behind schedule. These days, many public transit systems are connected to the Internet. This means you can check if your train will be on time at any moment using a computer or smart phone. [Christoph] wanted to take this concept one step further for the Devlol hackerspace is Linz, Austria, so he built himself an electronic tracking system (Google translate).

[Christoph] started with a printed paper map of the train system. This was placed inside what began as an ordinary picture frame. Then, [Christoph] strung together a series of BulletPixel2 LEDs in parallel. The BulletPixel2 LEDs are 8mm tri-color LEDs that also contain a small controller chip. This allows them to be controlled serially using just one wire. It’s similar to having an RGB LED strip, minus the actual strip. [Christoph] used 50 LEDs when all was said and done. The LEDs were mounted into the photo frame along the three main train lines; red, green, and blue. The color of the LED obviously corresponds to the color of the train line.

The train location data is pulled from the Internet using a Raspberry Pi. The information must be pulled constantly in order to keep the map accurate and up to date. The Raspberry Pi then communicates with an Arduino Uno, which is used to actually control the string of LEDs. The electronics can all be hidden behind the photo frame, out of sight. The final product is a slick “radar” for the local train system.


Filed under: Arduino Hacks, Raspberry Pi
Jun
01

Wiimote Controlled Extermination: Dalek-Style

arduino hacks, bluetooth, dalek, Doctor Who, Raspberry Pi, Raspi, Shrimp, wii, wiimote Comments Off on Wiimote Controlled Extermination: Dalek-Style 

Dalek Build

Convention-goers have likely strolled past a number of Daleks: the aliens drive around the event space, spouting threats of extermination and occasionally slapping folks with a rotating eyestalk. [James Bruton] has been hard at work building this Wii-remote-controlled Dalek with his fellow hackers at the SoMakeIt Hackerspace (you may remember our write-up from earlier this year).

Most Dalek builds seat a driver inside the body at the helm of a salvaged electric wheelchair, where they plunk around using a joystick control and simmer in an increasingly potent aroma. This version started like most, with a wooden structure from plans sourced at Project Dalek. Inside, however, [James] and his crew have tapped into the wheelchair’s motor controller to feed it a PWM signal from an Arduino Shrimp, which is linked to a Raspi. The Pi receives a Bluetooth signal from a Wiimote, and, through their custom Python script, directs the Dalek with ease.

They’re still working on finishing the Dalek’s body, but they’re using some clever tactics to push onward: using a 3D-printer to solve some of the nuanced styling choices. They’ve uploaded a gallery with additional photos on Facebook, and you can watch them goofing around with their creation (losing their balance and nearly exterminating themselves) in a video after the break.


Filed under: Arduino Hacks, Raspberry Pi

fishtankAutomation

People have been converting their old Power Macs and Mac G5s into fish tanks for a few years now, but [Hayden's] Internet-enabled tank is probably the most awesome ever crammed into an aquarium along with the water and the fish—and we’ve seen some fascinating builds this summer. After gutting the G5 and covering the basic acrylic work, [Hayden] started piling on the electronics: a webcam, timed LED lighting, an LCD for status readouts, filter and bubble control via a servo, an ultrasonic sensor to measure water levels, thermometer, scrolling matrix display, an automatic feeding mechanism, and more. He even snuck in the G5′s old mainboard solely for a cool backdrop.

The build uses both a Raspberry Pi and an Arduino Mega, which sit underneath the tank at the base. The Pi provides a web interface written in PHP and jQuery, which presents you with the tank’s status and allows changes to some settings. Nearly every component received some form of modification. [Hayden] stripped the webcam of its case and replaced the enclosure with a piece of acrylic and a mountain of silicone, making it both waterproof and slim enough to fit in the appropriate spot. Though he decided to stick with an Amazon-bought Eheim fish feeder, he disabled the unit’s autofeed timer and tapped in to the manual “feed” button to integrate it into his own system.

It’d take half of the front page to explain the rest of this thing. We’ve decided to let the aquarium tell you the rest of its features in the video below. Yeah…it can talk.


Filed under: Arduino Hacks, home hacks, Microcontrollers, Raspberry Pi
May
18

New Bricktronics Updates!

bricktronics, LEGO, python, Raspi, webdev Comments Off on New Bricktronics Updates! 

Today at the Bay Area Maker Faire, we are announcing a couple of cool new projects we’ve been working on with the Bricktronics Kits.

bricktronics_logo
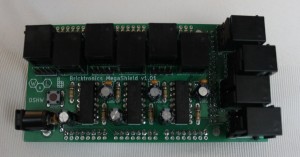
1. Bricktronics Megashield – Build robots and contraptions! Experiment with mechatronics using Arduino and LEGO Mindstorms NXT! Our latest kit, the Bricktronics Megashield, to connect up to and to an Arduino Mega. Works with the standard LEGO NXT motors and the touch, ultrasonic, and color sensors. Uses the same easy-to-use software interface as the original Bricktronics Shield, but supports more motors and supports all types of sensors on all ports.

finished_600w

The Megashield is available for purchase at the Maker Faire this weekend, and is now available for purchase from the Wayne and Layne store!


ThorLEGOSuperHeroesMinifigurec
2. Project codename “Trifrost” – We created a small python web framework for connecting local serial devices (such as an Arduino) to Linux computers (such as the RaspberryPi and the BeagleBone) to get real-time web dashboards and interactivity. This is still a work in progress, and we have tons of ideas for extending and enhancing it, so stay tuned.


Raspi-PGB001-300x267
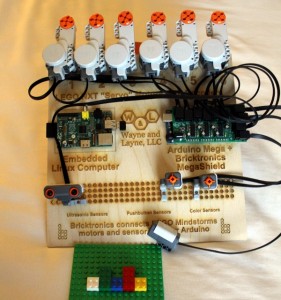
3. Bricktronics + RaspberryPi = Awesome! – The Raspberry Pi and other low-cost embedded Linux single-board computers are all the rage these days! We combined an Arduino with Shields, and connected them to a RasberryPi, to create a high-power interactive robotics platform. Using a WiFi adapter and a tablet computer, you can use the touchscreen to wirelessly interact with the motors and sensors.


raspi_bricktronics_demo_board_600w

We also created a mobile robot platform, using a LEGO tank platform, an Arduino with Bricktronics Shield, and a Raspberry Pi. Again using the WiFi network connection and a tablet, you can wirelessly drive the tank and read the sensor values.

raspi_tank_1_600w

Once we get more hardware information about the upcoming LEGO Mindstorms EV, we’ll be working on a single-board solution for bringing the power of embedded Linux to LEGO Mindstorms electronics.

For more information about any of these cool projects, subscribe to our RSS feed, or check back in the future for more info.

Note: Wayne and Layne, LLC and our products are not connected to or endorsed by the LEGO Group. LEGO, Mindstorms, and NXT are trademarks of the LEGO Group.

Oct
10

Using Arduino shields with the Raspi

arduino, arduino hacks, arduino shield, Raspberry Pi, Raspi, shield Comments Off on Using Arduino shields with the Raspi 

With hundreds of Arduino shields available for any imaginable application, it’s a shame they can’t be used with the Raspberry Pi. Breaking out the Raspi GPIO pins to Arduino-compatible headers would allow makers and tinkerers to reuse their shields with a far more capable computing platform.

The folks over at Cooking Hacks realized a Raspi to Arduino shield bridge would be an awesome device, so they made their own, complete with a software library that allows you to port your Arduino code directly to the Raspberry Pi.

There are a few limitations with the Raspberry Pi’s GPIO headers; the Raspi doesn’t have analog inputs, so the Cooking Hacks team added an 8-channel ADC. Along with analog inputs and the headers required to pop a shield on the board, there’s also a socket for an XBee module.

The software library contains most of the general Arduino functions such as digitalWrite() and digitalRead(). There Serial, Wire, and SPI libraries are also implemented, allowing any device that communicates through UART, I2C, or SPI to talk directly to the Raspberry Pi.

While the Raspi Arduino bridge doesn’t allow for PWM in the same capacity as an Arduino, you’re always welcome to whip up a servo or LED shield for this neat little adapter.


Filed under: arduino hacks, Raspberry Pi


  • Newsletter

    Sign up for the PlanetArduino Newsletter, which delivers the most popular articles via e-mail to your inbox every week. Just fill in the information below and submit.

  • Like Us on Facebook