Posts | Comments

Planet Arduino

Archive for the ‘OTA’ Category

Arduino Cloud Free

There are dozens, if not hundreds of amazing Arduino Cloud features. So it’s perfectly understandable if you’ve missed some of them.

So we’ve put together a list of our favorite Arduino Cloud features that you might not know existed.

1) Auto-generate Sketches

We’ve talked elsewhere about getting an understanding of what cloud computing really is, and how it’s not just the domain of experts. The cloud is how total beginners can get started much more easily. There’s no better demonstration of that than our first top Arduino Cloud feature; auto-generated sketches.

When you create a new “Thing” in your Arduino Cloud, you add various bits of info to it. Wi-Fi connection credentials, and any variables you want to control or monitor. The Cloud automatically generates a starting sketch from this info. That sketch can then be sent to your boards, so all your initial configuration is taken care of, without a single line of code.


2) Device-to-Device Communication

There’s simply no easier way to make two microcontroller boards talk to each other than Arduino Cloud. We’ve covered in detail how easy it is to wirelessly connect your boards.

This isn’t just for Arduino devices either. If you want any combination of Arduino, ESP32 and ESP8266 devices to work together, this is how you do it.


3) Over-the-Air Updates

Working through your Arduino Cloud means you don’t have to disconnect any Arduino boards when updating them. If you want to edit or add a new sketch, it can all be done wirelessly, over-the-air.

Anyone who’s had to dismantle a project or device to get to a board’s USB socket will appreciate the simple, vital value of this feature. It’s one of those things that you’ll wonder how you ever lived without.
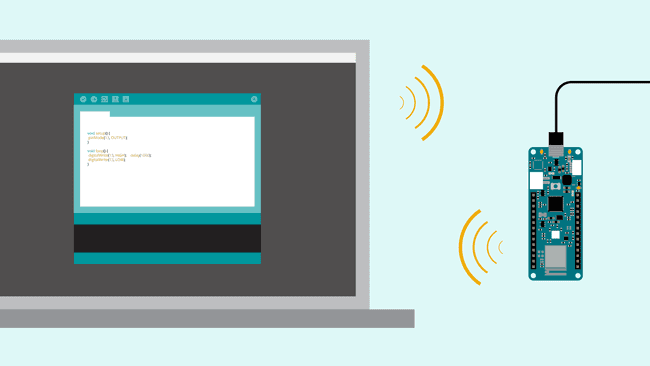
Arduino cloud features over-the-air updates

4) Support for ESP Boards

There’s a reason we call it the Arduino IoT Cloud. This is an all-encompassing platform for Internet of things, home automation, and electronics project control and management. So first we added support for ESP8266 devices. More recently, experimental support for ESP32 boards became available.

So even if your project doesn’t actually have any Arduino products in there, the Cloud is just as useful. Secure, private, and accessible to all kinds of IoT and maker devices.
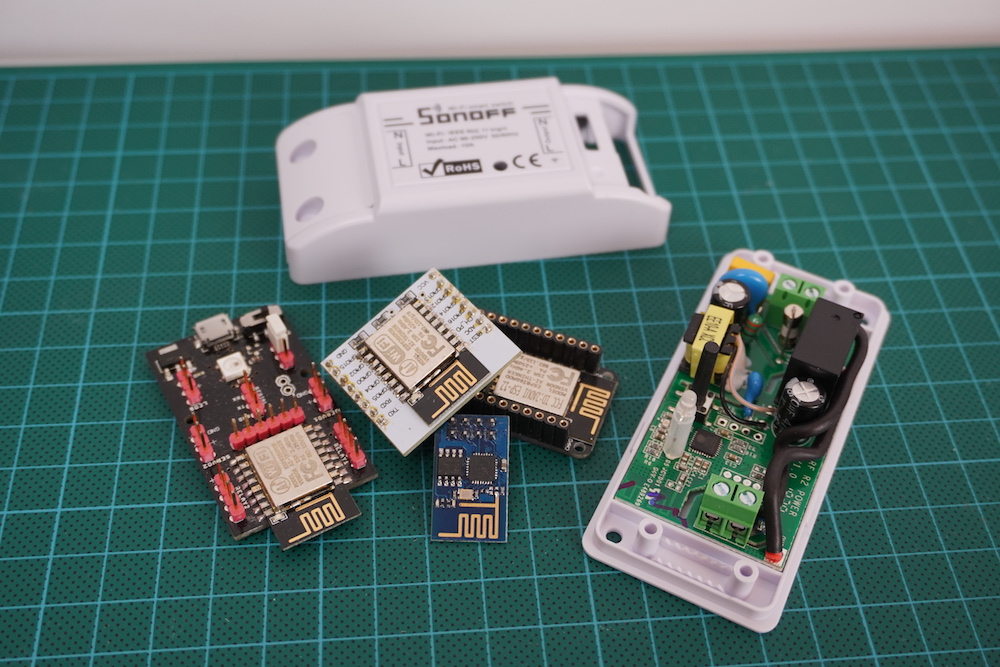
Arduino Cloud also supports ESP8266 and ESP32

5) Trigger Actions on Cloud Events

Arduino Cloud makes it super easy to do things that you might normally need the IDE for. But it’s also got lots of exclusive features that you only get in the Cloud.

For example, there are actions that can be triggered based on your board’s interactions with your Arduino Cloud. You can include actions within your sketches when a Cloud connection is successful, and when the Cloud has synced with a device. Or perhaps most useful of all, trigger an action if Cloud connectivity is lost. Getting an indication that a project has disconnected could be incredibly useful!

Here’s an example of using these actions within a sketch.


6) Sharing Your Dashboards

Dashboards are control panels within your Arduino Cloud. It’s one of the most powerful Arduino Cloud features, and essential to making full use of Cloud control. But what’s often overlooked is that you can share dashboards with anyone you want.

For example, let’s say you’re using Arduino Cloud to control your home automation. You can set up a dashboard for a tablet in the living room that the whole family can use, but doesn’t have sensitive admin controls in there. And then another for people to use on their phones. 

All Cloud plans include unlimited dashboards. And anyone can have a free Cloud account. So you can create as many dashboards as you like, and share them with literally anyone, anywhere.

Share dashboards with anyone you want from Arduino Cloud

7) Alexa Integration

Natural language voice control is genuine Star Trek stuff. So it’s no wonder people love the functionality of Alexa. Did you know it’s incredibly easy to connect your Arduino Cloud to Alexa? And once you have, it effectively adds voice control to every board, and every project. Nothing else needed.

There’s literally no easier way to make an Alexa-controlled device or project than with your Arduino Cloud. You’ll never look back, and you’ll always have someone to talk to.


8) Full API Integration

For the engineers, coders, developers and those among you who’ve been using Arduino for a long time, API integration is the powerhouse secret feature you’ve been looking for.

The API can be called with any HTTP client, or with languages like Javascript, Python, Golang and more. It’s what you need to incorporate the power of Arduino Cloud features into your systems, platforms and projects.


9) Use IFTT, Zapier and More with Webhooks

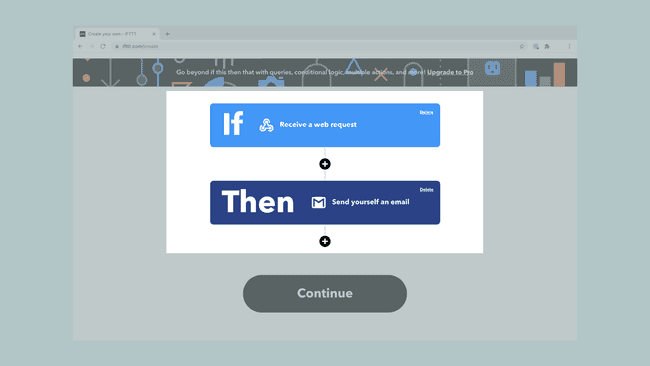
There are lots of reasons you might want to include control platforms outside of your Arduino Cloud. Like sending an email or a Tweet when you press a button on a Nano, or a device disconnects from the Cloud (see above).

That’s what webhooks are for, and they give you a universal way to send commands out of Arduino Cloud, and into… well, anything!

IFTTT and Zapier are great examples of services that can do almost anything from a webhook. Get to know this feature, and connected projects suddenly have easy access to the whole web.

10) Easy Firmware Updates

When you connect a new Arduino board, your Arduino Cloud automatically checks its firmware version. If there’s an update available, it offers you the option of applying that update.

Very easy, and you don’t have to worry about finding the correct/latest firmware version yourself. This simple, background function makes sure your boards and projects always have the latest features, security updates and bug fixes.

For people who use a lot of Arduino devices, it’s worth adding them to the Cloud for this feature alone.


11) Full Dashboard Customization

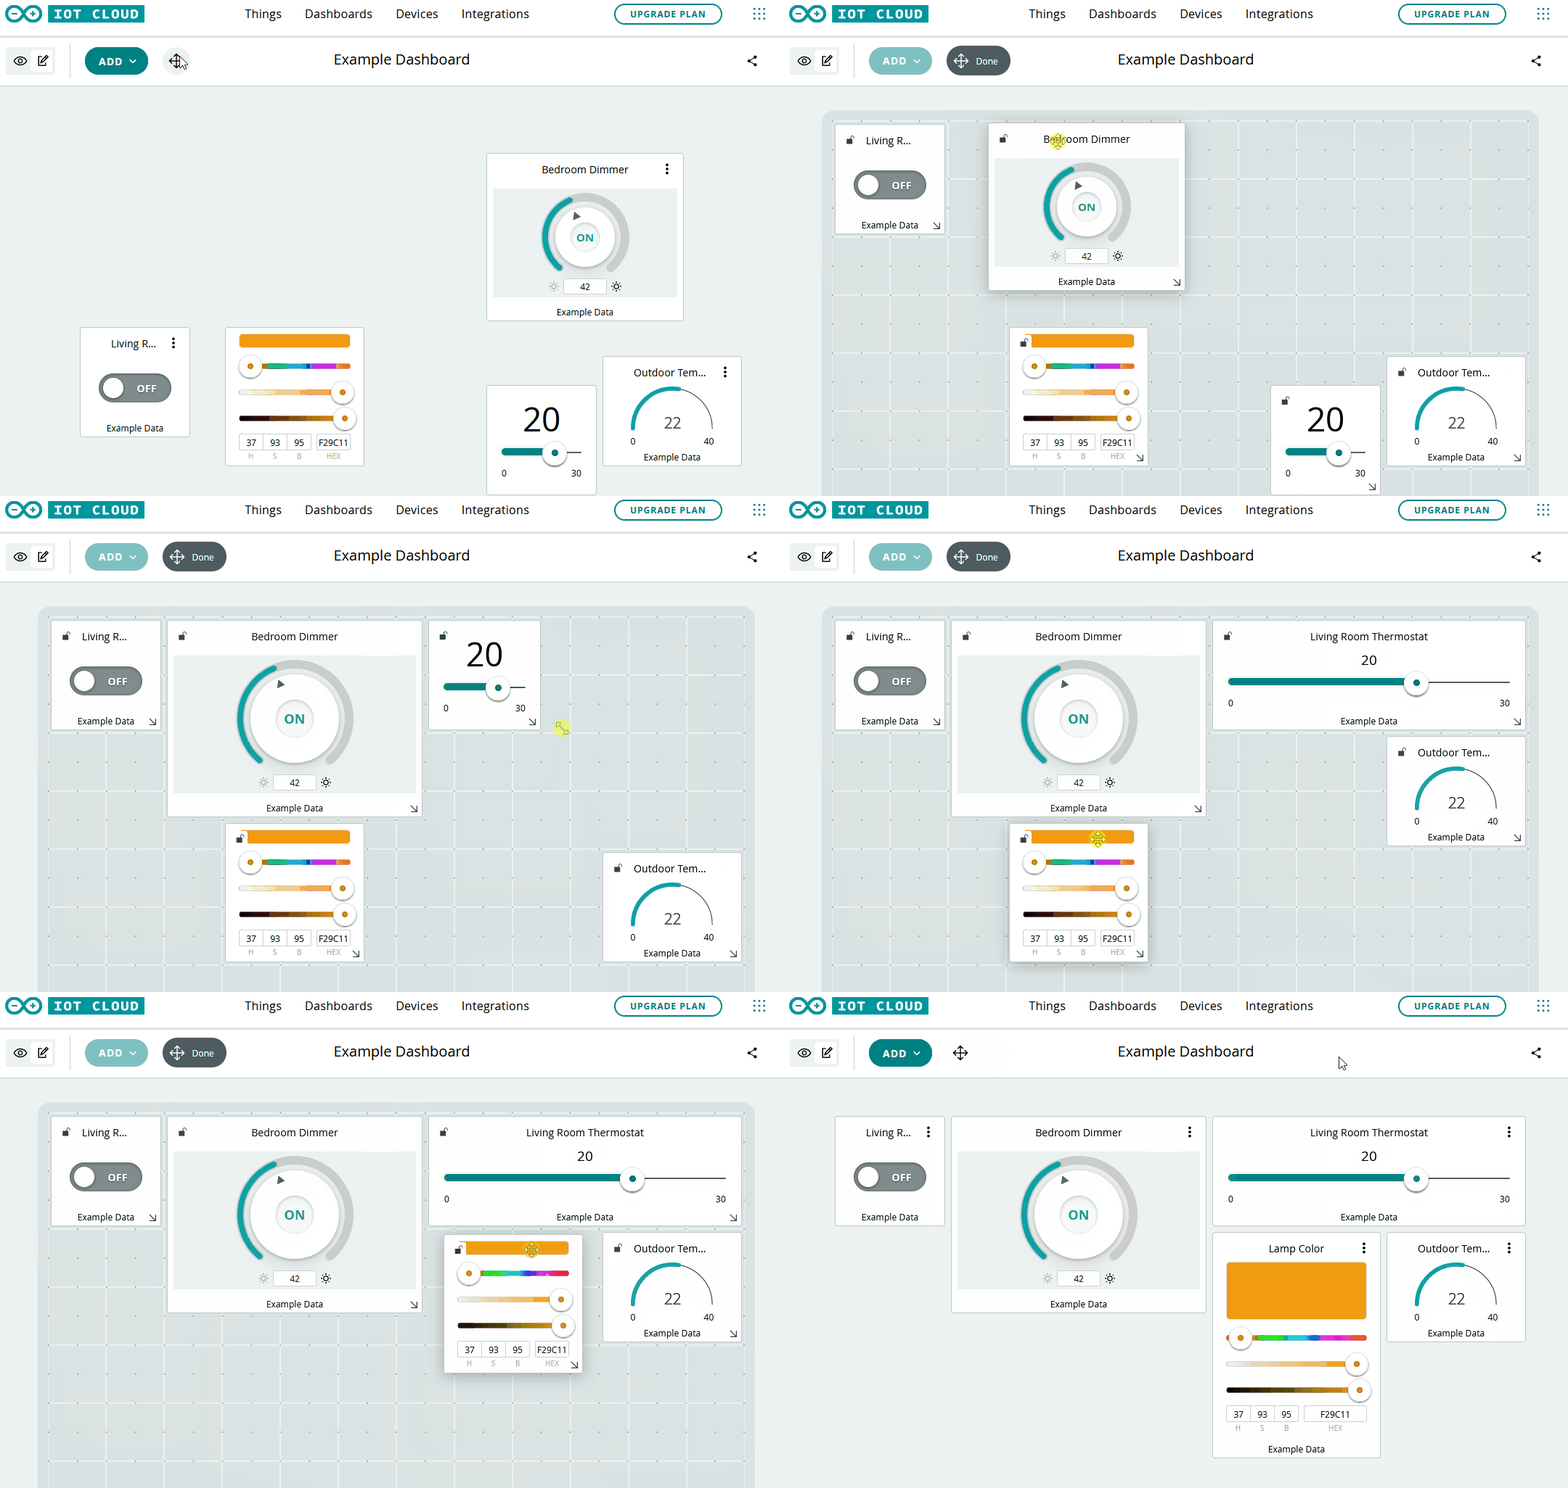
We’ve already talked about unlimited dashboards in your Arduino Cloud. Creating them is easy, but did you know you can customize them too?

Anyone who’s dipped their toe in the home automation waters knows how essential dashboard editing is. Some platforms work great, but offer very little when it comes to controlling your dashboard layout. For many people, that’s a deal breaker.

Your Arduino Cloud widgets can easily be added, edited, removed, repositioned and resized in any configuration you want. It’s as simple as drawing and resizing boxes, but the result makes your Cloud projects infinitely more useable.

12) Watchdog Timer

The Arduino Cloud automatically runs a watchdog timer that will reset your board, hardware or project if it crashes. This is a small feature, but a powerful one that can keep your projects running while unattended. 

It means you never have to manually reset it when you eventually realize it’s not been running all day. You can have devices running remotely (very remotely, with SIM or LoRa connectivity) and be sure they’re robust enough to keep on ticking.

It’s included and running automatically, but can easily be disabled if you don’t need it.


13) Node-RED Integration

Arduino provides a super easy way to use Node-RED for IoT automations. This is a powerful, but very easy-to-use visual programming platform specifically designed for IoT projects.

Complex automations using advanced triggers like sunrise or sunset, presence detection, combined actions or sensor readings and so much more. The possibilities are endless, and learning Node-Red is incredibly easy. Get to grips with this feature, and you’ll be creating IoT automations that would otherwise need an experienced coder.


13A) Fully Functional Free Account

One of the best kept secrets of the Arduino Cloud is that if you’re registered on the Arduino website or forum, you already have a free Cloud waiting for you. Simply head on over to the Cloud site and get started with unlimited dashboards and unlimited sketches. The free tier of Arduino Cloud is fully functional, and it’s ready and waiting for you to give it a try.

In fact, it’s the perfect option especially if you haven’t used Arduino before! Give it a shot and let us know what you think. No credit card required; just your creativity and a passion for connected projects.

The post 14 Awesome Arduino Cloud Features You Never Knew Existed appeared first on Arduino Blog.

Over-the-air (or OTA) programming is a very useful feature in all those cases where your devices are located in places that are not easily accessible. For example, you built a weather station using the Oplá IoT Kit, situated it on your rooftop, and started monitoring the weather from an IoT Cloud dashboard. That’s great until you find a bug or want to modify something and have to climb on your roof with a laptop to do so. Here’s where OTA becomes handy. 

If you have connected an Arduino Nano 33 IoT or a MKR WiFi 1010 to the Arduino IoT Cloud, you can now update the sketch using a wireless connection from the web.

How it works

To use OTA, you need to do two things: enable a device and create a Thing.

To enable a device, you need to connect a board to the IoT Cloud and update the firmware. Just plug the device into the USB, go to the Device tab, and click Add Device. A wizard will guide you through the process — at the end, your board will be available as a target for the upload over-the-air and you will be able to update the sketch remotely!

A Thing is a component that manages the dialogue between the cloud and the physical device thanks to a dedicated library (the Arduino Connection Handler), and stores the data into the cloud. Creating a Thing is simple: just select the voice from the IoT Cloud’s main menu, configure the variables that you want to exchange with the device, and pair the board that you have just enabled.

If you are new to the IoT Cloud, here is an in-depth tutorial on how to build an IoT project with Arduino Create. Once you have configured a Thing, you will be able to perform OTA updates. 

Devices that can be updated via OTA will appear in the dropdown list of all updatable devices in the online editors of Create — the full Web Editor and the new Sketch Editor have been introduced in the Thing configuration page to make minor changes to the code.

This Sketch Editor is one of the innovations that we have introduced in the IoT Cloud with two objectives in mind: 

1. Help those who are learning to program with Arduino follow the tutorials of IoT projects, such as those included in the Oplà IoT Kit.

2. Allow users to quickly make small changes to the sketch, which do not require access to libraries or more sophisticated editing functions.

More resources

If you want to know more about OTA and the redesign of the IoT Cloud, we have prepared a couple of detailed tutorials that will walk you through the exploration of the new features. 

Uploading sketches over-the-air (OTA)

Getting started with the Arduino IoT Cloud

New to Arduino Create? It’s a platform that helps you develop and manage connected projects with Arduino, featuring tools to code, monitor, and control devices from the Internet and your smartphones. Sign up for free now!

Don’t miss any updates and receive amazing projects from Arduino in your inbox! 

Potentially, one of the great things about having a device connected to the network is that you can update it remotely. However, how do you make that happen? If you use the Arduino setup for the ESP8266 or ESP32, you might try [scottchiefbaker’s] library which promises to make the process easy.

Adding it looks to be simple. You’ll need an include, of course. If you don’t mind using port 8080 and the path /webota, you only need to call handle_webota() from your main loop. If you want to change the defaults, you’ll need to add an extra call in your setup. You also need to set up a few global variables to specify your network parameters.

The only caveat is that long delay statements in your loop can block things from working and aren’t a great idea anyway. If you have them, you can replace all your delay calls with webota_delay which will stop the system from ignoring update requests.

The code started from a different online tutorial but packaged the code up nicely for reuse. To do an update, simply navigate to the device with a web browser and use the correct port number and path. From there you can upload a new binary image taken from the Arduino IDE with the export compiled binary command.

The only concern we saw was the code didn’t appear to authenticate you at all. That means anyone could load code into your ESP. That might be ok on a private network, but on the public Internet it is surely asking for trouble. The original tutorial code did have a hardcoded user and password, but it didn’t look very useful as the password was in the clear and didn’t stop you from uploading if you knew the right URL. Dropping it from the library probably makes sense, but we would want to build some kind of meaningful security into anything we deployed.

If you have a network connection, we’ve seen the same trick done with a normal Arduino with a wireless chip. You can even do it over WiFi but using an ESP8266 which you’ll then want to be able to update, too.

A few months back we first brought word of the progress being made in unlocking the SMART Response XE, an ATmega128RFA powered handheld computer that allowed teachers to create an interactive curriculum in the days before all the kids got Chromebooks. Featuring 2.4 Ghz wireless communication, a 384×160 LCD, and a full QWERTY keyboard, schools paid around $100 each for them 2010. Now selling for as little as $5 on eBay, these Arduino-compatible devices only need a little coaxing and an external programmer to get your own code running.

The previous post inspired [Larry Bank] to try his hand at hacking the SMART Response XE, and so far he’s made some very impressive progress. Not only has he come up with his own support library, but he’s also created a way to upload Arduino code to the devices through their integrated 802.15.4 radio. With his setup, you no longer need to open the SMART Response XE and attach a programmer, making it much easier to test and deploy software.

[Larry] has written up a very detailed account of his development process, and goes through the trouble of including his ideas that didn’t work. Getting reliable communication between two of these classroom gadgets proved a bit tricky, and it took a bit of circling around until he hit on a protocol that worked.

The trick is that you need to use one SMART Response XE attached to your computer as a “hub” to upload code to other XEs. But given how cheap they are this isn’t that big of a deal, especially considering the boost in productivity it will net you. [Larry] added a 5 x 2 female header to his “hub” XE so he could close the device back up, and also added a physical power switch. In the video after the break, you can see a demonstration of the setup sending a simple program to a nearby XE.

Between this wireless bootloader and the Arduboy compatibility covered previously, we’d suggest you get your SMART Response XE now. We wouldn’t be surprised if the prices of these things start going up like they did with the IM-ME.

An Arduino and a data radio can make a great remote sensor node. Often in such situations, the hardware ends up installed somewhere hard to get to – be it in a light fitting, behind a wall, or secreted somewhere outdoors. Not places that you’d want to squeeze a cable repeatedly into while debugging.

[2BitOrNot2Bit] decided this simply wouldn’t do, and decided to program the Arduinos over the air instead.

Using the NRF24L01 chip with the Arduino is a popular choice to add wireless communications to a small project. By installing one of these radios on both the remote hardware and a local Arduino connected to the programming computer, it’s possible to remotely flash the Arduino without any physical contact whatsoever using Optiboot.

The writeup is comprehensive and covers both the required hardware setup for both ends of the operation as well as how to install the relevant bootloaders. If you’re already using the NRF24L01 in your projects, this could be the ideal solution to your programming woes. Perhaps you’re using a different platform though – like an Arduino on WiFi? Don’t worry – you can do OTA updates that way, too.


  • Newsletter

    Sign up for the PlanetArduino Newsletter, which delivers the most popular articles via e-mail to your inbox every week. Just fill in the information below and submit.

  • Like Us on Facebook