Posts | Comments

Planet Arduino

Archive for the ‘bootloader’ Category

Sep
17

Make your own dual programmer in AVRDUDE

arduino, ATmega, avrdude, bootloader, Mcu, programmer Comments Off on Make your own dual programmer in AVRDUDE 

Arduino-As-Dual-Programmer_bb1

Stephen Wylie , “Program two ATmegas w/an Arduino & AVRDUDE without re-cabling in between!”

Those of you who have programmed an Arduino through the Arduino or AVR Studio IDE may have noticed the utility that is really doing the work: AVRDUDE (AVR Downloader/UploaDEr). This is a powerful program that can facilitate programming new sketches on top of a bootloader, load a brand new bootloader or chip image, capture the current firmware programmed on the chip, and set fuse bits (which can render your chip unusable without special tools if you’re not careful).

[via]

Make your own dual programmer in AVRDUDE - [Link]

The MicroView Blink  sketch running on our fixed boardThe response by GeekAmmo and Sparkfun to the MicroView problem has been amazing, but you can fix your broken one fairly simply if you're prepared to crack the case.

Read more on MAKE

Gauges on the MicroViewIf you're having problems with your MicroView, you aren't alone, as it appears that close to 2,000 boards may have been sent out without bootloaders. We talk to Marcus Schappi about the problem.

Read more on MAKE

Apr
11

Arduino on all sorts of Atmels

arduino, atmel, bootloader Comments Off on Arduino on all sorts of Atmels 

F8XCJ2RGJQEFS7T.LARGE

02JanDal @ instructables.com writes:

So, what exactly is this about?
Imagine: You are working on a project. You want to program in the Arduino language because of the simplicy. But you don’t want to use a 28 pin monster. Or you need peripherals like CAN or similar what the normal Arduino supported MCUs don’t have. So, what to do? Where are two alternatives:
1. Just don’t use the Arduino language and use things like bits and ports what you can’t understand.
2. Or continue reading this!

So, this instructable is going to show how to use the core files available from avr-developers.com. I’m also going to show you how to program the different MCUs and how to connect them to do so. At the end I’m going to give some ideas on what you can to with your new knowledge earned from this.

Arduino on all sorts of Atmels - [Link]

Mar
07

Burn Arduino Bootloader on Atmega-328 TQFP and DIP chips on Breadboard

arduino, ArduinoISP, Atmega-328, bootloader, breadboard, DIP, tqfp Comments Off on Burn Arduino Bootloader on Atmega-328 TQFP and DIP chips on Breadboard 

FO5I6LLHS80FURU.LARGE

Audigi @ instructables.com show us how to use an Arduino board to burn Arduino bootloader to mcus on a breadboard. He writes:

Connect Arduino Uno board to your computer. Start Arduino program and from examples choose “ArduinoISP” sketch and upload it to “Arduino Uno” board. Please make sure you select the correct board name and serial port. Now this board is ready to program new Atmega-328 chips on the breadboard as shown in the next step.

Burn Arduino Bootloader on Atmega-328 TQFP and DIP chips on Breadboard - [Link]

Jan
22

Body of a Trinket, Soul of a Digispark

adafruit, arduino, arduino hacks, bootloader, Digispark, digiStump, Firmware, News, Trinket Comments Off on Body of a Trinket, Soul of a Digispark 

TrinketDigispark

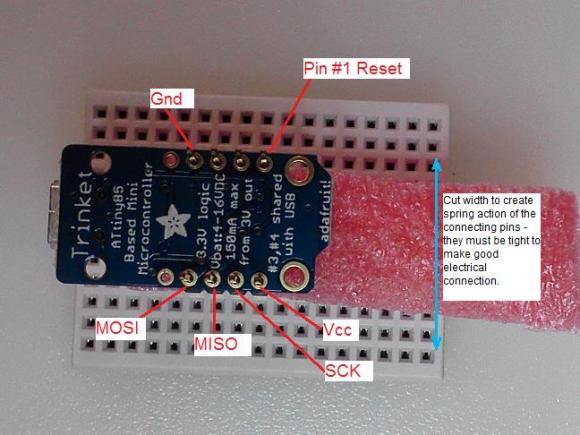
Adafruit’s Trinket and digiStump’s Digispark board are rather close cousins. Both use an ATtiny85 microcontroller, both have USB functionality, and both play nice with the Arduino IDE. [Ray] is a fan of both boards, but he likes the Trinket hardware a bit better. He also prefers the Digispark libraries and ecosystem. As such, he did the only logical thing: he turned his Trinket into a Digispark. Step 1 was to get rid of that pesky reset button. Trinket uses Pin 1/PB5 for reset, while Digispark retains it as an I/O pin. [Ray] removed and gutted the reset button, but elected to leave its metal shell on the board.

The next step was where things can get a bit dicey: flashing the Trinket with the Digispark firmware and fuses. [Ray] is quick to note that once flashed to Digispark firmware, the Trinket can’t restore itself back to stock. A high voltage programmer (aka device programmer) will be needed. The flashing process itself is quite a bit easier than a standard Trinket firmware flash. [Ray] uses the firmware upload tool from the Micronucleus project. Micronucleus has a 60 second polling period, which any Trinket veteran will tell you is a wonderful thing. No more pressing the button and hoping you start the download before everything times out! Once the Trinket is running Digispark firmware, it’s now open to a whole new set of libraries and software.


Filed under: Arduino Hacks, news
Pinguino Kit (actualmente en la versión v1.1) es un entorno que permite programar las placas Pinguino Pic gráficamente. Esta herramienta pretende convertirse en una herramienta de enseñanza de programación y electrónica digital básica, centrada en estas placas. Os dejo una captura del IDE de Pinguino Kit y un vídeo en el que podéis ver un […]
Mar
18

Introducing Goldilocks – the Arduino Uno-compatible with 1284p and uSD card

arduino, atmega1284p, atmel, bootloader, compatible, freetronics, goldilocks, kickstarter, pozible, tronixstuff, uno Comments Off on Introducing Goldilocks – the Arduino Uno-compatible with 1284p and uSD card 

[Update 19/03/2013 - the project is now fully funded. When the boards arrive we'll do a full review]

Introduction

It’s a solid fact that there are quite a few variations on the typical Arduino Uno-compatible board. You can get them with onboard wireless, GSM, Zigbee and more – however all with their own issues and specific purposes. But what if you wanted a board that was physically and electrically compatible with an Arduino Uno – but with much more SRAM, more EEPROM, more flash, more speed – and then some? Well that (hopefully) will be a possibility with the introduction of the “Goldilocks” board on Pozible by Phillip Stevens.

What’s Pozible?

Pozible is the Australian version of Kickstarter. However just like KS anyone with a credit card or PayPal can pledge and support projects.

What’s a Goldilocks board?

It’s a board based around the Atmel ATmega1284p microcontroller in an Arduino Uno-compatible physical board with a microSD card socket and a few extras. The use of the ’1284p gives us the following advantages over the Arduino Uno, including:

  • 16 kByte SRAM = 8x Uno SRAM – so that’s much more space for variables used in sketches – great for applications that use larger frame buffers such as Ethernet and image work;
  • 2 kByte EEPROM = 2 x Uno EEPROM – giving you more space for non-volatile data storage on the main board;
  • 128 kByte flash memory = 4 x Uno – giving you much, much more room for those larger sketches;
  • Two programmable USARTS – in other words, two hardware serial ports – no mucking about with SoftwareSerial and GSM or GPS shields;
  • Timer 3 – the ’1284p microcontroller has an extra 16-bit timer – timer 3, that is not present on any other ATmega microcontroller. Timer 3 does not have PWM outputs (unlike Timer 0, Timer 1, and Timer 2), and therefore is free to use as a powerful internal Tick counter, for example in a RTOS. freeRTOS has already been modified to utilise this Timer 3;
  • JTAG interface – yes – allowing more advanced developers the opportunity to debug their code;
  • better PWM access – the 1284p brings additional 8-bit Timer 2 PWM outputs onto PD, which creates the option for 2 additional PWM options on this port. It also removes the sharing of the important 16-bit PWM pins with the SPI interface, by moving them to PD4 & PD5, thus simplifying interface assignments;
  • Extra I/O pins – the 1284p has additional digital I/O pins on the PB port. These pins could be utilised for on-board Slave Select pins (for example), without stealing on-header digital pins and freeing the Arduino Pin 10 for Shield SPI SS use exclusively;

Furthermore the following design improvements over an Arduino Uno:

  • adding through-holes for all I/O – allowing you to solder directly onto the board whilst keeping header sockets;
  • replicate SPI and I2C for ease of use;
  • microSD card socket – that’s a no-brainer;
  • link the ATmega16u2 and ATmega1284p SPI interfaces – this will allow the two devices to work in concert for demanding multi-processing applications, involving USB and other peripherals;
  • Fully independent analogue pins, including seperate AVCC and GND – helps reduce noise on the ADC channels for improved analogue measurement accuracy;
  • move the reset button to the edge of the board – another no-brainer
  • clock the board at 20 MHz – that’s an extra 4 MHz over a Uno. And the use of a through hole precision crystal (not a SMD resonator) allows the use of after market timing choices, eg 22.1184 MHz for more accurate UART timings.

What does it look like? 

At the moment the board mock-up looks like this:

If funding is successful (and we hope it will be) the Goldilocks will be manufactured by the team at Freetronics. Apart from being a world-leader in Arduino-compatible hardware and systems, they’re the people behind the hardware for Ardusat and more – so we know the Goldilocks will be in good hands.

Will it really be compatible?

Yes – the Goldilocks will be shipped pre-programmed with an Arduino compatible boot-loader, and the necessary Board description files will be available to provide a 100% compatible Arduino IDE experience.

Conclusion

If you think this kind of board would be useful in your projects, you want to support a good project – or both, head over to Pozible and make your pledge. And for the record – I’ve put my money where my mouth is :)

Please note that I’m not involved in nor responsible for the Goldilocks project, however I’m happy to promote it as a worthwhile endeavour. In the meanwhile have fun and keep checking into tronixstuff.com. Why not follow things on twitterGoogle+, subscribe  for email updates or RSS using the links on the right-hand column? And join our friendly Google Group – dedicated to the projects and related items on this website. Sign up – it’s free, helpful to each other –  and we can all learn something.


Mar
18

Introducing Goldilocks – the Arduino Uno-compatible with 1284p and uSD card

arduino, atmega1284p, atmel, bootloader, compatible, freetronics, goldilocks, kickstarter, pozible, tronixstuff, uno Comments Off on Introducing Goldilocks – the Arduino Uno-compatible with 1284p and uSD card 

[Update 19/08/2013 - Exciting! Boards are shipping this week - review to follow!]

[Update 19/03/2013 - the project is now fully funded. Initial review here!]

Introduction

It’s a solid fact that there are quite a few variations on the typical Arduino Uno-compatible board. You can get them with onboard wireless, GSM, Zigbee and more – however all with their own issues and specific purposes. But what if you wanted a board that was physically and electrically compatible with an Arduino Uno – but with much more SRAM, more EEPROM, more flash, more speed – and then some? Well that (hopefully) will be a possibility with the introduction of the “Goldilocks” board on Pozible by Phillip Stevens.

What’s Pozible?

Pozible is the Australian version of Kickstarter. However just like KS anyone with a credit card or PayPal can pledge and support projects.

What’s a Goldilocks board?

It’s a board based around the Atmel ATmega1284p microcontroller in an Arduino Uno-compatible physical board with a microSD card socket and a few extras. The use of the ’1284p gives us the following advantages over the Arduino Uno, including:

  • 16 kByte SRAM = 8x Uno SRAM – so that’s much more space for variables used in sketches – great for applications that use larger frame buffers such as Ethernet and image work;
  • 2 kByte EEPROM = 2 x Uno EEPROM – giving you more space for non-volatile data storage on the main board;
  • 128 kByte flash memory = 4 x Uno – giving you much, much more room for those larger sketches;
  • Two programmable USARTS – in other words, two hardware serial ports – no mucking about with SoftwareSerial and GSM or GPS shields;
  • Timer 3 – the ’1284p microcontroller has an extra 16-bit timer – timer 3, that is not present on any other ATmega microcontroller. Timer 3 does not have PWM outputs (unlike Timer 0, Timer 1, and Timer 2), and therefore is free to use as a powerful internal Tick counter, for example in a RTOS. freeRTOS has already been modified to utilise this Timer 3;
  • JTAG interface – yes – allowing more advanced developers the opportunity to debug their code;
  • better PWM access – the 1284p brings additional 8-bit Timer 2 PWM outputs onto PD, which creates the option for 2 additional PWM options on this port. It also removes the sharing of the important 16-bit PWM pins with the SPI interface, by moving them to PD4 & PD5, thus simplifying interface assignments;
  • Extra I/O pins – the 1284p has additional digital I/O pins on the PB port. These pins could be utilised for on-board Slave Select pins (for example), without stealing on-header digital pins and freeing the Arduino Pin 10 for Shield SPI SS use exclusively;

Furthermore the following design improvements over an Arduino Uno:

  • adding through-holes for all I/O – allowing you to solder directly onto the board whilst keeping header sockets;
  • replicate SPI and I2C for ease of use;
  • microSD card socket – that’s a no-brainer;
  • link the ATmega16u2 and ATmega1284p SPI interfaces – this will allow the two devices to work in concert for demanding multi-processing applications, involving USB and other peripherals;
  • Fully independent analogue pins, including seperate AVCC and GND – helps reduce noise on the ADC channels for improved analogue measurement accuracy;
  • move the reset button to the edge of the board – another no-brainer
  • clock the board at 20 MHz – that’s an extra 4 MHz over a Uno. And the use of a through hole precision crystal (not a SMD resonator) allows the use of after market timing choices, eg 22.1184 MHz for more accurate UART timings.

What does it look like? 

At the moment the board mock-up looks like this:

If funding is successful (and we hope it will be) the Goldilocks will be manufactured by the team at Freetronics. Apart from being a world-leader in Arduino-compatible hardware and systems, they’re the people behind the hardware for Ardusat and more – so we know the Goldilocks will be in good hands.

Will it really be compatible?

Yes – the Goldilocks will be shipped pre-programmed with an Arduino compatible boot-loader, and the necessary Board description files will be available to provide a 100% compatible Arduino IDE experience.

Conclusion

If you think this kind of board would be useful in your projects, you want to support a good project – or both, head over to Pozible and make your pledge. And for the record – I’ve put my money where my mouth is :)

Please note that I’m not involved in nor responsible for the Goldilocks project, however I’m happy to promote it as a worthwhile endeavour. In the meanwhile have fun and keep checking into tronixstuff.com. Why not follow things on twitterGoogle+, subscribe  for email updates or RSS using the links on the right-hand column? And join our friendly Google Group – dedicated to the projects and related items on this website. Sign up – it’s free, helpful to each other –  and we can all learn something.

The post Introducing Goldilocks – the Arduino Uno-compatible with 1284p and uSD card appeared first on tronixstuff.


  • Newsletter

    Sign up for the PlanetArduino Newsletter, which delivers the most popular articles via e-mail to your inbox every week. Just fill in the information below and submit.

  • Like Us on Facebook