Posts | Comments

Planet Arduino

Archive for the ‘xBee’ Category

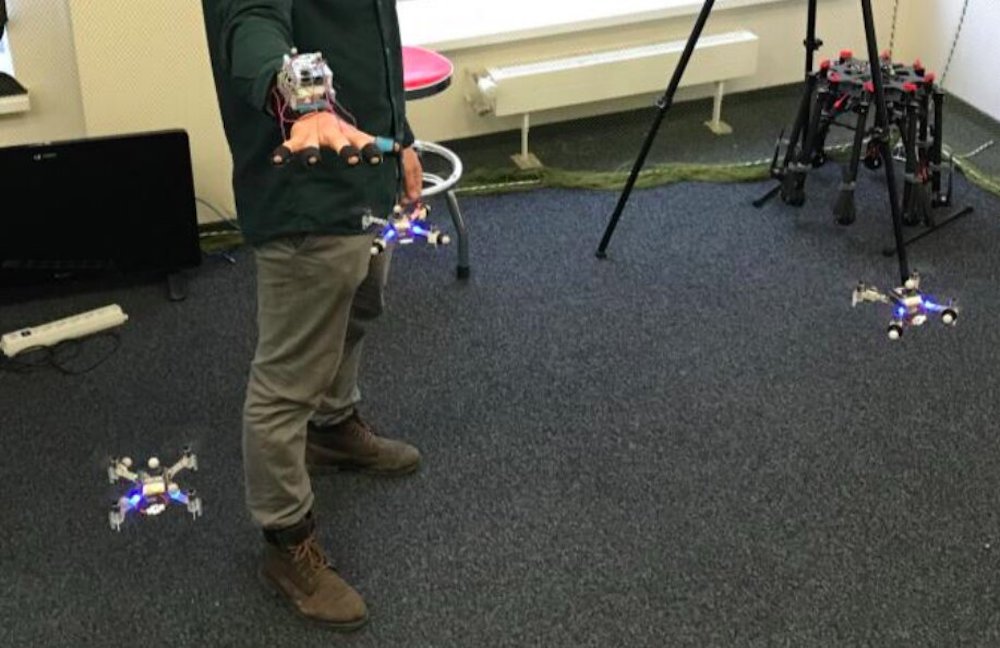
If you fly drones for fun—or perhaps even for work—you know that piloting them can sometimes be a difficult tasks. Imagine, however, trying to control four drones simultaneously. While also “challenging,” researchers at the Skolkovo Institute of Science and Technology in Russia have come up with a new approach, dubbed for commanding such a swarm using only arm movements.

SwarmTouch takes the form of a wrist and finger-mounted device, with an array of eight cameras tracking its position. When the operator moves their arm, the drones react to the hand motion and the other flying robots in the group, as if there was a mechanical system linking each one together. 
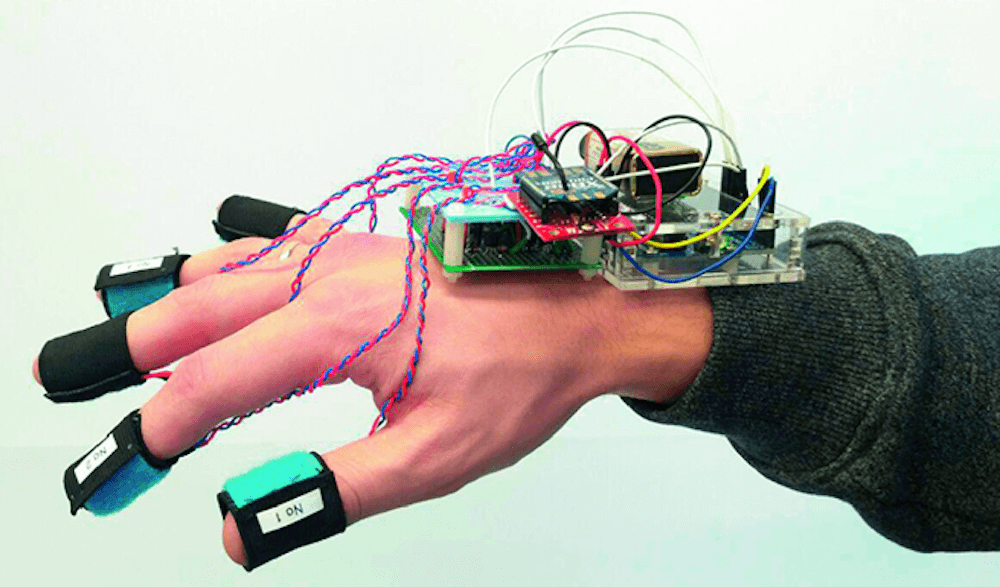
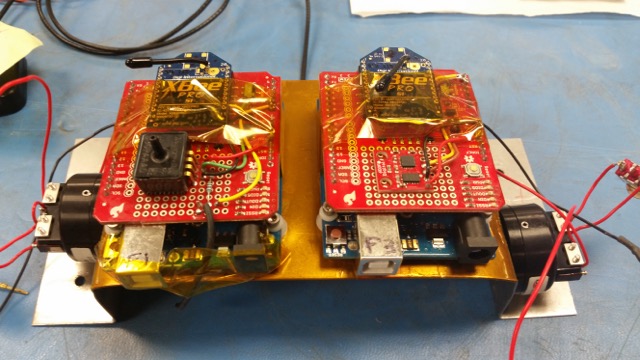
Feedback is provided by an Arduino Uno connected to the control station via an XBee radio, which tells the operator whether the swarm is expanding or contracting using finger-mounted vibration motors. The setup is on display in the video below and its research paper can be found here.

We propose a novel interaction strategy for a human-swarm communication when a human operator guides a formation of quadrotors with impedance control and receives vibrotactile feedback. The presented approach takes into account the human hand velocity and changes the formation shape and dynamics accordingly using impedance interlinks simulated between quadrotors, which helps to achieve a life-like swarm behavior. Experimental results with Crazyflie 2.0 quadrotor platform validate the proposed control algorithm. The tactile patterns representing dynamics of the swarm (extension or contraction) are proposed. The user feels the state of the swarm at his fingertips and receives valuable information to improve the controllability of the complex life-like formation. The user study revealed the patterns with high recognition rates. Subjects stated that tactile sensation improves the ability to guide the drone formation and makes the human-swarm communication much more interactive. The proposed technology can potentially have a strong impact on the human- swarm interaction, providing a new level of intuitiveness and immersion into the swarm navigation.

MapProject

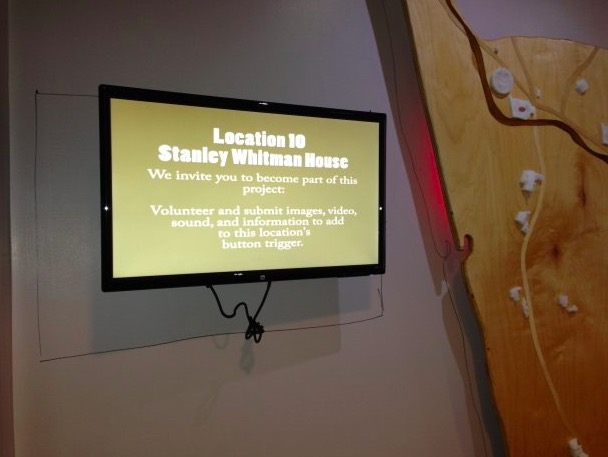
A group of students from Farmington, Connecticut partnered with artist Balam Soto and master teachers Earl Procko and Jim Corrigan to create a community-based sculpture project that allows people to explore the sights, sounds and history of their town through new media.

The installation runs on Arduino Uno and XBee, and is comprised of two panels which act as viewing screens for multiple visual projections. Visitors can interact with the display and manipulate the images using 24 buttons placed on the physical map. Plus, they are encouraged to record and add their own stories and memories of Farmington to the ever-growing multimedia library.

MapProject03

Permanently exhibited in Farmington’s public library, the Farmington Map Project was also the opportunity to introduce the students to physical computing, digital fabrication, woodworking, Arduino programming, and to the potential that Makerspaces have to offer for bringing ideas to life.

The project was created with the support of an Arts in Education Mini-Grant, funded by the Connecticut State Department of Education, the Department of Economic and Community Development, the Connecticut Office of the Arts, and the Connecticut Association of Schools, Farmington High School’s Fine and Applied Arts.

Interested? Check it out on Hackster.

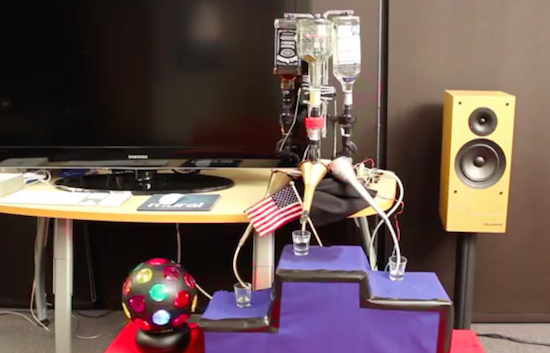
What do you get when you combine the Olympics, alcohol, and Arduino? An awesome machine that automatically pours a shot whenever your country wins a medal. Although a throwback, we can’t see why this project can’t be replicated for Rio!

It all began four years ago when a bunch of Makers were given early access to the SmartThings platform. To coincide with the London 2012 Summer Games, the team developed a device that would celebrate a U.S. victory by dispensing one of three different drinks–Goldschläger for gold, Jose Cuervo for silver, and Jack Daniels for bronze–while waving the American flag, turning on a strobe light, and playing the national anthem.

An Arduino is connected to a SparkFun XBee shield and the ZigBee network links it to SmartThings online. The Arduino controls the servos responsible for releasing the liquid into the glass, and the relays that switch the power strip on/off for the party effects. Of course, you can always just pour a drink manually by selecting the appropriate medal on the accompanying SmartThings Medal app.

With the 2016 Games now underway, check out the entire build below to help get you started on a machine of your own!


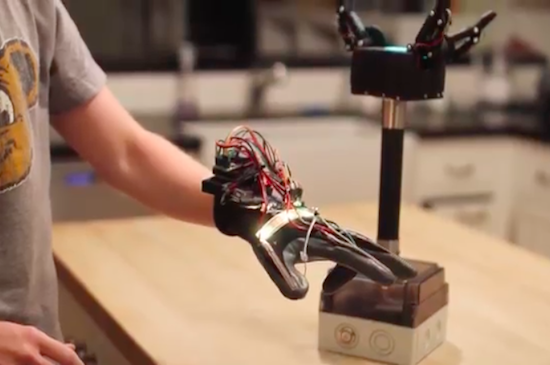
Sam Baumgarten and his friend have developed a pretty rad robotic gripper with the help of Arduino and 3D printing. The gripper itself consists of three large hobby servos joined to the fingers with a linkage. The underactuated fingers have a force sensor under each contact point, while the control glove is equipped with tiny vibrating motors at the fingertips. This, of course, provides haptic feedback to ensure that the user doesn’t crush anything–the greater the pressure, the stronger the motors vibrate.

The gripper is mounted to a handle with abrasive tape–the same kind found on staircases and skateboards. The tape is also used on each finger for optimal gripping. A box at the base of the pole houses all of the electronics, which include an Arduino Pro Mini for controlling the addressable LEDs on top, another Arduino for handling the communication and fingers, and a battery for power.

Aside from the vibration motors, the glove features flexible resistors on the back of the fingers, an LED strip for visualization, a breakout board for measuring the resistance from the flex sensors, a battery, an Arduino Uno for processing, and an XBee module for transmitting the signals to the Arduino in the gripper.

If you think this sounds awesome, wait until you see it in action. Baumgartnen has shared a demo of the project, along with a detailed breakdown of his build. Kudos to Hackaday for finding this incredible piece of work!

Jul
31

Xbee and Arduino sent to space by NASA

arduino mega, Featured, mega, space, xBee Comments Off on Xbee and Arduino sent to space by NASA 

XBee-Arduino-Nasa-4

Last July 7 at Wallops Flight Facility, NASA launched Black Brant IX , a suborbital sounding rocket to test “wireless-in-space” with XBee and Arduino :

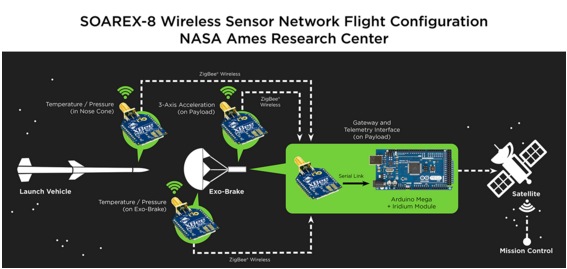
Onboard the rocket was an experiment testing Exo-Brake technology. XBee was used to collect sensor data including temperature, air pressure, and 3-axis acceleration parameters. NASA is considering Exo-brakes as a possible solution for returning cargo from the International Space Station (ISS), orbiting platforms or as possible landing mechanisms in low-density atmospheres. This was one of many tests used to analyze its effectiveness, but the first to incorporate an XBee connected sensor network. If you would like to read more about the Exo-brake, check out this article.

As part of a program to determine potential applications of wireless technologies in space, NASA chose XBee® ZigBee modules and Arduino Mega  explaining that:

Wireless sensor technology allows measuring important parameters such as aerodynamic pressure and temperature at the apex of the Exo-Brake during re-entry. It is very difficult to instrument a deployable parachute like the Exo-Brake, and wireless sensor modules provide the means for this type of measurement where it is difficult to run wires,” said Rick Alena, computer engineer at NASA Ames.

XBee-Arduino-NASA-6

The NASA team constructed a gateway using an Arduino Mega, XBee, and Iridium module. The Arduino Mega was used to manage communications between the local XBee wireless network and the long-range Iridium satellite uplink. It was chosen as part of a NASA initiative to use commercial off-the-shelf components where possible, and to employ rapid prototyping tools to efficiently explore new ideas.

See the diagram below to get a detailed view into how the network was configured.

nasaxbee


XBee-Arduino-Nasa-1 XBee-Arduino-Nasa-2 XBee-Arduino-Nasa-5 XBee-Arduino-NASA
May
03

[Bithead942’s] love of the ever popular Dr Who series led her to develop a replica of the 4th Doctor’s robotic companion. It’s name is K-9, and was built from scratch in only 4 months. Its shell is made from HPDE – a light and bendable plastic. A custom plastic bender was constructed to get the angles just right, and custom laser cut parts were used in various places.

Its frame consists of aluminum channel, and is packed full of juicy electronics. An arduino with an XBee shield controls the remote voice, frickin’ laser and eye sensors. Another arduino is paired with a motor shield to control the liner actuator for the neck movement. And a Raspberry Pi keeps the LCD screen in order.

We’re not done, folks. Because this puppy is radio controlled, a custom controller is needed. Sparkfun’s Fio paired with another XBee is used along with a 16×2 LCD and various other electronics to keep the robot on an invisible leash.

Be sure to check out the blog site, as it goes into great detail on all the various parts used to construct this complicated but awesome project.


Filed under: Arduino Hacks, classic hacks, wireless hacks
Oct
15

Control a robot by hand gestures with Arduino UNO and Xbee

arduino, arduino uno, Featured, flexsensors, Robot, xBee Comments Off on Control a robot by hand gestures with Arduino UNO and Xbee 

handgesture-robot.jpg

Robin Andersson shared with us the link to his Instructable to create a robot controlled by (gloved) hand gestures and running on a couple of Arduino Unos and Xbee.

You can make it yourself following the 8 steps of the tutorial and then customize the gestures as you like.

Enjoy the video below:

Feb
09

Upgrading Home Automation to Home Anticipation

arduino fio, arduino hacks, arduino uno, Home automation, home hacks, u.fl, xBee Comments Off on Upgrading Home Automation to Home Anticipation 

geofencingHomeAnticipation

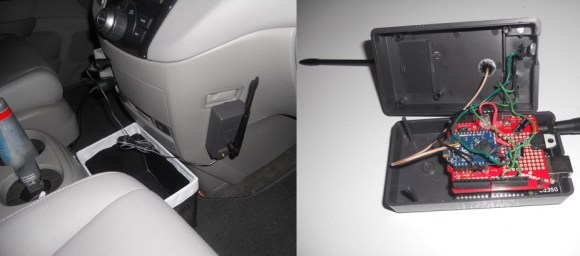
[Bithead's] already built some home automation to control the lighting and temperature in his house while he’s away, but he wanted to take things a step further and have the house automatically anticipate his arrival and adjust the environment accordingly. The project takes advantage of geofencing to create a perimeter around the home that listens for a transceiver in [Bithead's] car. We featured a similar project with a Raspi a few months ago, which locked the doors upon driving away.

[Bithead's] implementation uses a pair of Digi Xbee Pro XSC radios with U.FL antennas to provide an impressive 2+ mile range of communication. The home-based Xbee hooks up to a Parallax Xbee USB adapter and subsequently into his computer—its antenna sits in a nearby window on the top floor of his house to maximize range. For his car, [Bithead] originally opted for an Xbee shield and an Arduino Uno, but he’s recently overhauled the build in favor of an Arduino Fio, which reduced the footprint and increased the range. Check out his page for the build log specifics and more pictures.


Filed under: Arduino Hacks, home hacks
Oct
03

Talking to Jason Kridner About the new Arduino Tre

arduino, Arduino Tre, beagleboard, BeagleBone, CircuitCo, Electronics, TI, TRE, xBee, Yun Comments Off on Talking to Jason Kridner About the new Arduino Tre 

Top view of the new Arduino Tre board.With information about the new Arduino Tre board scare on the ground, I managed to track down Jason Kridner from the BeagleBoard Foundation to talk about the new board.

Read more on MAKE

Jul
17

Arduino quadcopter iPhone control

arduino, iPhone, Quadcopter, xBee Comments Off on Arduino quadcopter iPhone control 

Arduino quadcopter iPhone control:

This Arduino Quadcopter by Kyle Fieldus has iPhone Control, similar to the AR Drone you can tilt the phone to control the quadcopter. Touch OSC is being used to design the phone interface, there is also an Android version available. The system chain is a bit complex since the phone is sending the input data to the computer, the computer determines what should be done on the quadcopter and sends these commands to a computer tethered Arduino via USB. The computer tethered Arduino finally sends the commands to the quadcopter mounted Arduino via Xbee. All of the code and instructions will be made available as soon as this University project has been handed in and graded. You can see the first video here that was taken when the Xbee link between the two Arduinos was tested.

Arduino quadcopter iPhone control - [Link]


  • Newsletter

    Sign up for the PlanetArduino Newsletter, which delivers the most popular articles via e-mail to your inbox every week. Just fill in the information below and submit.

  • Like Us on Facebook