Posts | Comments

Planet Arduino

Archive for the ‘wifi’ Category

Potentially, one of the great things about having a device connected to the network is that you can update it remotely. However, how do you make that happen? If you use the Arduino setup for the ESP8266 or ESP32, you might try [scottchiefbaker’s] library which promises to make the process easy.

Adding it looks to be simple. You’ll need an include, of course. If you don’t mind using port 8080 and the path /webota, you only need to call handle_webota() from your main loop. If you want to change the defaults, you’ll need to add an extra call in your setup. You also need to set up a few global variables to specify your network parameters.

The only caveat is that long delay statements in your loop can block things from working and aren’t a great idea anyway. If you have them, you can replace all your delay calls with webota_delay which will stop the system from ignoring update requests.

The code started from a different online tutorial but packaged the code up nicely for reuse. To do an update, simply navigate to the device with a web browser and use the correct port number and path. From there you can upload a new binary image taken from the Arduino IDE with the export compiled binary command.

The only concern we saw was the code didn’t appear to authenticate you at all. That means anyone could load code into your ESP. That might be ok on a private network, but on the public Internet it is surely asking for trouble. The original tutorial code did have a hardcoded user and password, but it didn’t look very useful as the password was in the clear and didn’t stop you from uploading if you knew the right URL. Dropping it from the library probably makes sense, but we would want to build some kind of meaningful security into anything we deployed.

If you have a network connection, we’ve seen the same trick done with a normal Arduino with a wireless chip. You can even do it over WiFi but using an ESP8266 which you’ll then want to be able to update, too.

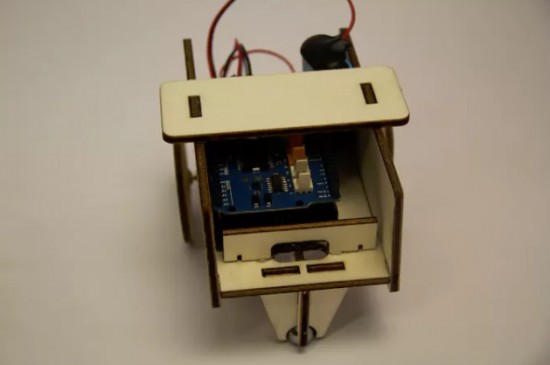
For an electronics person, building the mechanics of a robot — especially a robust robot — can be somewhat daunting. [Jithin] started with an off-the-shelf 4 wheel drive chassis to build an off-road Arduino robot he calls the Badland Brawler. The kit was a bit over $100, but as you can see in the video below, it is pretty substantial, with an enclosed frame and large mud tires.

The remaining parts include an Arduino, a battery, and a motor driver IC. The Arduino is one with WiFi (an MKR 1000, in fact) and there’s a phone app for controlling the robot.

Honestly, once you have the chassis taken care of, the rest is pretty easy. Of course, the phone app is a bit more effort, but you could replace it in a number of ways. Blynk, comes to mind, for example.

The motor drivers are easy to figure out. This would be a great platform for some sensors to allow for more autonomy. We liked how the frame had mount points for a lot of different boards and sensors and could hold everything, for the most part, inside. That’s probably a good idea for a robot which will be traversing rugged terrain.

If you do decide to roll your own app with Blynk, we’ve done it with a very different kind of robot. Four-wheel drive robots don’t have to be big, as we’ve seen in the past.

Connecting your shiny new ESP8266 to WiFi can be as simple or as complicated as you please. Most people decide to manually add it. Some people find clever ways to make the bloody thing connect itself. [Eduardo Zola] transfers his WiFi password using the flashing light of a smartphone screen.

A simple photo-resistor and a bit of tinkering allows him to easily send credentials — or any data really — to his ESP8266, through the power of LiFi. Short for Light Fidelity, LiFi transmits data using light with on and off states representing digital values. It can use visible light, or reach into either the ultraviolet or infra-red radiation if need be. For the nitty-gritty details on the subject, check out our primer on LiFi.

 A flashing LCD screen and a photo-resistor barely make the cut for a one-way LiFi system, but [Eduardo Zola] makes it work. The approach is to build a resitor divider and watch an input pin on the ESP for changes.
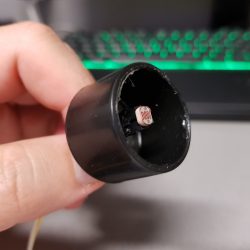
The trick is to keep ambient light out of the mix. The test sensor shown here places the LDR in a black cap, but [Eduardo] 3D-Printed a slick little enclosure for his reverse flashlight so it fits flush with the phone screen. One click and about half a minute of a flashing screen later, and the Wi-Fi credentials are transferred. This circuit could really be added onto any project, for short data transfers. With a bit more work on the sensor circuit, speed could be improved with the limiting factor being the timing on the phone screen itself.

Since the ESP8266 has its own WiFi connection, it’s likely you’ll use that for data transfer once the LiFi gets it onto the network. But any situation where you don’t have a full user input or a network connection could benefit from this. Pull out that old scrolling LED matrix project and add this as a way to push new messages to the device!

A good robot is always welcome around here at Hackaday, and Hackaday.io user [igorfonseca83]’browser-controlled ‘bot s is no exception. Felines beware.

[igorfonseca83] — building on another project he’s involved in — used simple materials for the robot itself, but you could use just about anything. His goal for this build was to maximize accessibility in terms of components and construction using common tools.

An Arduino Uno gets two D/C motors a-driving using an H-bridge circuit — granting independent control the wheels — an ESP8266 enabling WiFi access, with power provided by a simple 5V USB power bank. [igorfonseca83] is using an Android smartphone to transmit audio and video data; though this was mostly for convenience on his part, a Raspberry Pi and camera module combo as another great option!

A few workarounds notwithstanding — considering some components in this particular configuration do not directly connect to each other — a bunch of code, set up of a website to act as a controller that accesses the IP address of the ESP8266, and an app installed on the audio/video streaming smartphone later, and you have a cat-stalking robot ready to rock. There are, of course, other uses for fpv robots, but with arguably less entertaining results.

[via Hackaday.io and Instructables]


Filed under: Android Hacks, Arduino Hacks, robots hacks

The WS2812 is an amazing piece of technology. 30 years ago, high brightness LEDs didn’t even exist yet. Now, you can score RGB LEDs that even take all the hard work out of controlling and addressing them! But as ever, we can do better.

Riffing on the ever popular Adafruit NeoPixel library, [Harm] created the WS2812FX library. The library has a whole laundry list of effects to run on your blinkenlights – from the exciting Hyper Sparkle to the calming Breathe inspired by Apple devices. The fantastic thing about this library is that it can greatly shorten development time of your garden-variety blinkables – hook up your WS2812s, pick your effect, and you’re done.

[Harm]’s gone and done the hard yards, porting this to a bevy of platforms – testing it on the Arduino Nano, Uno, Micro and ESP8266. As a proof of concept, they’ve also put together a great demonstration of the software – building some cute and stylish Christmas decorations from wood, aluminium, and hacked up Christmas light housings. Combining it with an ESP8266 & an app, the effects can be controlled from a smartphone over WiFi. The assembly video on YouTube shows the build process, using screws and nails to create an attractive frame using aluminium sheet.

This project is a great example of how libraries and modern hardware allow us to stand on the shoulders of giants. It’s quicker than ever to build amazingly capable projects with more LEDs than ever. Over the years we’ve seen plenty great WS2812 projects, like this sunrise alarm clock or this portable rave staff.
As always, blink hard, or go home. Video after the break.


Filed under: Arduino Hacks, Holiday Hacks, led hacks

MKRRobotTutorial

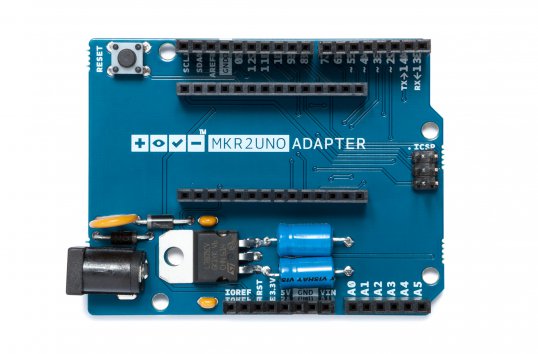
A few days ago, we launched the MKR2UNO Adapter, which enables you to easily turn an Arduino Uno form factor project into a MKR1000-based one. Simply mount your IoT board to the adapter, plug in any Uno shield and have a wireless device in no time.

Our newly-published tutorial provides a step-by-step overview of how to build a WiFi-controllable robot using the MKR2UNO Adapter with a MKR1000 and an Arduino Motor Shield.

MKR2Uno

This project combines the Arduino MKR1000’s web server and Arduino Motor Shield’s capabilities to drive a pair of different DC motors. A basic interface is hosted and hard-coded in the MKR1000, allowing the user to maneuver the robot up, down, left or right.

Check out all of the schematics and code here!

ocat

Over the last couple of years, cat videos have become the undisputed champions of the web. Whether it’s kittens playing with their shadows to failed jump attempts to giving each another massages, we’re all guilty of watching a few of these clips from time to time (yes, even at work). Built with this in mind, oCat is a real-time tracker for feline-related activity on the Internet.

oCat consists of two parts: the oCat News Distractor and the Kitty o’Cat Twitter bot. Using Google’s YouTube API, the system works by continuously monitoring for new uploads, the number of new views each day, or a specific video that has received a remarkable amount of attention. It then tweets these stats and prints them out on thermal paper, stamping a paw print on the timeline for every 1,000 views.

Created by Annika Engelhardt, a digital media design master’s student at the University of the Arts in Bremen, oCat uses an Arduino along with an ESP Wi-Fi module, a servo, and an LCD screen. The aim of the project is to increase and reveal the amount of hours people spend watching cat videos online.

The cat is an altered Maneki-neko, holding a stamp using welding wire and hot glue. Even though I filled the stamp with extra ink, it did not work properly and I had to cut out the paw-shape from a sponge and glue it onto the original stamp.

The thermal printer used in the device needs a USB connection, so I used a Raspberry Pi to control it. I wrote a Python script that checks four different RSS news feeds for new posts every 15 minutes and prints one headline with a timestamp every minute.

The Twitter bot was programmed using Python and a library called tweepy. Most of the script is reading JSON files, juggling and comparing data and text files and in the end mixing up parts of a sentence to form a tweet. The bot will be enhanced in the future

fd014c44519451.5814af0a88949

Engelhardt exhibited the project at Galerie Flut in Bremen back in October. You can find more pictures and information on the project here.

If necessity is the mother of invention, then inconvenience is its frustrating co-conspirator. Faced with a finicky dryer that would shut down mid-cycle with a barely audible beep if its load was uneven (leaving a soggy mass of laundry), [the0ry] decided to add the dryer to the Internet of Things so it could send them an email whenever it shut itself down.

After opening a thinger.io account, adding the soon-to-be device, and setting up the email notification process, [the0ry] combined the ESP8266 Development Board, a photosensitive resistor, and a 5V power supply on a mini breadboard. All that was left was to mount it on the dryer and direct the LDR (light-dependent resistor) to the machine’s door lock LED to trigger an email when it turned off — indicating the cycle had finished or terminated prematurely. A little tape ensured the LDR would only be tripped by the desired light source.

If you’re an apartment-dweller have WiFi in the wash area it would be awesome to see a battery-powered version you take with you. But in general this is a great hardware blueprint as many device have status LEDs that can be monitored in a similar way. If you want to keep the server in-house (literally in this case) check out the Minimal MQTT series [Elliot Williams] recently finished up. It uses a Raspberry Pi as the center server and an ESP8266 is one of the limitless examples of hardware that plays nicely with the protocol.

We love seeing hacks like this because not only does it conserve water and energy by reducing instances of rewashing, but it’s also a clever way to extend the life of an appliance and potentially save hundreds of dollars in replacing it. Add this to the bevvy of hacks that add convenience to one’s home — some of which produce delicious results.


Filed under: Arduino Hacks, home hacks

If you are a regular Hackaday reader, you’ve probably seen plenty of ESP8266 projects. After all, the inexpensive device is a workhorse for putting a project on WiFi, and it works well. There is a processor onboard, but, most often, the onboard CPU runs a stock firmware that exposes an AT command set or Lua or even BASIC. That means most projects have a separate CPU and that CPU is often–surprise–an Arduino.

It isn’t a big leap of logic to imagine an Arduino with an integrated WiFi subsystem. That’s the idea behind the MKR1000. But the real question you have to ask is: is it better to use an integrated component or just put an Arduino and ESP8266 together?

[Andreas Spiess] not only asked the question, but he answered it in a YouTube video (see below). He examines several factors on the MKR1000, the Arduino Due and Uno, and several other common boards. The examination covers performance, features, and power consumption.

We’ve covered a slew of ESP8266 projects. We’ve also seen at least two MKR1000 projects, one for an automotive project and the other controls a shower.


Filed under: Arduino Hacks, wireless hacks


  • Newsletter

    Sign up for the PlanetArduino Newsletter, which delivers the most popular articles via e-mail to your inbox every week. Just fill in the information below and submit.

  • Like Us on Facebook