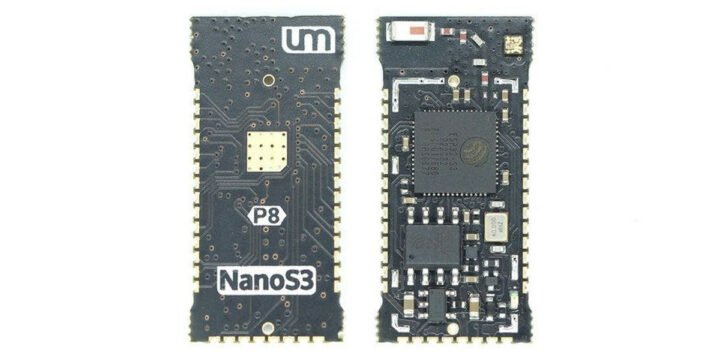
Posts | Comments

Planet Arduino

Archive for the ‘bluetooth’ Category

The Garmin HUD+ was a small Bluetooth device intended for the dashboard of a car, meant to be used as a GPS heads-up display for data from Garmin smartphone apps. It used a bright VFD (vacuum fluorescent display) which was viewed through a clear reflector, and displayed GPS information and directions. It was discontinued in 2015, but [Doz] was fond of his and used it happily until a phone upgrade meant it no longer worked. Was it destined for a landfill? Not if he had anything to say about it!

The first thing [Doz] tried was using an alternate Android app, but since it also didn’t work, it was time to sit back and reflect on the scope of the issue. In [Doz]’s case, he really only wanted some basic meaningful data displayed, and decided he could do away with the phone altogether if he had the right hardware.

A GPS receiver and ESP32 board take the place of a mobile phone app that no longer works. The HUD display itself is unchanged.

A u-blox GPS module and ESP32 board were the keys to making a standalone device to display meaningful data on the Garmin HUD+ over Bluetooth, thanks to the fact that the protocol used had been reverse engineered. After a lot of troubleshooting, [Doz] got some basic functions working: speed, time, satellite count, and a working compass arrow. The GPS receiver and ESP32 live in a small 3D-printed enclosure, and the HUD? It stays on the dash just like it always has, forever in 2015, blissfully unaware that the march of smartphone technology has left it behind.

His code is on GitHub and there is a video demonstrating the the unit embedded below, just under the page break. It’s always nice to see VFD displays given new life.

In the Northern hemisphere, summer is about to hit us full bore. While we love the season, we do dislike lawn maintenance. Apparently, so does [salmec] who developed the Mowerino around an Arduino Mega 2560 board.

As you might expect, the robot uses sharp blades so, you probably want to be careful. There are sensors that allow the machine to self-navigate or you can control it via Bluetooth. This is one of those things that seems easy until you try to actually do it. Nylon trimmer string is probably safer, but it breaks and it is hard to keep it cutting. Blades are more robust but also riskier to things like rocks, fingers, and pets.

Moving around in the yard is also an issue. The Mowerino has some ordinary-looking caster wheels in the front. That might be a place for improvement since most yards are not friendly to that kind of wheel. The other thing we worried about is what happens to the grass clippings. Around here, a week of rain means your mower will choke on grass clippings. On the other hand, the Mowerino has a smaller blade so maybe that helps mitigate clipping clogging.

Overall, though, it looks like it might be a good place to start if you dream of robot groundskeepers patrolling your estate. Most of the mowers we see like this have big wheels. But, of course, not all of them.

A portable Bluetooth turntable.

You know, we were just discussing weird and/or obsolete audio formats in the writers’ dungeon the other day. (By the way, have you ever bought anything on DAT or MiniDisc?) While vinyl is hardly weird or (nowadays) obsolete, the fact that this Bluetooth record player by [JGJMatt] is so modern makes it all the more fantastic.

Not since the Audio-Technica Sound Burger, or Crosley’s semi-recent imitation, have we seen such a portable unit. But that’s not even the most notable part — this thing runs inversely to normal record players. Translation: the record stands still while the the player spins, and it sends the audio over Bluetooth to headphones or a speaker.

Inside this portable player is an Arduino Nano driving a 5 VDC motor with a worm gear box. There really isn’t too much more to this build — mostly power, a needle cartridge, and a Bluetooth audio transmitter. There’s a TTP223 touch module on the lid that allows [JGJMatt] to turn it off with the wave of a hand.

[JGJMatt] says this is a prototype/work-in-progress, and welcomes input from the community. Right now the drive system is good and the Bluetooth is stable and able, but the tone arm has some room for improvement — in tests, it only played a small section of the record and skidded and skittered across the innermost and outermost parts. Now, [JGJMatt] is trying two-part arm approach where the first bit extends and locks into position, and then a second arm extending from there and moves around freely.

Commercial record players can do more than just play records. If you’ve got an old one that isn’t even good enough for a thrift store copy of a Starship record, you could turn it into a pottery wheel or a guitar tremolo.

The Arduino Pro lineup continues to grow with the introduction of the new Arduino Edge Control. This is a remote monitoring and control solution optimized for outdoor environments. Easy deployment makes it suitable for smart agriculture, precision farming, and other intelligent control applications in remote locations.

Featuring built-in Bluetooth, Arduino MKR boards can expand connectivity with 2G/3G/CatM1/NB-IoT modems, LoRa®, Sigfox and WiFi. With solar power capabilities you can place it anywhere while leveraging AI on the edge. Once installed in the field, it can then be managed remotely using Arduino IoT Cloud (or other services). 

Real-Time Monitoring with Edge Control Sensors

You can also connect sensors, provide real-time monitoring, and drive actuators — commonly used in agriculture — thereby reducing production-related risks.

Particularly aimed at smart agriculture, the sensors can collect real-time data. Weather conditions, soil quality, crop growth and any other data you need. Once sent to Arduino IoT Cloud, the data value chain becomes valuable analytics that support business processes at various levels. For example, crop yield, equipment efficiency, staff performance and so forth. The Edge Control can improve crop quality, reduce effort and minimize error by automating processes like irrigation, fertilization or pest control.

Arduino Edge Control for smart agriculture and industrial applications

Remote Access and Maintenance

With its robust design, the Edge Control is a fitting solution for applications in any outdoor setting. For example, using it on construction sites or in real estate to automate access control. Similarly, swimming pool maintenance and cleaning companies could monitor and control the condition of pool water from remote locations. As usual, we expect the Arduino community to come up with countless ingenious ways to implement this new technology.

To learn more about how you can use the Edge Control, check out how to get started.

The Edge Control is now available for €169/US$199 on the Arduino Store.

The post Sense the Future of Smart Agriculture with Arduino Edge Control appeared first on Arduino Blog.

Ever wanted your own gesture-controlled robot arm? [EbenKouao]’s DIY Arduino Robot Arm project covers all the bases involved, but even if a robot arm isn’t your jam, his project has plenty to learn from. Every part is carefully explained, complete with source code and a list of required hardware. This approach to documenting a project is great because it not only makes it easy to replicate the results, but it makes it simple to remix, modify, and reuse separate pieces as a reference for other work.

[EbenKouao] uses a 3D-printable robotic gripper, base, and arm design as the foundation of his build. Hobby servos and a single NEMA 17 stepper take care of the moving, and the wiring and motor driving is all carefully explained. Gesture control is done by wearing an articulated glove upon which is mounted flex sensors and MPU6050 accelerometers. These sensors detect the wearer’s movements and turn them into motion commands, which in turn get sent wirelessly from the glove to the robotic arm with HC-05 Bluetooth modules. We really dig [EbenKouao]’s idea of mounting the glove sensors to this slick 3D-printed articulated gauntlet frame, but using a regular glove would work, too. The latest version of the Arduino code can be found on the project’s GitHub repository.

Most of the parts can be 3D printed, how every part works together is carefully explained, and all of the hardware is easily sourced online, making this a very accessible project. Check out the full tutorial video and demonstration, embedded below.

3D printing has been a boon for many projects, especially those involving robotic arms. All kinds of robotic arm projects benefit from the advantages of 3D printing, from designs that focus on utility and function, to clever mechanical designs that reduce part count in unexpected ways.

Oh, dominoes — the fun of knocking them down is inversely proportional to the pain of setting them all up again. [DIY Machines] is saving loads of time by automating the boring part with a remote control domino-laying machine. If only it could pick them back up.

This machine can be driven directly over Bluetooth like an R/C car, or programmed to follow a predetermined path via Arduino code. Here’s how it works: an Arduino Uno drives two servos and one motor. The 1:90 geared motor drives the robot around using a 180° servo to steer. A continuous servo turns the carousel, which holds nearly 140 dominoes. We love that the carousel is designed to be hot-swappable, so you can keep a spare ready to go.

[DIY Machines] really thought of everything. Every dozen or so dominoes, the machine leaves a gap in case one of the dominoes is tipped prematurely. There are also a couple of accessories for it, like a speedy domino loading stick and a fun little staircase bridge to add to your domino creations. Though all the machine files are freely available, [DIY Machines] requests a small donation for the accessories files. Check out the complete build video after the break, followed by a bonus video that focuses on upgrading the machine with an HM10 Bluetooth module for controlling it directly with a phone.

This certainly isn’t the first domino-laying device we’ve seen, though it might be the most accessorized. [Matthias Wandel]’s version uses only one motor to move and deal the dominoes.

Recently [Imran Haque]’s family bought the quite popular Peloton bike. After his initial skepticism melted to a quiet enthusiasm, [Imran] felt his hacker curiosity begin to probe the head unit on the bike. Which despite being a lightly skinned android tablet, has a reputation for being rather locked down. The Peloton bike will happily collect data such as heart rate from other devices but is rather reticent to broadcast any data it generates such as cadence and power. [Imran] set out to decode and liberate the Peleton’s data by creating a device he has dubbed PeloMon. He credits the inspiration for his journey to another hacker who connected a Raspberry Pi to their bricked exercise bike.

As a first step, [Imran] step began with decoding the TRRS connector that connects the bike to the head unit. With the help of a multi-meter and a logic analyzer, two 19200bps 8N1 RS-323 channels (TX and RX) were identified. Once the basic transport layer was established, he next set to work decoding the packets. By plotting the bytes in the packets and applying deductive reasoning, a rough spec was defined. The head unit requested updates every 100ms and the bike responded with cadence, power, and resistance data depending on the request type (the head unit did a round-robin through the three data types).

Once the protocol was decoded, the next step for [Imran] was to code up an emulator. It seems a strange decision to write an emulator for a device with a simple protocol, but the reasoning is quite sound. It avoids a 20-minute bike ride every time a code change needs to be tested. [Imran] wrote both an event-driven and a timing-accurate emulator. The former runs on the same board as the PeloMon and the latter runs on a separate board (an Arduino).

The hardware chosen for the PeloMon was an Adafruit Feather 32u4 Bluefruit LE. It was chosen for supporting Bluetooth LE as well as having onboard EEPROM. A level shifter allows the microcontroller to talk directly to the RS-323 on the bike. After a few pull requests to the Adafruit Bluetooth libraries and a fair bit of head-banging, [Imran] has code that advertises two Bluetooth services, one for speed and another for power. A Bluetooth serial console is also included for debugging without having to pull the circuit out.

The code, schematics, emulators, and research notes are all available on GitHub.

dropController has the kind of documentation we wish would spontaneously generate itself whenever we build something. [Martyn Currey] built a robust rig for water droplet photography, and we don’t want to dismiss the hardware, but the most impressive part might be the website. It might not be very fancy, but it’s thorough and logically organized. You can find parts lists, assembly manuals, tutorials, sketches, and schematics. If only all the projects that came our way were so well detailed.

Water droplet photography is pretty cool, although freehanding it will make your patience fall faster than 9.81 m/s². The concept is that a solenoid valve will flicker open to release a drop of water, wait for a certain number of microseconds, and then trigger your DSLR via a wired remote cable. The tricky part comes from controlling as many as six valves and three flashes. We don’t have enough fingers and toes to press all those buttons.

The bill of materials contains many commonly available parts like an Arduino Nano, an LM2596 voltage regulator, some MOSFETS, an HC-06 Bluetooth module, plus standard audio connectors to hook everything up. Nothing should break the bank, but if money is not an issue, [Martyn] sells kits and complete units.

Waterdrop controllers are not the newest kids on the block, and strobe photography is a time-honored tradition.

All pictures credits are to [Martyn Currey].

People get into electronics for all kinds of reasons, but we would guess that the ability to blink the blinkenlights is probably pretty high on the survey results. [Kuchbert] has been going to Deichkind shows for the last decade and has wanted to build one of the German techno-rap band’s signature tetrahedral LED hats for about as long.

Up inside the hat is an Arduino Nano driving WS2812B LEDs and a portable battery to power everything. Thanks to an HC-05 Bluetooth module, the show can be controlled with an Android app. The many, many holes in the acrylic panels were milled out, but they could just as easily be laser-cut, or if you have infinite patience, drilled by hand. The code is coming once it has been cleaned up a bit. Everything else you’d need is already there waiting. This helmet even has its own lil’ music video, which we’ve carefully beat-matched in after the break.

Naturally, this makes us think of all the Daft Punk helms that have blinked by on this blog over the years. This hand-soldered one might be the most meticulously made.

[Adnan.R.Khan] had a sliding door latch plus an Arduino, and hacked together this cool but simple app controlled door lock.

Mechanically the lock consists of a Solarbotics GM3 motor, some Meccano, and a servo arm. A string is tied between two pulleys and looped around the slide of a barrel latch. When the motor moves back and forth it’s enough to slide the lock in and out. Electronically an Arduino and a Bluetooth module provide the electronics. The system runs from a 9V battery, and we’re interested to know whether there were any tricks pulled to make the battery last.

The system’s software is a simple program built in MIT App Inventor. Still, it’s pretty cool that you can get functionally close to a production product with parts that are very much lying around. It also makes us think of maybe keeping our childhood Meccano sets a little closer to the bench!


  • Newsletter

    Sign up for the PlanetArduino Newsletter, which delivers the most popular articles via e-mail to your inbox every week. Just fill in the information below and submit.

  • Like Us on Facebook