Posts | Comments

Planet Arduino

Archive for the ‘USB’ Category

A useful add-on for any computer is a plug-in macro keyboard, a little peripheral that adds those extra useful buttons to automate tasks. [Sayantan Pal] has made one, a handy board with nine programmable keys and a USB connector, but the surprise is that at its heart lies only the ubiquitous ATmega328 that you might find in an Arduino Uno. This isn’t a USB HID keyboard, instead it uses a USB-to-serial chip and appears to the host computer as a serial device. The keys themselves are simple momentary action switches, perhaps a deluxe version could use key switches from the likes of Cherry or similar.

The clever part of this build comes on the host computer, which runs some Python code using the PyAutoGui library. This allows control of the keyboard and mouse, and provides an “in” for the script to link serial and input devices. Full configurability is assured through the Python code, and while that might preclude a non-technical user from gaining its full benefit it’s fair to say that this is not intended to compete with mass-market peripherals. It’s a neat technique for getting the effect of an HID peripheral though, and one to remember for future use even if you might not need it immediately.

More conventional USB keyboards have appeared here in the past, typically using a processor with built-in USB HID support such as the ATmega32u4.

Sometimes debugging just doesn’t go the way you want it to. When USB problems arise, you can usually use a protocol analyzer to find the issue causing trouble. For [Paul Stoffregen], it was only the first step in a long process to find the culprit.

Procotol Analyzer

The complaint that came up was from a customer whose 2 port USB hub wasn’t working on their Teensy 3.6. The hub had been tested on Linux, Mac, and Windows, so it made sense to test what was different about the Teensy. Furthermore, all other USB hubs worked on the Teensy. As it turns out, these weren’t the most helpful assumptions to make when finding the bug.

Any protocol analyzer can be used, for instance the Beagle480. The way it works is by passing through USB communication, making a copy of the communication coming in and out, and sending it to the PC.


Normally, the analyzer has a small buffer memory and must sustain fast data flow. Unfortunately, this can occasionally cause software lockup. From what could be gathered from the verbose printing, USB descriptors were found for the hub. As it turns out, the faulty hub was a Multi-TT type hub, while most others are single TT (transaction translator).

Fixing Software Lockup

Since it was necessary to get the rest of the descriptor data, fixing the software lockup was the next step. Writing in a panic function – a breakpoint of sorts – into the code allowed the USB host’s power to terminate, and stepping through the program revealed that while the 2 port hub was initially being read, some issue arose afterwards.

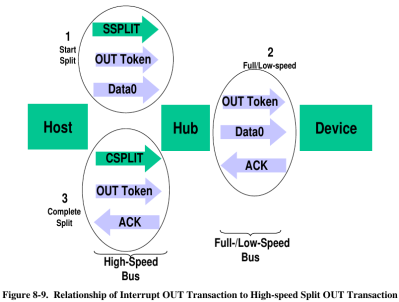
As it turns out, the issue relied on USB split transactions, used only between USB hosts and hubs. Communication happens by tokens, which begins with a SPLIT-START token.


As it turns out, the issue was that the tokens weren’t being sent in the correct order. The other hubs seemed to be handle this nevertheless. By applying a fix to the C++ code of the bad hub, which had previously not been implementing the data structure for accessing register properly, the hub was able to work again.The hub appeared to be rejecting bad token, which was causing the issue in the first place.

All in all, while I’m sure this had to be a head scratching experience, at least it gives us some insight into the low-level design of USB communication.

If you treat your Pi as a wearable or a tablet, you will already have a battery. If you treat your Pi as a desktop you will already have a plug-in power supply, but how about if you live where mains power is unreliable? Like [jwhart1], you may consider building an uninterruptible power supply into a USB cable. UPSs became a staple of office workers when one-too-many IT headaches were traced back to power outages. The idea is that a battery will keep your computer running while the power gets its legs back. In the case of a commercial UPS, most generate an AC waveform which your computer’s power supply converts it back to DC, but if you can create the right DC voltage right to the board, you skip the inverting and converting steps.

Cheap batteries develop a memory if they’re drained often, but if you have enough space consider supercapacitors which can take that abuse. They have a lower energy density rating than lithium batteries, but that should not be an issue for short power losses. According to [jwhart1], this quick-and-dirty approach will power a full-sized Pi, keyboard, and mouse for over a minute. If power is restored, you get to keep on trucking. If your power doesn’t come back, you have time to save your work and shut down. Spending an afternoon on a power cable could save a weekend’s worth of work, not a bad time-gamble.

We see what a supercap UPS looks like, but what about one built into a lightbulb or a feature-rich programmable UPS?

Historically, getting files on to a microcontroller device was a fraught process. You might have found yourself placing image data manually into arrays in code, or perhaps repeatedly swapping SD cards in and out. For select Arduino boards, that’s no longer a problem – thanks to the new TinyUSB library from Adafruit (Youtube link, embedded below).

The library is available on Github, and is compatible with SAMD21 and SAMD51 boards, as well as Nordic’s NRF52840. It allows the Arduino board to appear as a USB drive, and files can simply be dragged and dropped into place. The library can set up to use SPI flash, SD cards, or even internal chip memory as the storage medium.

Potential applications include images, audio files, fonts, or even configuration files. Future plans include porting the TinyUSB library to the ESP32-S2 as well. Being able to drag a settings file straight on to a board could make getting WiFi boards online much less of a hassle.

We’ve seen other nifty USB libraries before, VUSB is a great option if you need USB on your AVR microcontroller. Video after the break.

When you build one-off projects for yourself, if it doesn’t work right the first time, it’s a nuisance. You go back to the bench, rework it, and move on with life. The equation changes considerably when you’re building things to sell to someone. Once you take money for your thing, you have to support it, and anything that goes out the door busted is money out of your pocket.

[Brian Lough] ran into this fact of life recently when the widget he sells on Tindie became popular enough that he landed an order for 100 units. Not willing to cut corners on testing but also not interested in spending days on the task, he built this automated test jig to handle the job for him. The widget in question is the “Power BLough-R”, a USB pass-through device that strips the 5-volt from the line while letting the data come through; it’s useful for preventing 3D-printers from being backfed when connected to Octoprint. The tester is very much a tactical build, with a Nano in a breakout board wired to a couple of USB connectors. When the widget is connected to the tester, a complete series of checks make sure that there are no wiring errors, and the results are logged to the serial console. [Brian] now has complete confidence that each unit works before going out the door, and what’s more, the tester shaved almost a minute off each manual test. Check in out in action in the video below.

We’ve featured quite a few of [Brian]’s projects before. You may remember his Tetris-themed YouTube subscriber counter, or his seven-segment shoelace display.

[via r/Arduino]

[Corey Harding] designed his business card as a USB-connectable demonstration of his skill. If potential manager inserts the card in a USB drive, open a text editor, then touches the copper pad on the PCB, [Corey]’s contact info pops up in the text box.

In addition to working as a business card, the PCB also works as a Tiny 85 development board, with a prototyping area for adding sensors and other components, and with additional capabilities broken out: you can add an LED, and there’s also room for a 1K resistor, a reset button, or break out the USB’s 5V for other uses. There’s an AVR ISP breakout for reflashing the chip.

Coolly, [Corey] intended for the card to be an Open Source resource for other people to make their own cards, and he’s providing the Fritzing files for the PCB. Fritzing is a great program for beginning and experienced hardware hackers to lay out quick and dirty circuits, make wiring diagrams, and even export PCB designs for fabrication. You can download [Corey]’s files from his GitHub repository.

For another business card project check out this full color business card we published last month.


Filed under: Arduino Hacks

Infinity mirrors are some far-out table mods and make a great centerpiece. Instructables user [bongoboy23] took a couple steps beyond infinity when designing this incredible table tailor-made for our modern age.

Poplar and pine wood make up the framing, and red oak — stained and engraved — make for a chic exterior. Programmed with Arduino and run on a Teensy 3.1, the tabletop has 960 LEDs in forty sections. There are, four USB ports hidden behind sliding panels, as well as a two-port AC outlet and an inductive charging pad and circuit.  A hidden Adafruit TFT touchscreen display allows the user to control the table’s functions. Control is limited to changing lighting functions, but Pac-Man, Snake, and text features are still to come!

Weighing in at $850, it’s not a cheap build, but it looks amazing.

This is one of the most extensive Instructables you may happen across, containing dozens of pictures, CAD files, diagrams, appendices, and a change log, with tips besides; if you want one just like this at home, you are in good hands, here. Or try an easier build, we won’t judge. However, maker beware — you may be stepping through a portal that’s difficult to return from.

[Thanks for the tip, JohnL!]


Filed under: Arduino Hacks, how-to, led hacks

[DastardlyLabs] saw a video about converting a PS/2 keyboard to Bluetooth and realized he didn’t have any PS/2 keyboards anymore. So he pulled the same trick with a USB keyboard. Along the way, he made three videos explaining how it all works.

The project uses a stock DuinoFun USB mini host shield with a modification to allow it to work on 5V. An Arduino mini pro provides the brains. A FT-232 USB to serial board is used to program the Arduino. A standard Bluetooth module has to have HID firmware installed. [Dastardly] makes a homemade daughterboard–er, shield–to connect it to the Arduino.

The result is a nice little sandwich with a USB plug, a Bluetooth antenna, and some pins for reprogramming if necessary. Resist the urge to solder the Bluetooth board in–since it talks on the same port as the Arduino uses for programming, you’ll have to remove it before uploading new code.

If you need help reprogramming the HC-05 Bluetooth module, we’ve covered that before. This project drew inspiration from [Evan’s] similar project for PS/2 keyboards.


Filed under: Arduino Hacks

There are a ton of applications that we use that can benefit from keyboard shortcuts, and we use ’em religiously. Indeed, there are some tasks that we do so often that they warrant their own physical button. And the only thing cooler than custom keyboards are custom keyboards that you’ve made yourself.

Which brings us to [Dan]’s four-button Cherry MX USB keypad. It’s not really all that much more than four keyswitch footprints and an AVR ATmega32u4, but that plus some software is all you really need. He programs the Arduino bootloader into the chip, and then he’s using the Arduino Leonardo keyboard libraries. Bam! Check out the video below.

We see this design much more as a demo or collection of building-blocks than necessarily a one-size-fits-all solution. You might need five buttons, or want a different layout, or… It’s all open-source, so go nuts. And you’re not limited to key-clicks either — mouse buttons or even multiple scripted actions are within easy reach.

Building a special-function USB keypad or gaming device used to be hard work. But today between hardware and software design availability, it’s child’s play. Whether you need a footboard, a single-handed chording keyboard, or even just to update an old typewriter, the ability to control the input device that we use for eight hours per day is liberating. Experiment!


Filed under: Arduino Hacks, peripherals hacks

Evil geniuses usually have the help of some anonymous henchmen or other accomplices, but for the rest of us these resources are usually out of reach. [Evan], on the other hand, is on his way to a helpful army of minions that will do his bidding: he recently built a USB-powered minion that turns a regular PS/2 mouse and keyboard into a Bluetooth mouse and keyboard.

[Evan] found his minion at a McDonald’s and took out essentially everything inside of it, using the minion as a case for all of the interesting bits. First he scavenged a PS/2 port from an old motherboard. An Arduino Nano is wired to an HC-05 Bluetooth chip to translate the signals from the PS/2 peripherals into Bluetooth. The HC-05 chip is a cheaper alternative to most other Bluetooth chips at around $3 vs. $40 for more traditional ones. The programming here is worth mentioning: [Evan] wrote a non-interrupt based and non-blocking PS/2 library for the Arduino that he open sourced which is the real jewel of this project.

Once all the wiring and programming is done [Evan] can turn essentially any old keyboard and mouse into something that’ll work on any modern device. He also put an NFC tag into the minion’s head so that all he has to do to connect the keyboard and mouse is to swipe his tablet or phone past the minion.

If you’re looking for an interesting case for your next project, this McDonald’s Minion toy seems to be pretty popular. PS/2 keyboards are apparently still everywhere, too, despite their obsolescence due to USB. But there are lots of other ways to get more use out of those, too.


Filed under: Arduino Hacks


  • Newsletter

    Sign up for the PlanetArduino Newsletter, which delivers the most popular articles via e-mail to your inbox every week. Just fill in the information below and submit.

  • Like Us on Facebook