Posts | Comments

Planet Arduino

Archive for the ‘arduino uno’ Category

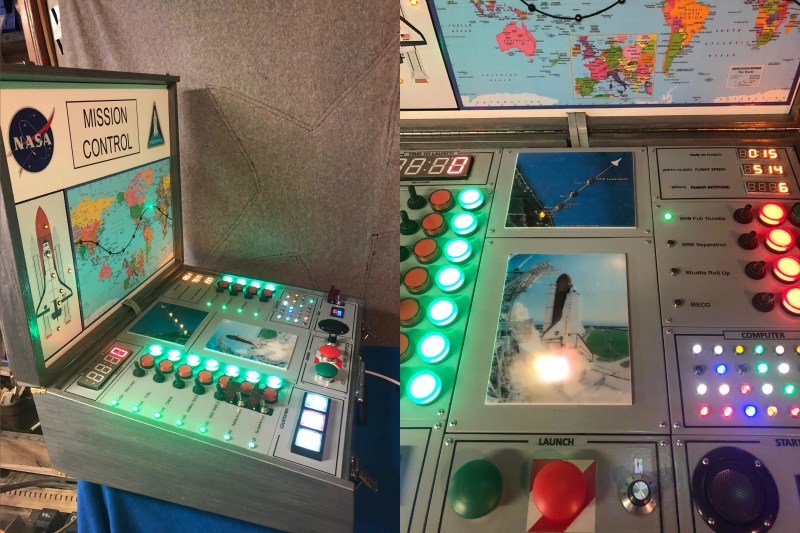
A lot of electronic busy boxes that are built for children are simply that — a mess of meaningless knobs and switches that don’t do much beyond actuating back and forth (which, let’s be honest, is still pretty fun to do). But this Mission Control Center by [gcall1979] knocks them all out of orbit. The simulation runs through a complete mission, including a 10-minute countdown with pre-flight system checks, 8.5 minutes of powered flight to get out of the atmosphere that includes another four tasks, and 90 minutes to orbit the Earth while passing through nine tracking stations across the world map.

That’s a lot time to keep anyone’s attention, but fortunately [gcall1979] included a simulation speed knob that can make everything go up to 15 times faster than real-time. This knob can be twiddled at any time, in case you want to savor the countdown but get into space faster, or you don’t have 90 minutes to watch the world map light up.

The main brain of this well-built box is an Arduino Mega, which controls everything but the launch systems’ mainframe computer — this is represented by bank of active LEDs that blink along with the voice in the sound clips and runs on an Arduino Uno and a couple of shift registers. To keep things relatively simple, [gcall1979] used an Adafruit sound board for the clips.

We love everything about this build, especially the attention to detail — the more important pre-flight tasks are given covered toggle switches, and there’s a Shuttle diagram that lights up as each of these are completed. And what Shuttle launch simulator would be complete without mushroom buttons for launch and abort? Grab your victory cigar and check out the demo video after the break.

Is your child too young to be launching the Shuttle? Here’s an equally cool busy box with toddler brains in mind.

[Andrew] wonders why the SerialUSB() function on the Cortex M3-based Arduino Due is so much faster than Serial() on the Uno or Nano, and shares his observations in this short video. He sets up an experiment with a simple sketch on both boards and uses Wireshark to evaluate the results.

Data is sent in the USB packets in groups of four characters on the ATmega-based boards, but the entire string is put in a packet on the Due board. If you look under the hood, the answer is hiding in plain sight. While the Arduino family of boards connect to your computer using a USB virtual serial port, the ATmega ones have an actual serial connection on-board. For instance, on the Nano there is an FT232RL between the USB connector and the microprocessor (on an Arduino Uno board, a small ATMEGA8U2 is used instead of an FTDI chip, but the concept is the same). On the Arduino Due, the USB connects directly to the SAM3X8E processor.

This concept doesn’t apply only to Arduino boards, of course. On any serial connection between two computers, when a virtual USB device is used on both sides of the link (no actual serial signals involved), the serial baud rate is a fictional thing — data transfer speeds depends on USB alone. We are curious why the packets contain four characters in [Andrew]’s ATmega Wireshark captures — why not 1, 2, or 10? Is this something that can be controlled by the programmer, or is it fixed by the protocol and/or the FTDI chip? If you have the answer, let us know in the comments below.

When one thinks of the Arduino Uno, one thinks of a capable 8-bit microcontroller platform that nonetheless doesn’t set the world alight with its performance. Unlike more modern parts like the ESP32, it has just a single core and no real multitasking abilities. But what if one wanted to run many threads on an Uno all at once? [Adam] whipped up some code to do just that.

Threads are useful for when you have multiple jobs that need to be done at the same time without interfering with each other. The magic of [Adam]’s ThreadHandler library is that it’s designed to run many threads and do so in real time, with priority management as well. On the Arduino Uno, certainly no speed demon, it can run up to 57 threads concurrently at 6ms intervals with a minumum timing error of 556 µs and a maximum of 952 µs. With a more reasonable number of 7 threads, the minimum error drops to just 120 µs.  Each thread comes with an estimated overhead of 1.3% CPU load and 26 bytes of RAM usage.

While we struggle to think of what we could do with more than a handful of threads on an Arduino Uno, we’re sure you might have some ideas – sound off in the comments. ThreadHandler is available for your perusal here, and runs on SAMD21 boards as well as any AVR-based boards that are compatible with TimerOne. We’ve seen other work in the same space before, such as ChibiOS for the Arduino platform. Video after the break.

Oh, dominoes — the fun of knocking them down is inversely proportional to the pain of setting them all up again. [DIY Machines] is saving loads of time by automating the boring part with a remote control domino-laying machine. If only it could pick them back up.

This machine can be driven directly over Bluetooth like an R/C car, or programmed to follow a predetermined path via Arduino code. Here’s how it works: an Arduino Uno drives two servos and one motor. The 1:90 geared motor drives the robot around using a 180° servo to steer. A continuous servo turns the carousel, which holds nearly 140 dominoes. We love that the carousel is designed to be hot-swappable, so you can keep a spare ready to go.

[DIY Machines] really thought of everything. Every dozen or so dominoes, the machine leaves a gap in case one of the dominoes is tipped prematurely. There are also a couple of accessories for it, like a speedy domino loading stick and a fun little staircase bridge to add to your domino creations. Though all the machine files are freely available, [DIY Machines] requests a small donation for the accessories files. Check out the complete build video after the break, followed by a bonus video that focuses on upgrading the machine with an HM10 Bluetooth module for controlling it directly with a phone.

This certainly isn’t the first domino-laying device we’ve seen, though it might be the most accessorized. [Matthias Wandel]’s version uses only one motor to move and deal the dominoes.

After the year humanity has endured, we could all use a little more relaxation in our lives. This atmosphere lamp is just the thing to set a relaxing ambience for work, studying, or hanging out. Just touch the surface and the light ripples to life, resembling the concentric circles that form on the surface of still water when it is touched. When the light settles, it looks like an inviting pool that’s ready for a nighttime swim.

There aren’t really any surprises inside — the lamp is operated via capsense by touching the center of the top. Three NeoPixel rings and an RGB LED strip provide the lighting, and an Arduino UNO runs the show. [Qttting_F] used an inexpensive ceramic bowl with a piece of acrylic for a lid, but this could just as easily be printed in white PLA or something. Check it out in action after the break.

Ambience is nice, but sometimes you need something more functional. Those types of lamps can be printed, too.

As the pandemic rages on, so does the desire to spend the idle hours tinkering. [knaylor1] spent the second UK lockdown making a sweet Theremin-inspired noise machine with a low parts count that looks like a ton of fun.

It works like this: either shine some light on the photocells, cover them up, or find some middle ground between the two. No matter what you do, you’re going to get cool sounds out of this thing.

The photocells behave like potentiometers that are set up in a voltage divider. An Arduino UNO takes readings in from the photocells, does some MIDI math, and sends the serial data to a program called Hairless MIDI, which in turn sends it to Ableton live.

[knaylor1] is using a plugin called TAL Noisemaker on top of that to produce the dulcet acid house tones that you can hear in the video after the break.

If you’ve never played with light-dependent resistors before, do yourself a favor and spend a little bit of that Christmas cash on a variety pack of these things. You don’t even need an Arduino to make noise, you can use them as the pots in an Atari Punk console or make farty square waves with a hex inverting oscillator chip like the CD40106. Our own [Elliot Williams] once devoted an entire column to making chiptunes.

At home for the holidays –  from building robots to science experiments, this is the perfect time to make! 

Arduino Project Hub offers around 6000 projects for all levels: each tutorial includes detailed assembling instructions and the Arduino code.
We have selected the TOP 5 Arduino projects for beginners; you don’t need a degree in engineering – these are the perfect and safe way to express your creativity and entertain yourself and your loved ones.

HAVE FUN – OTTO THE DANCING ROBOT

Otto by Camillo Carlo Palacio is a little robot that walks, dances, makes sounds, and avoids obstacles thanks to an Arduino Nano Every,  a micro servo motor, and a buzzer. 

GET FIT THIS HOLIDAY – PUSH UP COUNTER 

This project by Mod Natao, Peter Ma, Sarah Han, and Kevin Vo is perfect for exercising at home. The counter works with an Arduino Uno, an Arduino WIFI Shield, and a proximity sensor that tracks push up.

HAS SANTA BEEN? – ULTRASONIC SECURITY SYSTEM 

This security device by Ivan is based on an Arduino Uno and on an ultrasonic sensor that, thanks to ultrasonic waves can detect objects or eagerly awaited guests in an indoor environment. 

JINGLE BELLS (it isn’t) – ARDUINO I2S THEREMIN

Based on the Arduino I2S library, this theremin plays sound through an Arduino MKR Zero, a speaker, and a slider. 


IT CAN’T WRAP PRESENTS, BUT NEVER THE LESS THIS SIMPLE ROBOTIC ARM  IS STILL GREAT!

This simple robotic arm by Ryan Chan is made out of an Arduino Uno, a micro servo, and a potentiometer. It can record and play five positions.

What is it about useless machines that makes them so attractive to build? After all, they’re meant to be low-key enraging. At this point, the name of the game is more about giving that faceless enemy inside the machine a personality more than anything else. How about making it more of a bully with laughter and teasing? That’s the idea behind [alexpikkert]’s useless machine with attitude — every time you flip a switch, the creature of uselessness inside gets a little more annoyed.

In this case the creature is Arduino-based and features two sound boards that hold the giggles and other sounds. There are three servos total: one for each of the two switch-flipping fingers, and a third that flaps the box lid at you. This build is wide open, and [alexpikkert] even explains how to repurpose a key holder box for the enclosure. Check out the demo after the break.

We love a good useless machine around here, especially when they take a new tack. This one looks like any other useless machine, but what’s happening inside may surprise you.

What could be more terrifying than ghosts, goblins, or clowns? How about a shapeless pile of fright on your bedroom floor that only moves when you’re not looking at it? That’s the idea behind [Sciencish]’s nightmare robot, which is lurking after the break. The Minecraft spider outfit is just a Halloween costume.

In this case, “looking at it” equates to you shining a flashlight on it, trying to figure out what’s under the pile of clothes. But here’s the thing — it never moves when light is shining on it. It quickly figures out the direction of the light source and lies in wait. After you give up and turn out the flashlight, it spins around to where the light was and starts moving in that direction.

The brains of this operation is an Arduino Uno, four light-dependent resistors, and a little bit of trigonometry to find the direction of the light source. The robot itself uses two steppers and printed herringbone gears for locomotion. Its chassis has holes in it that accept filament or wire to make a cage that serves two purposes — it makes the robot into more of an amorphous blob under the clothes, and it helps keep clothes from getting twisted up in the wheels. Check out the demo and build video after the break, because this thing is freaky fast and completely creepy.

While we usually see a candy-dispensing machine or two every Halloween, this year has been more about remote delivery systems. Don’t just leave sandwich bags full of fun size candy bars all over your porch, build a candy cannon or a spooky slide instead.

Via r/duino

Just when we think we’ve seen all possible combinations of 3D printing, microcontrollers, and pretty blinkenlights coming together to form DIY clocks, [Mukesh_Sankhla] goes and builds this geometric beauty. It’s kaleidoscopic, it’s mosaic, and it sorta resembles stained glass, but is way cheaper and easier.

The crucial part of the print does two jobs — it combines a plate full of holes for a string of addressable RGB LEDs with the light-dividing walls that turn the LEDs into triangular pixels. [Mukesh] designed digits for a clock that each use ten triangles. You’d need an ESP8266 to run the clock code, or if you’d rather sit and admire the rainbow light show unabated by the passing of time, just use an Arduino Uno or something similar.

Most of the aesthetic magic here is in the printed pieces and the FastLED library. It has a bunch of really cool animations baked in that look great with this design. Check out the demo video after the break. The audio is really quiet until the very end of the video, so be warned. In our opinion, the audio isn’t necessary to follow along with the build.

The humble clock takes many lovely forms around here, including pop art.


  • Newsletter

    Sign up for the PlanetArduino Newsletter, which delivers the most popular articles via e-mail to your inbox every week. Just fill in the information below and submit.

  • Like Us on Facebook