
Oct
26
26
Automatic Halloween Candy Dispenser
arduino, automatic halloween candy dispenser, candy, halloween, iobridge, twilio, twitter Comments Off on Automatic Halloween Candy Dispenser
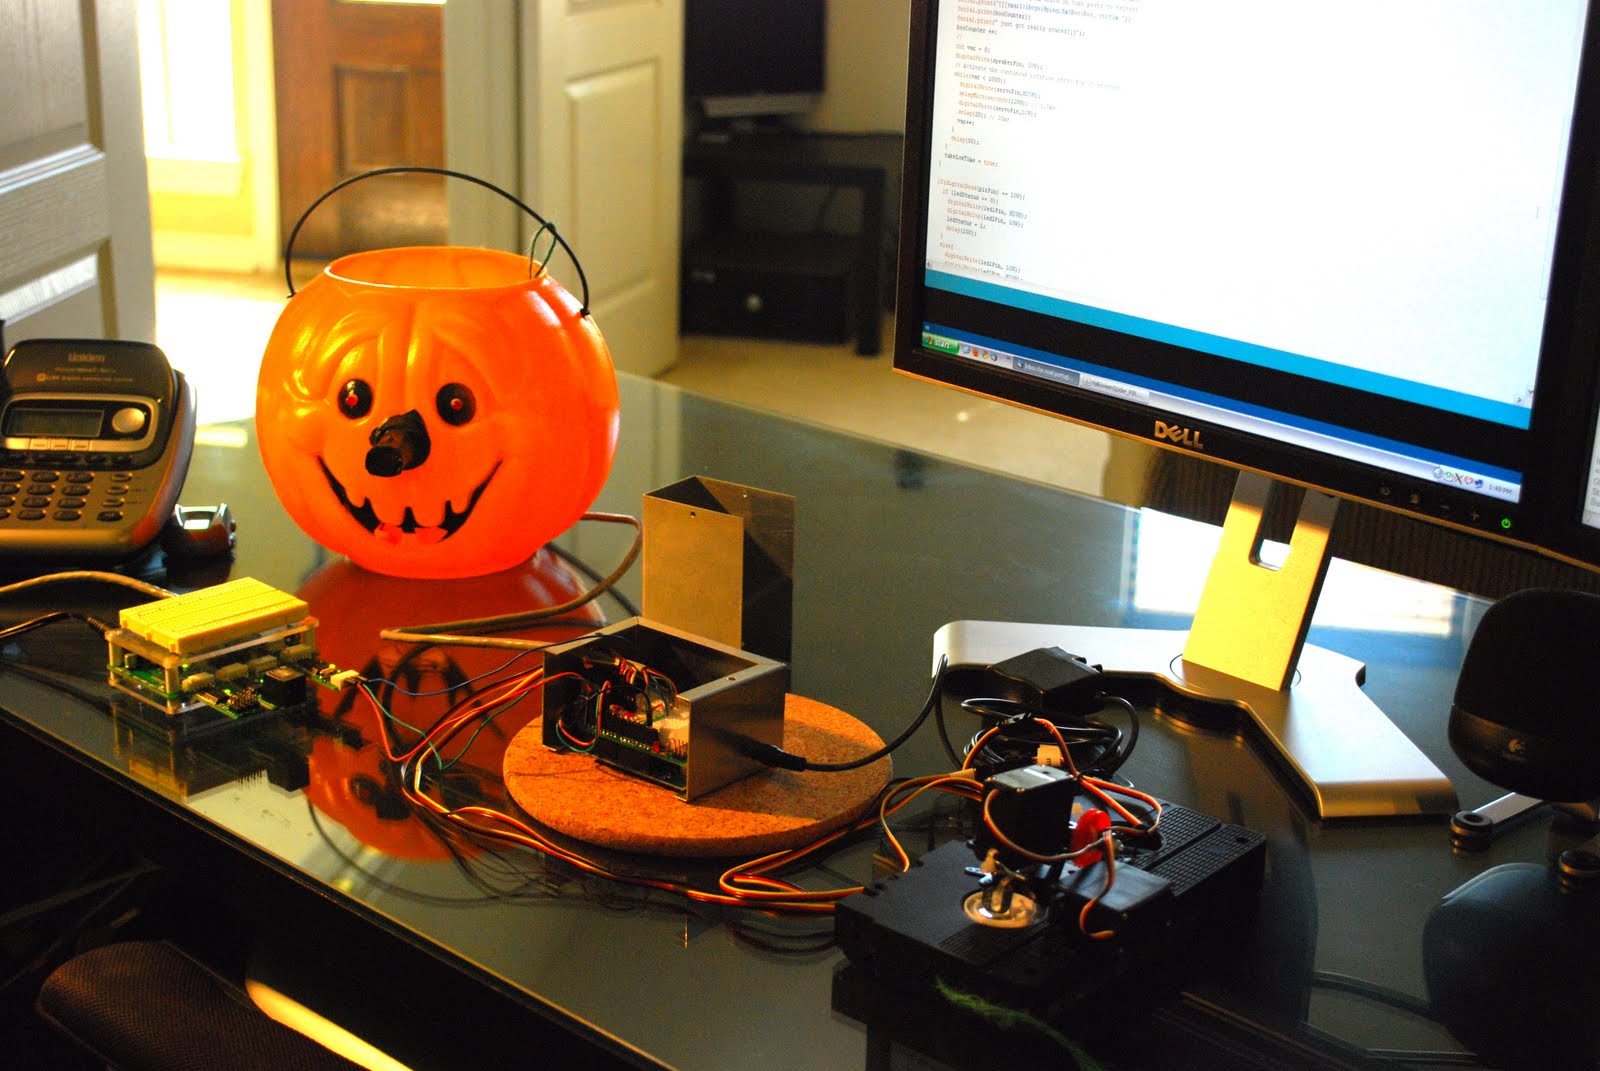
This year my Halloween project is the Automatic Halloween Candy Dispenser® triggered by TextforTreat®, CallforTreat® (powered by Twilio)and @TweetforTreat® technologies. Of course it can also be triggered from a Big Red push button, but where is the fun in that?
When trick-or-treaters show up at my house they can text, call, or tweet a code displayed on an LCD screen to get their Halloween candy. They can also push the Big Red button.
Once the candy request is made a few "special" effects are triggered by X10 modules. A low laying fog machine is activated and lights turn on while the candy shoots down from my front deck on the second floor.
* Check my Instructable write up for more detailed information.
 Candy Dispenser
Fog Machine
Candy Dispenser

The first thing was to figure out a good way to hold the candy and dispense it. I used a plastic bucket, a metal ventilation pipe and a CD attached to a servo motor. I figured that by having the candy dispense from the side as opposed to the bottom would allow the candy to move more freely and avoid candy jams.
The ventilation pipe comes in a "U" shape, so I made a "U" shaped cut in the bottom center of the bucket. Notice I did't cut the whole "U", instead I left a piece of plastic in the middle to hold the servo motor that rotates the CD.
After I inserted the ventilation pipe I did a few cuts to allow me to expand the pipe into a sheet form. I used a couple screws and bolts to keep the sheet attached to the bucket. The rest of the space was covered by the mighty duck tape.
I cut the CD to allow the candy flow when rotated. Also I duck taped a continuous servo inside to function as a "shaker."
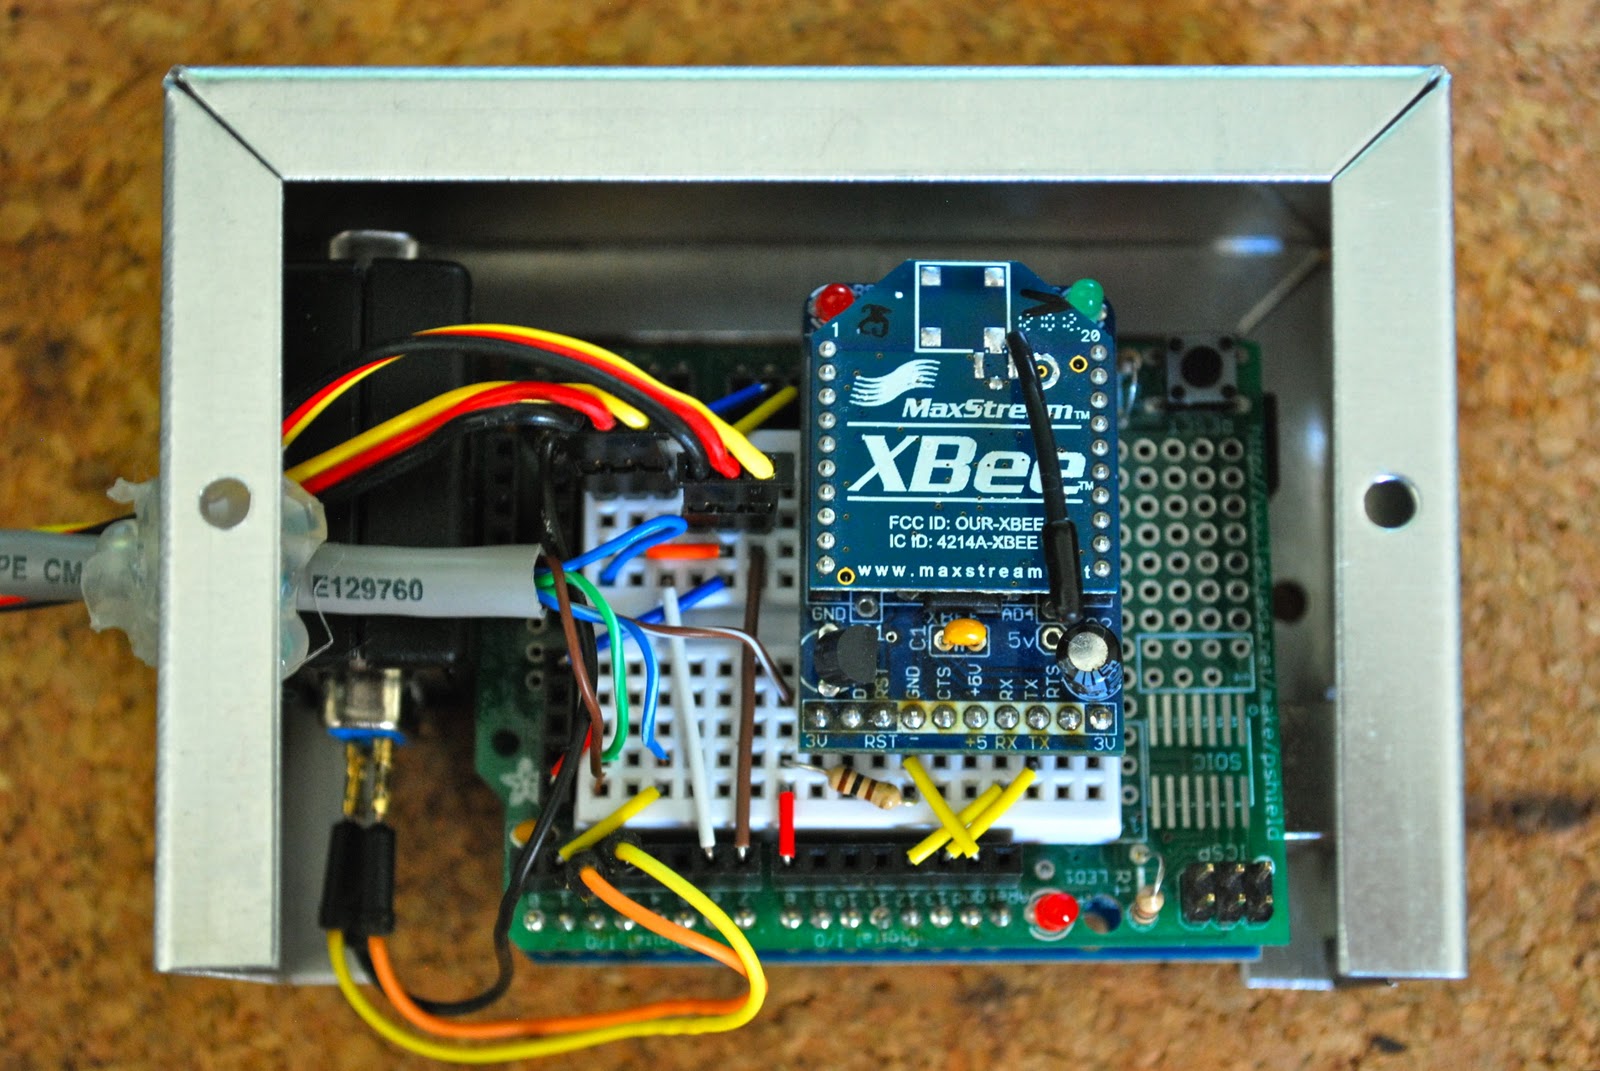
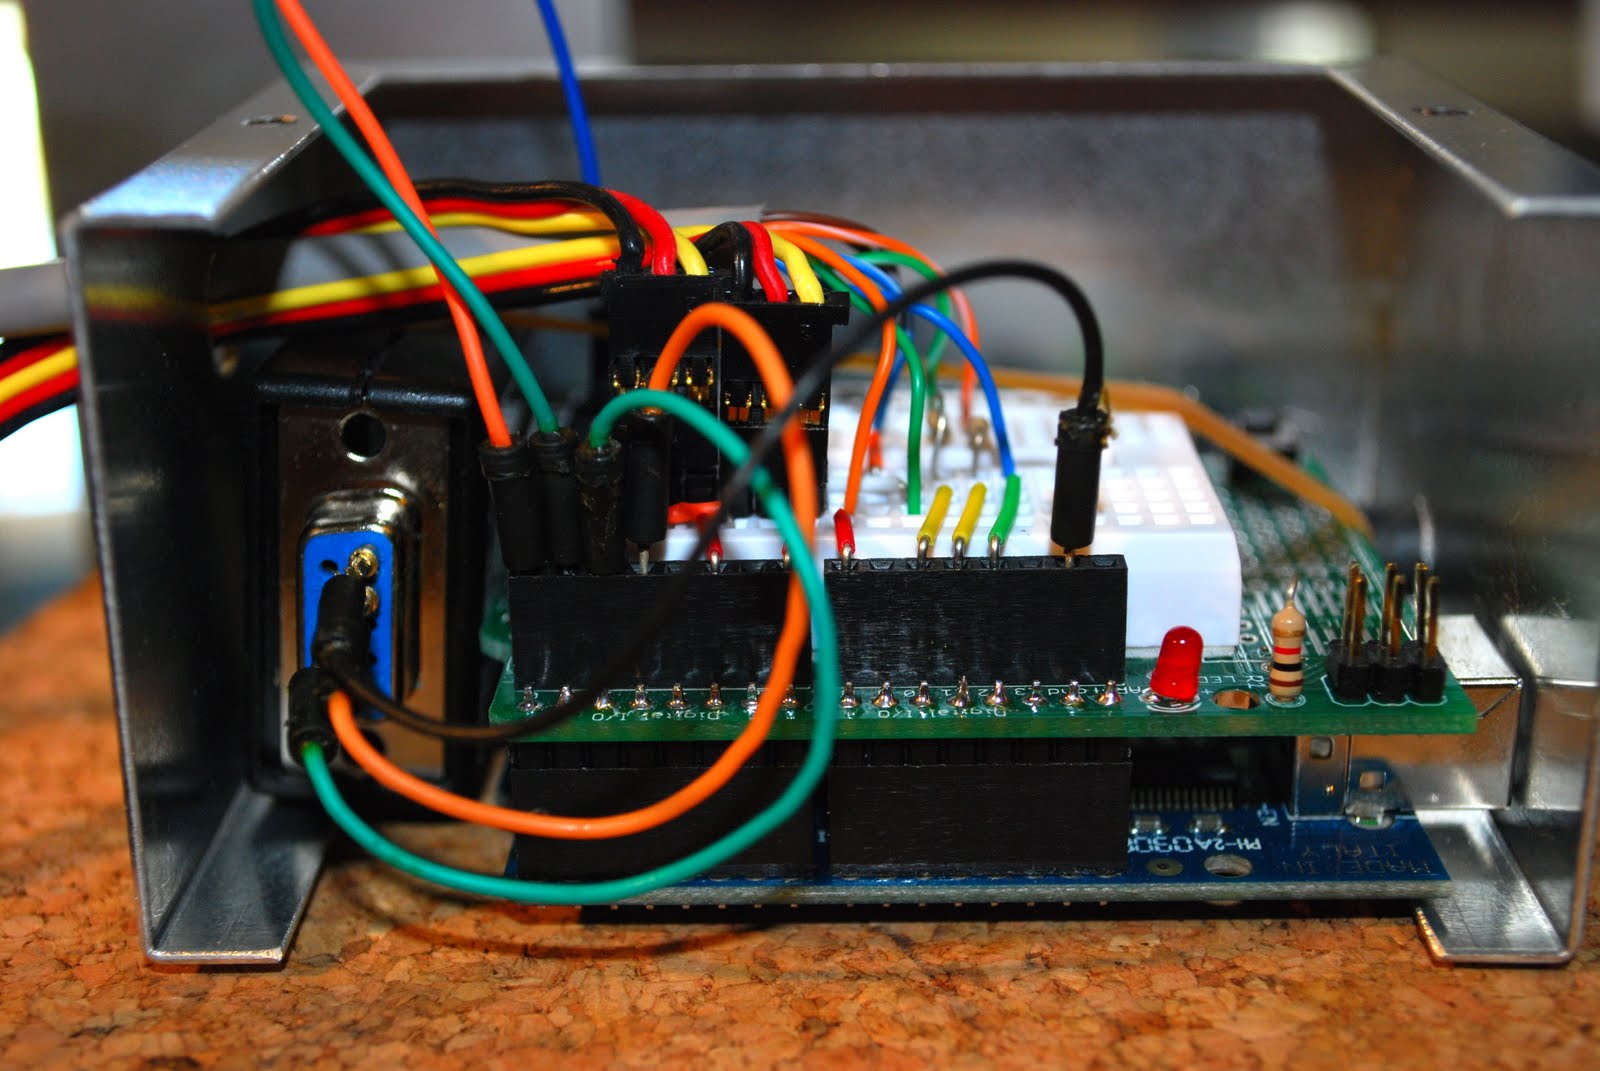
Control Box

The control box is pretty simple. I drilled/dremelled a few holes to attach the big red button, ioBridge LCD screen, power jack and the RJ45 jack.
I really like the use of CAT 5 cable to make things more modular.
Main Box
The main program runs in the Arduino Duemilanove. When the board is initialized it immediately makes a Web call to check for the current code and displays it on the LCD screen.
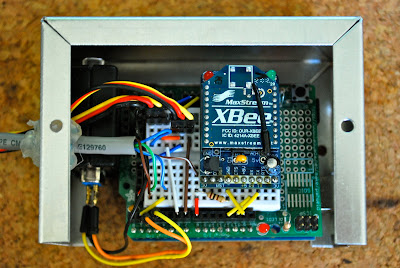
The main loop is waiting for either a physical push of the big red button or to receive a remote serial message. The attached XBee module communicates with another XBee module connected to the ioBridge IO-204 module serial board.
These are the digital I/O pins configuration:
Code Generator

I realized that someone with mischievous intentions could just tweet-spam the @Tweetfortreat account (or less likely someone could text or call my Twilio number numerous times) and I would end up with tons of candy on the floor.
Instead, I created a REST web service using of course my favorite web development tool, Oracle Application Express http://apex.oracle.com/ , to make sure a unique and random code was generated each time candy drop request was made from text, call or Twitter.
The REST application is really simple and I recognize it can also be created using any other technologies such as LAMP or even a GCI, or Perl application.
Application Objects:
ioBridge Setup
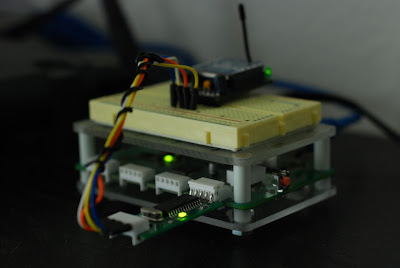
The ioBridge IO-204 is used as bridge (duh!) between the arduino and the internet. I am using the ioBridge serial board to connect an XBee module.
There are two main functions that the ioBridge was used for:
These are the digital I/O pins configuration:
Twilio Setup

Twilio is a web-service API for communication apps. Twilio is as simple as it gets. It only took me a short time to get my SMS and Voice applications up and running! I had tried in the past to create similar applications with other technologies (VoiceXML and even Google Voice) and let me tell you is not that easy.
The voice application answers the phone, plays an intro sound file and asks for the code followed by the # sign. If a code is detected Twilio will do a "GET" action to a PHP file that will lookup the current code from my Code Generator Web Service. If it matches it will call the ioBridge static widget URL and candy will be dispensed.
The SMS application has almost the same PHP code except this time instead of looking for the digits dialed it will look for body of the SMS message.
Check the attached XML and PHP files that generate the TwiML XML.
All in all Twilio is a winner and I have plenty of other ideas for the future.
Twitter Setup

No modern internet enabled project is complete without Twitter integration, right? :) Here is mine: This time i used a bash script, twurl and a crontab job to check for replies to @tweetfortreat. This bash script is running on my Sheevaplug, but it can be run in any linux/mac machine or it could be adapted to run as .bat in windows (using scheduled tasks).
Twurl is almost like curl but for Twitter. I did some ugly parsing of the twitter RSS feed to retrieve the tweet sender, but it works!
Here is my bash script
#!/bin/bash
mycode=`curl --silent http:/my.apexserver.com/pls/apex/getcode`
twitter=`twurl /1/statuses/mentions.rss | grep "@tweetfortreat $mycode" | cut -d ':' -f1 | tail -n 1 | cut -d '>' -f2`
echo $mycode $twitter
if [ -n "$twitter" ]; then
iobridge=`curl --silent http://www.iobridge.com/widgets/static/id=[widgetID]`
newkey=`curl --silent -d "code=$mycode" http:/my.apexserver.com/pls/apex/updatecode`
update=`twurl -d "status=@$twitter The code $mycode is correct. Happy Halloween!" /1/statuses/update.xml`
echo $newkey $iobridge
fi
Crontab will only allow you to execute a script every minute and I think is fine for now. Alternatively a while loop could be used instead.
Here is my crontab entry
*/1 * * * * /script_location/HalloweenCandy.sh > /dev/null 2>&1
Conclussion and Alternatives
If my Google skills (http://lmgtfy.com/?q=automatic+halloween+candy+dispenser)serve me well there are just not many documented Automatic Halloween Candy Dispensers out there. I did run into this one which I really like but is limited to M&Ms sized candy.I found some inspiration from the dog/cat feeders built using the internet enabled ioBridge http://support.iobridge.com/projects/tag/dog-feeder/.
I hope to see more iterations of the Automatic Halloween Candy Dispenser next year. Please make sure you share all your ideas/improvements in the comments section.
Happy Halloween!
When trick-or-treaters show up at my house they can text, call, or tweet a code displayed on an LCD screen to get their Halloween candy. They can also push the Big Red button.
Once the candy request is made a few "special" effects are triggered by X10 modules. A low laying fog machine is activated and lights turn on while the candy shoots down from my front deck on the second floor.
* Check my Instructable write up for more detailed information.

- Plastic Bucket
- 3 in. x 60 in. Round Pipe
- 2 Futaba S3003 Servos
- 1 Old CD
- Nuts and bolts
- Plastic Project Enclosure
- Big Dome Push Button
- 16x2 Serial LCD Display
- Snap-In Category 5e RJ-45 Jack
- Size M Panel-mount Coaxial DC Power Jack
- 12 V DC transformer
- Cat 5 Cable
- Aluminum Project Enclosure
- Arduino Duemilanove
- Adafruit Protoshield
- XBee adapter kit
- x10 Firecracker CM17A
- x10 Transeiver
- 1 100k resistor
Fog Machine
- X10 Appliance module
- 125VAC/10A DPDT Plug-In Relay (as a switch combined with x10)
- Styrofoam cooler and dryer hose and Ice to create low laying fog.
(Check my last year Halloween project http://www.instructables.com/id/Halloween-Dropping-Spider/ for more info).
- X10 Appliance module
- Incandescent black light, strobe light, black light bulbs.
Candy Dispenser

The first thing was to figure out a good way to hold the candy and dispense it. I used a plastic bucket, a metal ventilation pipe and a CD attached to a servo motor. I figured that by having the candy dispense from the side as opposed to the bottom would allow the candy to move more freely and avoid candy jams.
The ventilation pipe comes in a "U" shape, so I made a "U" shaped cut in the bottom center of the bucket. Notice I did't cut the whole "U", instead I left a piece of plastic in the middle to hold the servo motor that rotates the CD.
After I inserted the ventilation pipe I did a few cuts to allow me to expand the pipe into a sheet form. I used a couple screws and bolts to keep the sheet attached to the bucket. The rest of the space was covered by the mighty duck tape.
I cut the CD to allow the candy flow when rotated. Also I duck taped a continuous servo inside to function as a "shaker."
Control Box
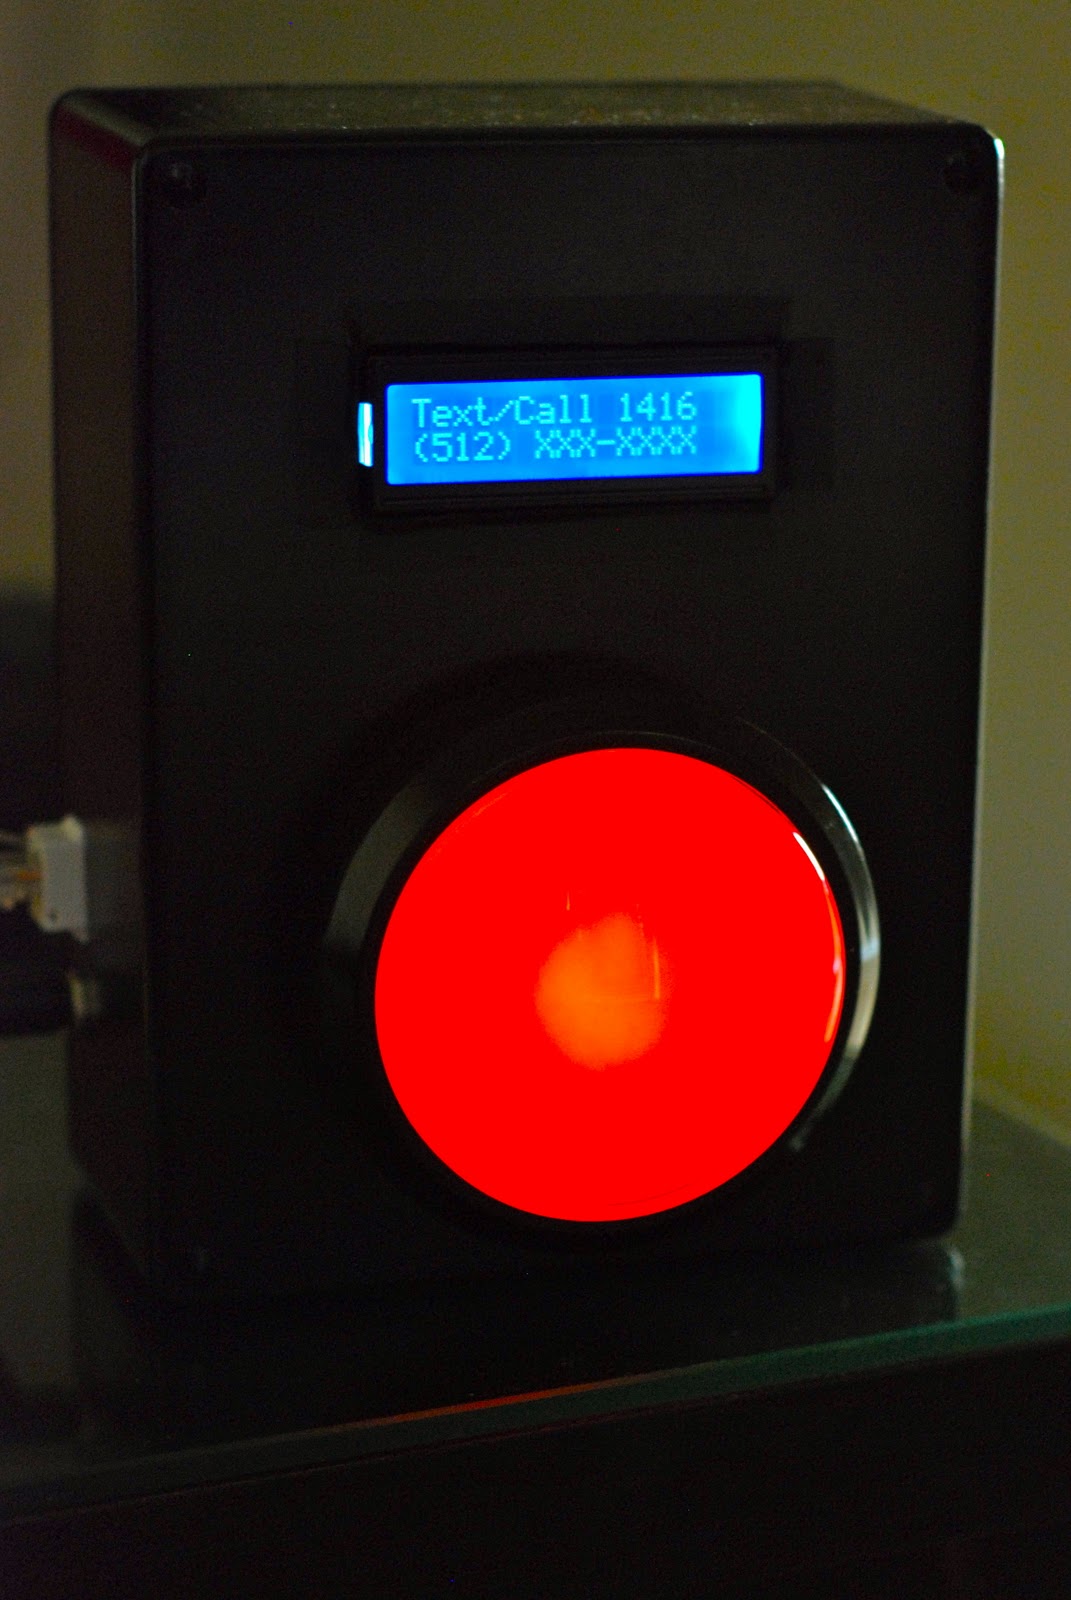
The control box is pretty simple. I drilled/dremelled a few holes to attach the big red button, ioBridge LCD screen, power jack and the RJ45 jack.
I really like the use of CAT 5 cable to make things more modular.
Main Box
The main program runs in the Arduino Duemilanove. When the board is initialized it immediately makes a Web call to check for the current code and displays it on the LCD screen.
The main loop is waiting for either a physical push of the big red button or to receive a remote serial message. The attached XBee module communicates with another XBee module connected to the ioBridge IO-204 module serial board.
These are the digital I/O pins configuration:
- XBee Module (with adafruit XBee kit)
- Pin 13 - TX
- Pin 12 - RX
- Gnd and 5v
- Big Dome Push Button
- Pin 8 - Button NO(normally open) + GND + 100K.
- 5v - COM
- Servo 1 (continuous rotating servo used for shaking)
- Pin 7 - Data
- Gnd and 5v
- Servo 2 (used to rotate the CD)
- Pin 6 - Data
- Gnd and 5v
- X10 C17A (x10 devices controller)
- Pin 3 - DTR line for C17A - DB9 pin 4
- Pin 2 - RTS line for C17A - DB9 pin 7
- Gnd - DB9 pin 5
- ioBridge 16x2 serial LCD display
- Pin 1 - LCD Data pin
- Gnd and 5v
Code Generator

I realized that someone with mischievous intentions could just tweet-spam the @Tweetfortreat account (or less likely someone could text or call my Twilio number numerous times) and I would end up with tons of candy on the floor.
Instead, I created a REST web service using of course my favorite web development tool, Oracle Application Express http://apex.oracle.com/ , to make sure a unique and random code was generated each time candy drop request was made from text, call or Twitter.
The REST application is really simple and I recognize it can also be created using any other technologies such as LAMP or even a GCI, or Perl application.
Application Objects:
- 1 Table (ID,CODE,SELECTED)
- 1 Numerical Sequence to generate primary key (ID)
- 1 Trigger before insert record that will get the ID value and append a random number to the CODE column
- 1 public procedure to retrieve the code (where selected = 1)
- 1 public procedure to update the code once is used and generate a new one.
http:/my.apexserver.com/pls/apex/getcode
http:/my.apexserver.com/pls/apex/updatecode?code=XXXX
*If you would like to implement something with a static file instead, I would recommend using http://www.random.org/clients/http/ to get a random number and store it in file, memory, or even the arduino itself.http:/my.apexserver.com/pls/apex/updatecode?code=XXXX
ioBridge Setup
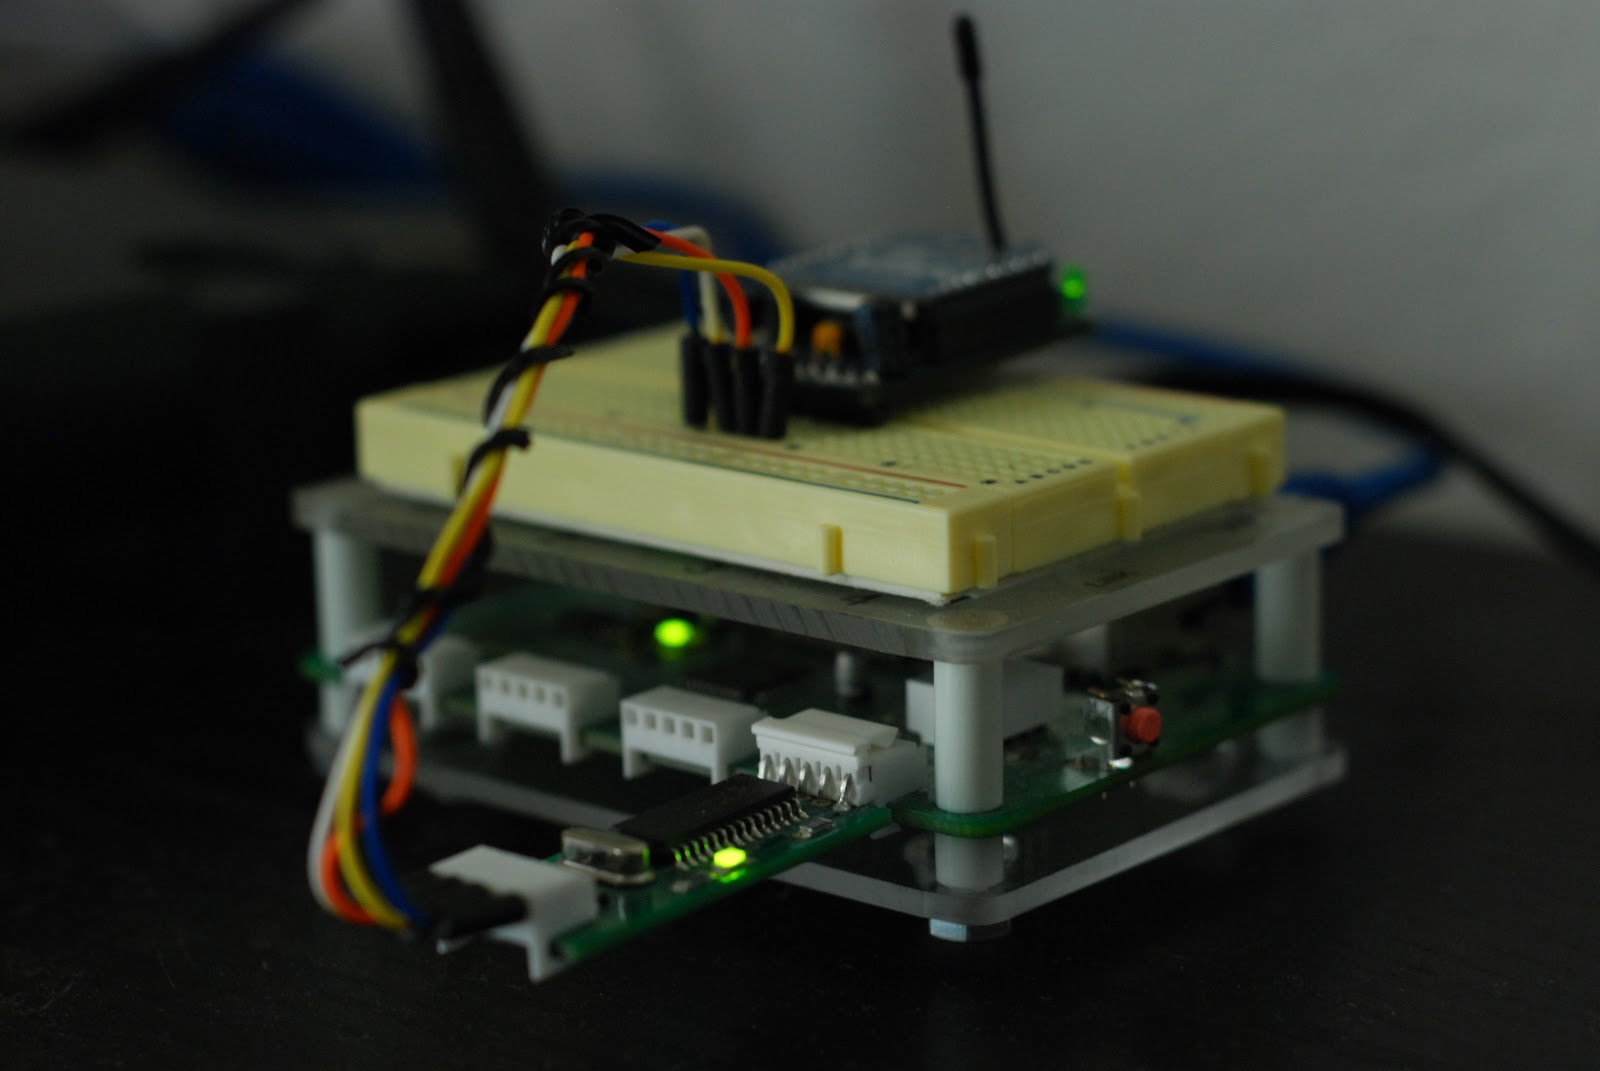
The ioBridge IO-204 is used as bridge (duh!) between the arduino and the internet. I am using the ioBridge serial board to connect an XBee module.
There are two main functions that the ioBridge was used for:
- Request current code
I do a GET call from the arduino to retrieve the current code from my Code Generator service using ioBridge Serial Web Services API.
Arduino code:
mySerial.println("[[[get|http:/my.apexserver.com/pls/apex/getcode]]]");
- Start candy dropping sequence by text, call or tweet.
An ioBridge widget will send a start character via serial message and the candy dropping sequence will start. This widget can be called using the ioBridge Static Widget API.
This URL is called by Twilio and by my custom Twitter alert script.
http://www.iobridge.com/widgets/static/id=[widgetID]
http://www.iobridge.com/widgets/static/id=[widgetID]
These are the digital I/O pins configuration:
- ioBridge Serial Board
- TX - RX XBee
- RX - TX XBee
- GND and 5v
Twilio Setup
Twilio is a web-service API for communication apps. Twilio is as simple as it gets. It only took me a short time to get my SMS and Voice applications up and running! I had tried in the past to create similar applications with other technologies (VoiceXML and even Google Voice) and let me tell you is not that easy.
The voice application answers the phone, plays an intro sound file and asks for the code followed by the # sign. If a code is detected Twilio will do a "GET" action to a PHP file that will lookup the current code from my Code Generator Web Service. If it matches it will call the ioBridge static widget URL and candy will be dispensed.
The SMS application has almost the same PHP code except this time instead of looking for the digits dialed it will look for body of the SMS message.
Check the attached XML and PHP files that generate the TwiML XML.
All in all Twilio is a winner and I have plenty of other ideas for the future.
Twitter Setup
No modern internet enabled project is complete without Twitter integration, right? :) Here is mine: This time i used a bash script, twurl and a crontab job to check for replies to @tweetfortreat. This bash script is running on my Sheevaplug, but it can be run in any linux/mac machine or it could be adapted to run as .bat in windows (using scheduled tasks).
Twurl is almost like curl but for Twitter. I did some ugly parsing of the twitter RSS feed to retrieve the tweet sender, but it works!
Here is my bash script
#!/bin/bash
mycode=`curl --silent http:/my.apexserver.com/pls/apex/getcode`
twitter=`twurl /1/statuses/mentions.rss | grep "@tweetfortreat $mycode" | cut -d ':' -f1 | tail -n 1 | cut -d '>' -f2`
echo $mycode $twitter
if [ -n "$twitter" ]; then
iobridge=`curl --silent http://www.iobridge.com/widgets/static/id=[widgetID]`
newkey=`curl --silent -d "code=$mycode" http:/my.apexserver.com/pls/apex/updatecode`
update=`twurl -d "status=@$twitter The code $mycode is correct. Happy Halloween!" /1/statuses/update.xml`
echo $newkey $iobridge
fi
Crontab will only allow you to execute a script every minute and I think is fine for now. Alternatively a while loop could be used instead.
Here is my crontab entry
*/1 * * * * /script_location/HalloweenCandy.sh > /dev/null 2>&1
Conclussion and Alternatives
If my Google skills (http://lmgtfy.com/?q=automatic+halloween+candy+dispenser)serve me well there are just not many documented Automatic Halloween Candy Dispensers out there. I did run into this one which I really like but is limited to M&Ms sized candy.I found some inspiration from the dog/cat feeders built using the internet enabled ioBridge http://support.iobridge.com/projects/tag/dog-feeder/.
I hope to see more iterations of the Automatic Halloween Candy Dispenser next year. Please make sure you share all your ideas/improvements in the comments section.
Happy Halloween!


