Posts | Comments

Planet Arduino

Archive for the ‘Art’ Category

It is one thing to make an artistic steampunk display. But [CapeGeek] added an Arduino to make the display come alive. The display has plenty of tubes and wires. The pressure gauge dominates the display, but there are lots of other interesting bits. Check it out in the video below.

From the creator:

The back-story is a fictional factory that cycles through a multistage process. It starts up with lights and sounds starting in a small tube in one corner, the needle on a big gauge starts rising, then a larger tube at the top lights up in different colors. Finally, the tall, glass reactor vessel lights up to start cooking some process. All this time, as the sequence progresses, it is accompanied by factory motor sounds and bubbling processes. Finally, a loud glass break noise hints that the process has come to a catastrophic end! Then the sequence starts reversing, with lights sequentially shutting down, the needle jumps around randomly, then decreases, finally, all lights are off, indicating the factory shutting down.

We especially liked the distillation column. We doubt we would exactly duplicate this project, but there are plenty of things to borrow for your own creations here.

We always enjoy steampunk computers. But we also like the ones that have unusual components like the distillation column or a chain.

You never forget your first diorama, especially when it’s interactive. Although admittely a bit late to celebrate Erntedankfest (Germanic Thanksgiving), [Markus Bindhammer] is ahead of the curve when it comes to the American version.

This interactive diorama lamp features a cute chameleon that [Markus sculpted from a wire frame and a lump of clay]. In the chameleon’s midsection is a ping pong ball that does the work of diffusing an RGB LED. Wires run out the far side and through the bamboo stand and connect to a TCS34725 RGB color sensor and an Arduino Pro Micro.

The lamp does what you think — hold any colored object up to the color sensor, and the chameleon will change colors to match. When no one is interacting with the lamp, it slowly runs through a rainbow of colors. Be sure to check out the build video after the break.

Don’t have a color sensor? You can roll your own with an RGB LED, a photocell, and not much else. If you’re wondering how they work, we’ve seen the color sensor demystified.

We absolutely love the impetus of this project, as it definitely sounds like something a Hackaday reader would go through. After finally deciding between a CNC router and a laser cutter, [Eirik Brandal] was planning to “Hello, World” the CNC with something quick and simple, like maybe a few acrylic plates with curves and some electronics. Instead, feature creep took over, “things escalated out of control”, and [Eirik] came up with this intriguing and complicated kinetic sculpture.

As you’ll see in the demo video below, this is a motor-driven sculpture with sound and intermittent light. It has an Arduino Nano Every, two motors, and eight gears with various cog counts to accommodate the project. The light comes from LEDs that are attached to the DIY gears with their legs bent and their little feet sliding around homemade slip rings in order to alight.

But what about the sound? There’s an affixed piezo disk that picks up the gears’ vibrations and chafing, and this gets amplified to augment the acoustic sounds of the sculpture. Be sure to check out the quite satisfying demo video after the break, and stick around for the build video.

Are you as fascinated by kinetic sculptures as we are? Here’s on that uses machine learning in order to bring balance to itself.

Here at Hackaday, we love a good art piece, whether that involves light or sound. Combining both is a sure-fire way to get our attention, and [Eirik Brandal] did just that with his Void Extrusion piece.

The project is built around the Daisy Seed from Electrosmith. It’s an embedded platform designed for musical purposes, which made it perfect for [Eirik]’s project. Based on an STM32 chip, it’s very capable when it comes to DSP tasks. In this role, it’s charged with algorithmic music composition, providing the captivating soundtrack that emanates from the sculpture.

The sculpture itself looks almost like a fancy mid-century home from the Hollywood Hills, but it’s fundamentally a little more abstract than that. [Eirik] built it as an opportunity to experiment with using 3D printed forms in his work. To that end, it features a beautiful diffused LED wall and a speaker enclosure as an integral part of the build. The LEDs are run from an Arduino Nano Every.

[Eirik’s] work shows us that “generative” music can be intoxicating and compelling with a real sense of feeling and mood. The sculpture is a visually-capable pairing that works with the soundscape. It recalls us of some other great artworks we’ve featured from [Eirik] before, too.

Art is inherently subjective and its meaning varies from one person to the next. But many pieces have widespread appeal as they tap into some emotion we all share. Interactive art pieces tend to stimulate our senses of curiosity and wonder. Niklas Roy’s “Visitors Magnet” installation harnesses the mystique of magnetism to provide that wonder.

Visitors Magnet contains far too many elements for us to cover here, but they all incorporate magnetic fields in some way or another. One element, for example, consists of a vintage CRT (cathode-ray tube) TV. When a visitor passes a strong magnet by the TV, the magnetic fields deflect the electron beam and cause interesting patterns to appear on the screen. Another element of the piece includes magnetic viewing film and a magnetic glove. It lets visitors see the magnetic fields created by the glove.

Roy provides detail about each element on his project page and we know that at least one of them uses an Arduino. That Arduino monitors a Hall effect sensor that outputs a voltage proportional to the strength of a nearby magnetic field. The Arduino uses that value to control the brightness, color, and animation of a strip of WS2812B individually addressable RGB LEDs. As visitors move a large magnet (the same one used for the CRT element) around the Hall effect sensor, they can see the results on the LED strip.

Roy displayed Vistors Magnet at the Technorama science center in Winterthur, Switzerland during a short residency.

The post This interactive art installation is a study in magnetism appeared first on Arduino Blog.

A diagram showing an LED on the left, a lever-style plumbing valve in the center, and an Arduino Uno on the right.

Input devices that can handle rough and tumble environments aren’t nearly as varied as their more fragile siblings. [Alastair Aitchison] has devised a brilliant way of detecting inputs from plumbing valves that opens up another option. (YouTube) [via Arduino Blog]

While [Aitchison] could’ve run the plumbing valves with water inside and detected flow, he decided the more elegant solution would be to use photosensors and an LED to simplify the system. This avoids the added cost of a pump and flow sensors as well as the questionable proposition of mixing electronics and water. By analyzing the change in light intensity as the valve closes or opens, you can take input for a range of values or set a threshold for an on/off condition.

[Aitchison] designed these for an escape room, but we can see them being great for museums, amusement parks, or even for (train) simulators. He says one of the main reasons he picked plumbing valves was for their aesthetics. Industrial switches and arcade buttons have their place, but certainly aren’t the best fit in some situations, especially if you’re going for a period feel. Plus, since the sensor itself doesn’t have any moving parts, these analog inputs will be easy to repair should anything happen to the valve itself.

If you’re looking for more unusual inputs, check out the winners of our Odd Inputs and Peculiar Peripherals contest or this typewriter that runs Linux.

close-up image of a philodendron houseplant with electrodes attached, connected to a robot arm holding a machete

In a straight fight between a houseplant and a human, you might expect the plant to be at a significant disadvantage. So [David Bowen] has decided to even the odds a little by arming this philodendron with a robot arm and a machete.

The build is a little short on details but, from the video, it appears that adhesive electrodes have been attached to the leaves of the recently-empowered plant and connected directly to analog inputs of an Arduino Uno.  From there, the text tells us that the signals are mapped to movements of the industrial robot arm that holds the blade.

It’s not clear if the choice of plant is significant, but an unarmed philodendron appears to be otherwise largely innocuous, unless you happen to be a hungry rodent. We hope that there is also a means of disconnecting the power remotely, else this art installation could defend itself indefinitely! (or until it gets thirsty, at least.) We at Hackaday welcome our new leafy overlords.

We have covered the capabilities of plants before, and they can represent a rich seam of research for the home hacker.  They can tell you when they’re thirsty, but can they bend light to their will?  We even held a Plant Communication Hack Chat in 2021.

Thanks to [Niklas] for the tip.

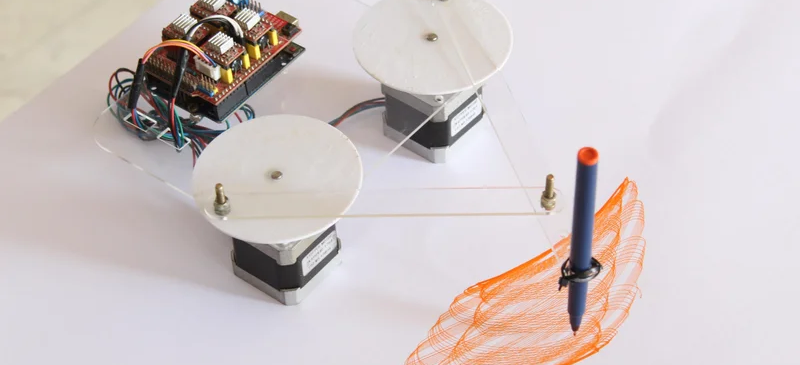
The holidays always remind us of our favorite toys from when we were kids. Johnny Astro, an Erector set, and — of course — a Spirograph. [CraftDiaries] has an Arduino machine that isn’t quite a Spirograph, but it sure reminds us of one. The Arduino drives two stepper motors that connect to a pen that can create some interesting patterns.

The build uses a few parts that were laser cut, but they don’t look like they’d be hard to fabricate using conventional means or even 3D printing. The author even mentions you could make them out of cardboard or foamboard if you wanted to.

The electronics are straightforward with two stepper drivers. We couldn’t help but think that some of the old 3D printer motherboards we have laying around here could handle this very easily. However, in this project, the CPU is an ordinary UNO with a CNC shield to drive the motors.

Of course, the real trick is the software. Apparently, the different patterns come from the relationship between the delay between steps of the right motor and that of the left motor. There’s got to be some math behind that, but the patterns are certainly pretty.

If you prefer something that looks more like an actual Spirograph, grab a bag of Lego. Or try the Art-O-Matic.

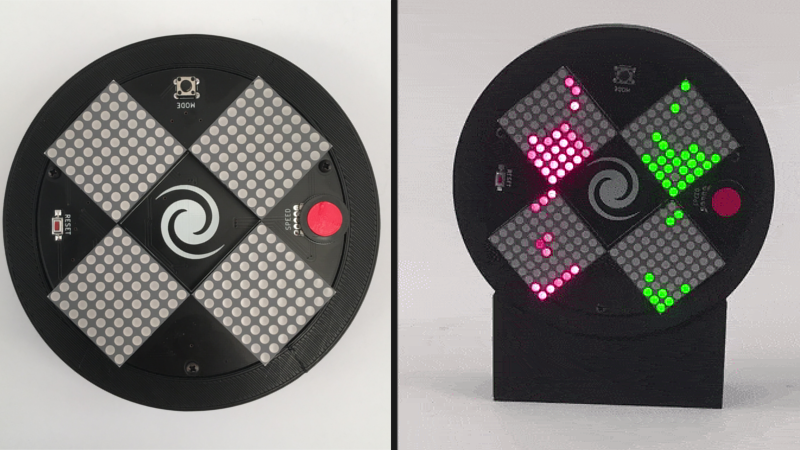
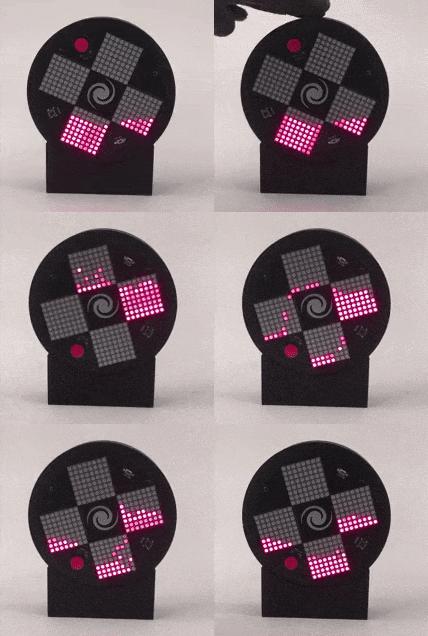
[Fearless Night]’s slick dual hourglass doesn’t just simulate sand with LEDs, it also emulates the effects of gravity on those simulated particles and offers a few different mode options.

The unit uses an Arduino (with ATMEGA328P) and an MPU-6050 accelerometer breakout board to sense orientation and movement, and the rest is just a matter of software. Both the Arduino and the MPU-6050 board are readily available and not particularly expensive, and the LED matrix displays are just 8×8 arrays of red/green LEDs, each driven by a HT16K33 LED controller IC.

The enclosure and stand are both 3D-printed, and a PCB not only mounts the components but also serves as a top cover, with the silkscreen layer of the PCB making for some handy labels. It’s a clever way to make the PCB pull double-duty, which is a technique [Fearless Night] also used on their earlier optical theremin design.

Those looking to make one of their own will find all the design files and source code handily available from the project page. It might not be able to tell time in the classical sense, but seeing the hourglass displays react to the device’s orientation is a really neat effect.

We will be the first to admit that it’s often hard to be productive while working from home, especially if no one’s ever really looking over your shoulder. Well, here is one creepy way to feel as though someone is keeping an eye on you, if that’s what gets you to straighten up and fly right. The Eyecam research project by [Marc Teyssier] et. al. is a realistic, motorized eyeball that includes a camera and hangs out on top of your computer monitor. It aims to spark conversation about the sensors that are all around us already in various cold and clinical forms. It’s an open source project with a paper and a repo and a how-to video in the works.

The eyebrow-raising design pulls no punches in the uncanny department: the eye behaves as you’d expect (if you could have expected this) — it blinks, looks around, and can even waggle its brow. The eyeball, brow, and eyelids are actuated by a total of six servos that are controlled by an Arduino Nano.

Inside the eyeball is a Raspberry Pi camera connected to a Raspi Zero for the web cam portion of this intriguing horror show. Keep an eye out after the break for the Eyecam infomercial.

Creepy or fascinating, it succeeds in making people think about the vast amount of sensors around us now, and what the future of them could look like. Would mimicking eye contact be an improvement over the standard black and gray oblong eye? Perhaps a pair of eyes would be less unsettling, we’re not really sure. But we are left to wonder what’s next, a microphone that looks like an ear? Probably. Will it have hair sprouting from it? Perhaps.

Yeah, it’s true; two eyes are more on the mesmerizing side, but still creepy, especially when they follow you around the room and can shoot frickin’ laser beams.

Thanks for the tip, [Sven, greg, and Itay]!


  • Newsletter

    Sign up for the PlanetArduino Newsletter, which delivers the most popular articles via e-mail to your inbox every week. Just fill in the information below and submit.

  • Like Us on Facebook