A common hacker upgrade to an espresso machine is to improve stability and performance with a better temperature controller, but [Schematix]’s Smart Coffee project doesn’t stop there. It entirely replaces the machine’s controller and provides an optional array of improvements for a variety of single-boiler machines (which is most of them).
Smart Coffee isn’t free, it costs 16 NZD (about 10 USD) but there is a free demo version. There is no official support, but there are wiring guides and sources aplenty from which to purchase the various optional parts. It runs on an Arduino MEGA 2560 PRO (or similar microcontroller) and supports a wide array of additional hardware including pressure transducer, water level sensor, flow meter, OLED display, and more.
Modification of one’s espresso machine is a rewarding endeavor, but the Smart Coffee project provides a way for one to get straight to the hacking and function modifying, instead of figuring out the wiring hardware interfacing from scratch.
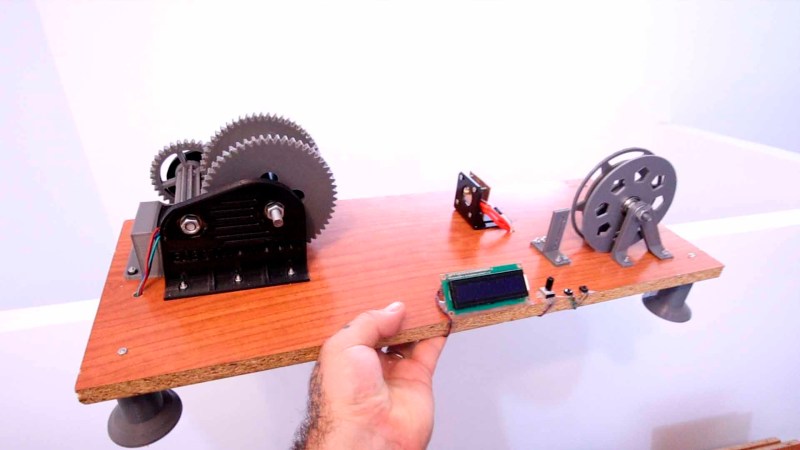
While the price of 3D printers has come down quite a lot in the past few years, filament continues to be rather pricey especially for those doing a lot of printing. This has led to some people looking to alternatives for standard filament, including recycling various forms of plastic. We’ve seen plenty of builds using various materials, but none so far have had this level of quality control in the final project.
What sets this machine apart from others is that it’s built around an Arduino Nano and includes controls that allow the user to fine-tune a PID controller during the conversion of the recycled plastic into filament. Different plastic bottles have different material qualities, so once the machine is started it can be adjusted to ensure that the filament produced has the exact specifications for the printer. The PCB is available for download, and the only thing that needs to be done by hand besides feeding the machine to start it is to cut the plastic into strips for the starter spool. There is also a separate 3D printed tool available to make this task easy, though.
Not only could this project save printing costs, but it also keeps harmful plastics out of landfills and other environments. Recycling plastic tends to be quite difficult since producing new plastic is incredibly cheap, and the recycled material can’t be used as often as other materials such as aluminum. But there are still plenty of people out there trying to reuse as much of it as they can.
There’s this whole class of vertically scrolling rhythm games that take both hands and look really fun to play, albeit hard on the joints. You can buy specialized controllers for them, but they’re ridiculously expensive for what they are — just a handful of switches and two knobs. It’s exactly the kind of thing you should build to your taste for far less money.
Inspired by a pocket version of the Voltex controller that is also pretty darned expensive, [OmniSaiRen] set out to make their own on the cheap by building an awesome little macro keyboard that’s smaller and easier to use than the specialized controller. Inside there’s an Arduino Pro Micro taking input from eight Cherry MX switches and two optical encoders. The game treats the encoders as vertical and horizontal mouse movements, so [OmniSaiRen]’s code scans the encoders for their positions.
[OmniSaiRen] wrote their own matrix code and says it’s ugly, but it works well enough to play the game. What more can you ask for? A cool sticker to go on the top? Done. It’s too cold outside to paint, anyway. If it’s a one-handed game pad you need, check out this sweet little thing.
If you have even the most passing interest in space and what it takes to get there, you’ve probably already played Kerbal Space Program (KSP). If you haven’t, then you should set aside about ten hours today to go check that out real quick. Don’t worry, Hackaday will still be here when you get back. Right now you need to focus on getting those rockets built and establishing a network of communication satellites so you can get out of low orbit.
For those of you who’ve played the game (or are joining us again after playing KSP for the prescribed 10, 12, 16 hours), you’ll know that the humble computer keyboard is not very well suited to jaunts through space. You really want a joystick and throttle at the absolute minimum for accurate maneuvers, but even you’ll be spending plenty of time back on the keyboard to operate the craft’s various systems. If you want the ultimate KSP control setup, you’ll need to follow in the footsteps of [Hugo Peeters] and build your own. Luckily for us, he’s written up an exceptionally well detailed guide on building KSP controllers that should prove useful even if you don’t want to clone his.
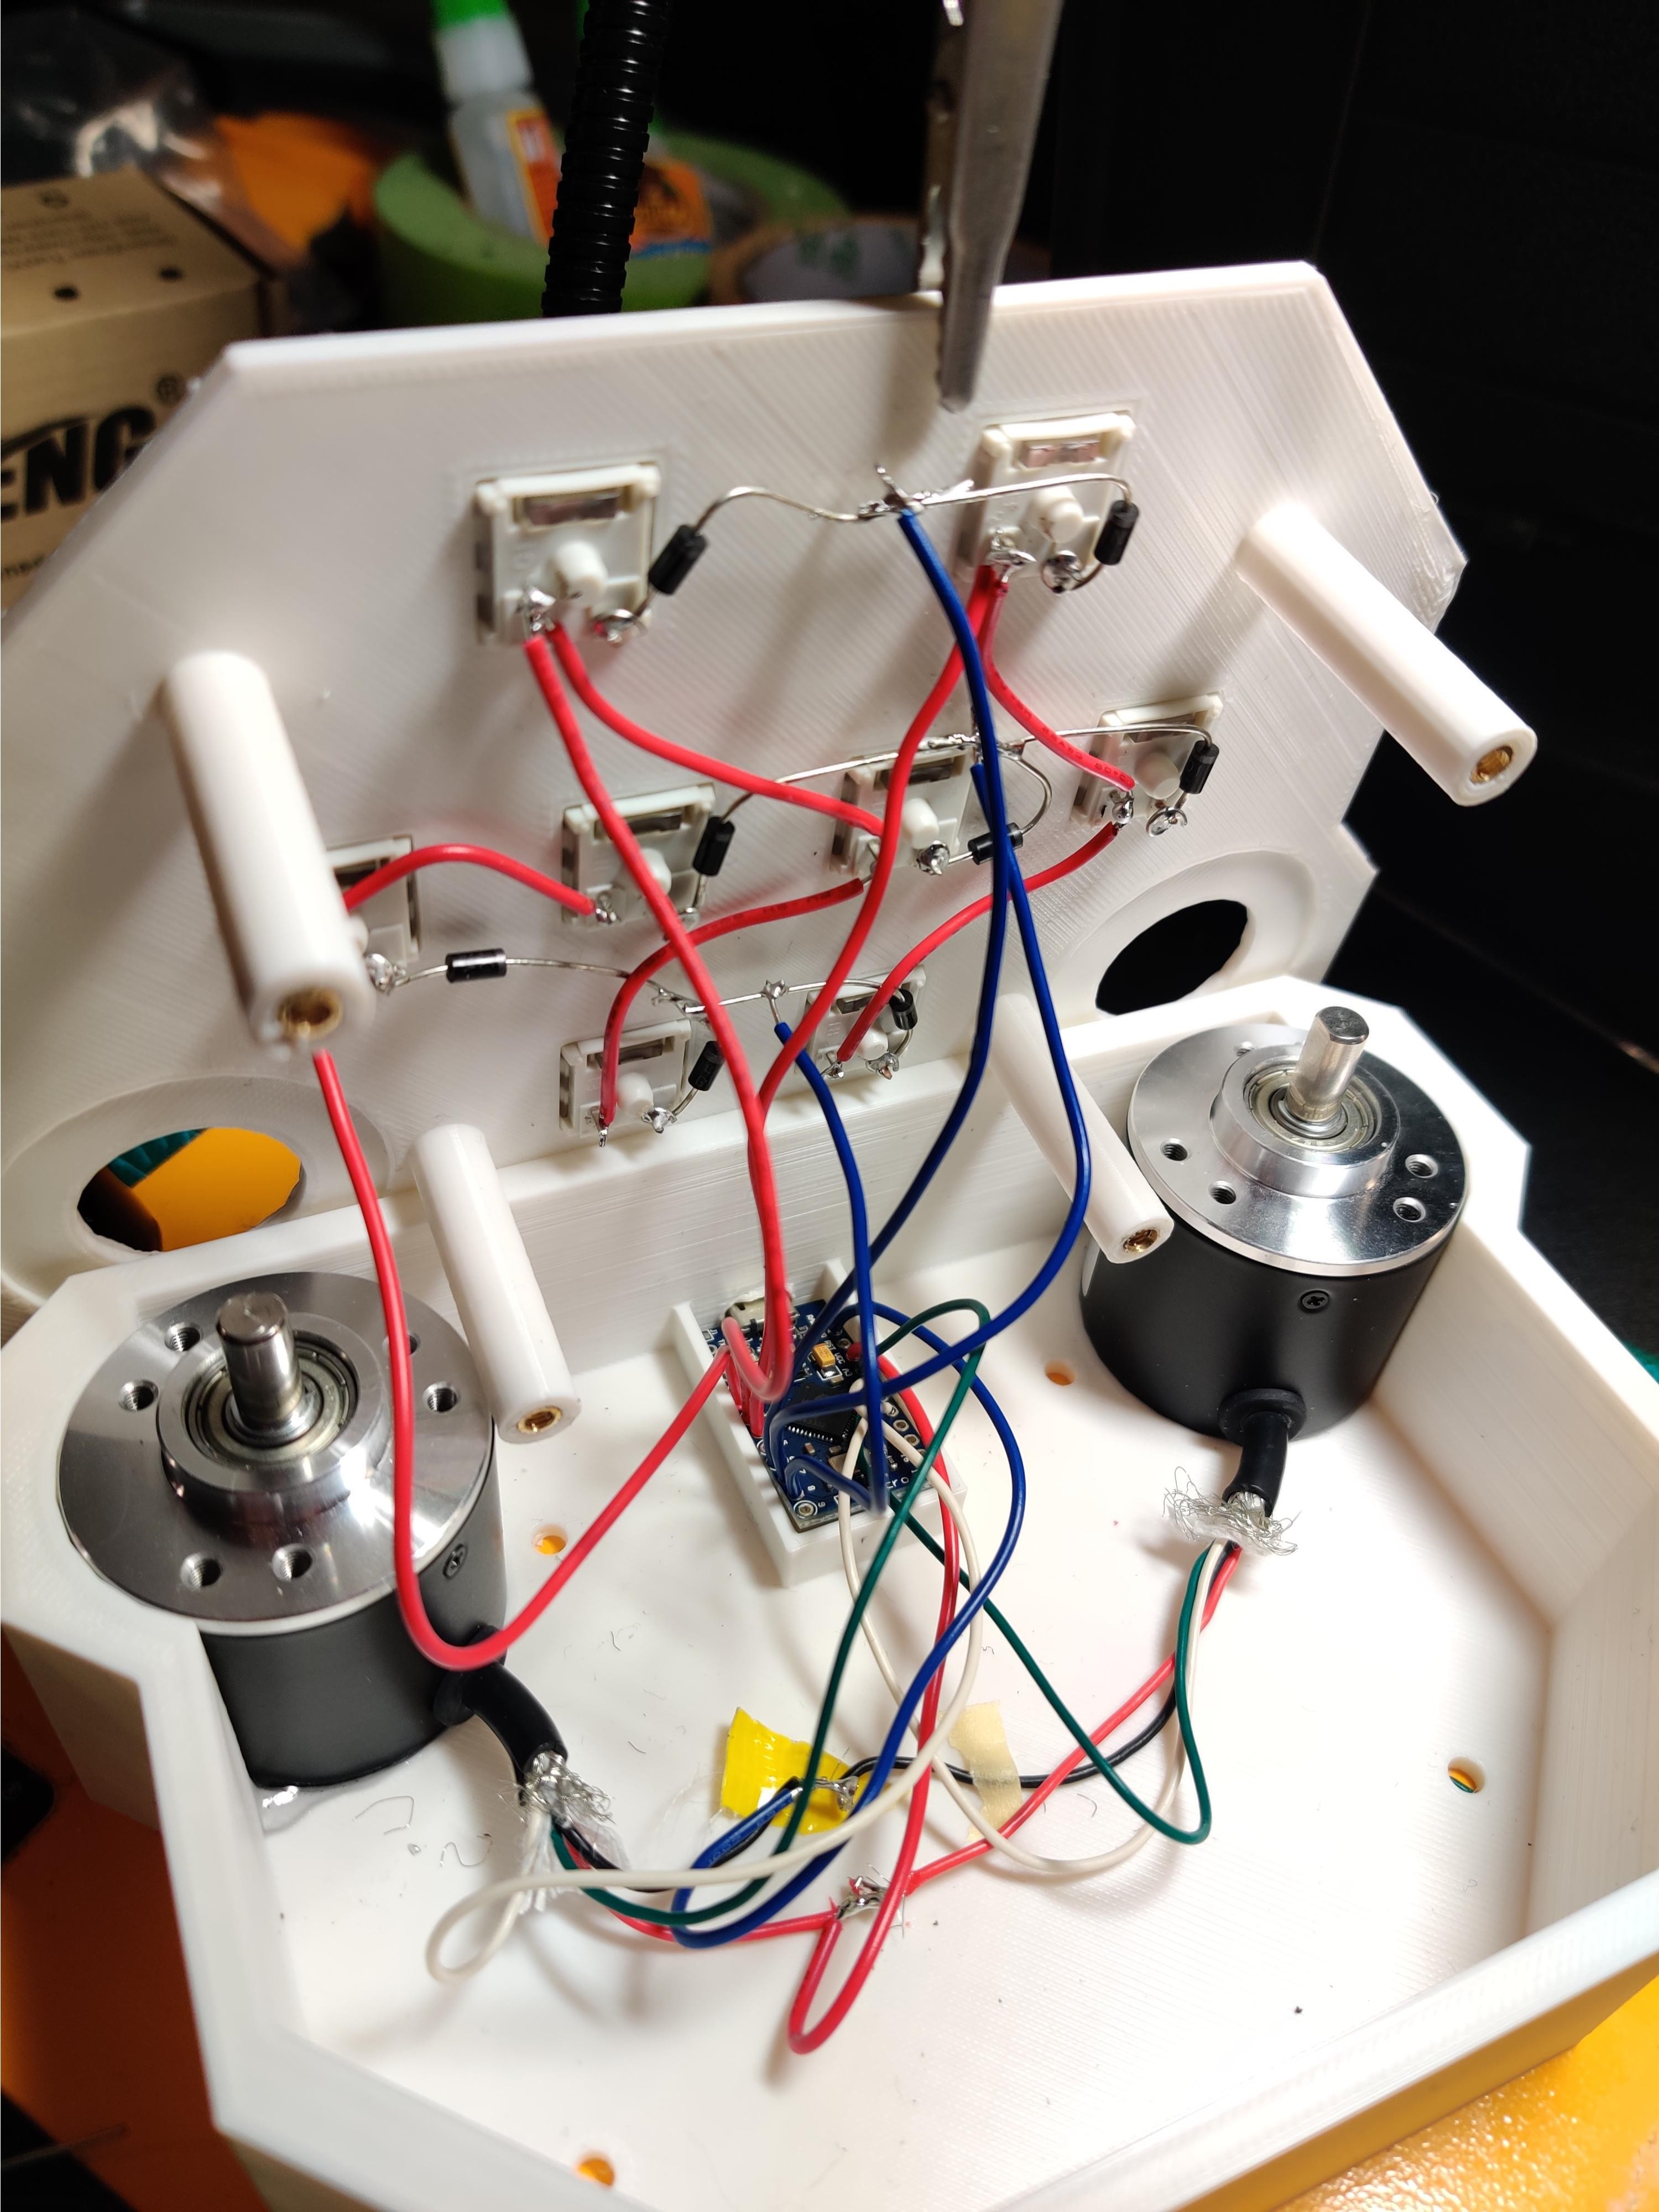
Wiring switches and buttons to the Arduino.
At the most basic level, building a KSP controller consists of hooking a bunch of switches and buttons to a microcontroller such as the Arduino or Teensy, and converting those to USB HID key presses that the game understands. This works fine up to a point, but is limited because it’s only a one-way method of communication. For his controller, [Hugo] forked KSPSerialIO, a plugin for KSP that allows bidirectional communication between the game and your controller, enabling things like digital readouts of speed and fuel levels on the controller’s panel.
Once the logistics of how you’ll talk to the game are settled, the rest is really up to the individual. The first step in building your own KSP controller is deciding what you want it to do. Are you looking to fly planes? Control a rover? Maybe you just want a master control panel for your space station. There’s a whole lot of things you can build in KSP, and the layout, inputs, and displays on your controller should ideally reflect your play style.
[Hugo] went with a fairly general purpose panel, but did spend quite a bit of extra time to get some slick LED bar graphs hooked up to display resource levels of different systems on his craft. That’s an extra step that isn’t strictly required for a build like this, but once you see it, you’re going to have a hard time not wanting to include it on your own panel. He also went through the expense of having the panel and case professionally laser cut and etched, which definitely gives it a polished feel.
After booting up his RetroPie system, [jfrmilner] had the distinct feeling that something was off. Realizing that the modern Xbox 360 controller didn’t fit right when reliving the games of his youth, he rounded up all his old controllers to make sure he always had the right gamepad for the game.
Wanting to keep the controllers unmodified — so they could still be used on the original systems — he had to do a bit of reverse-engineering and source some controller sockets before building his controller hub. Using shift-in registers, shift-out registers, and some multiplexers, he designed a large circuit selector — which acts as a shield for an Arduino Micro — so all the controllers remain connected. A potentiometer allows him to select the desired controller and a few arcade buttons which access RetroPie shortcuts really round out the hub. Check out the demo after the break!
[jfrmilner] kept the controllers relevant to the games he would be playing, but we hope there’s some room to include a controller in rug format in his build. Of course, there’s always the option of Jerry-rigging old systems to use your preferred retro gamepad.
If you’re looking for a high entertainment value per byte of code, [Nardax] has you covered with his wearable spellcasting controller. With not much effort, he has built a very fun looking device, proving what we’ve always known: a little interaction can go a long way.
[Nardax] originally intended his glorified elbow-mount potentiometer to be a fireworks controller. Ironically, he’s now using it to throw virtual fireballs instead. Depending on the angle at which he holds his elbow before releasing it, he can cast different spells in the game World of Warcraft. We’re not at all sure that it helps his gameplay, but we’re absolutely sure that it’s more fun that simply mashing different keys.
There’s a lot of room for expansion here, but the question is how far you push it. Sometimes the simplest ideas are the best. It looks like [Nardax] is enjoying his product-testing research, though, so we’ll keep our eyes out for the next iterations of this project.
Instructables user [Roboro] had a Mad Catz Xbox steering wheel controller he hasn’t had much use for of late, so he decided to hack and use it as a controller for a robot instead.
Conceivably, you could use any RC car, but [Roboro] is reusing one he used for a robot sumo competition a few years back. Cracking open the controller revealed a warren of wires that were — surprise, surprise — grouped and labelled, making for a far less painful hacking process. Of course, [Roboro] is only using the Xbox button for power, the player-two LED to show the connection status, the wheel, and the pedals, but knowing which wires are which might come in handy later.
An Arduino Uno in the wheel and a Nano in the robot are connected via CC41-A Bluetooth modules which — despite having less functionality than the HM10 module they’re cloned from — perform admirably. A bit of code and integration of a SN754410 H-bridge motor driver — the Arduino doesn’t supply enough current to [Roboro]’s robot’s motors — and the little robot’s ready for its test drive.
[Roboro]’s suggested improvements are servo steering for the robot, upgrading to the HM10 module, more sensors to take advantage of the other buttons on the wheel, and a camera — because who doesn’t love some good ol’ fashioned FPV racing?
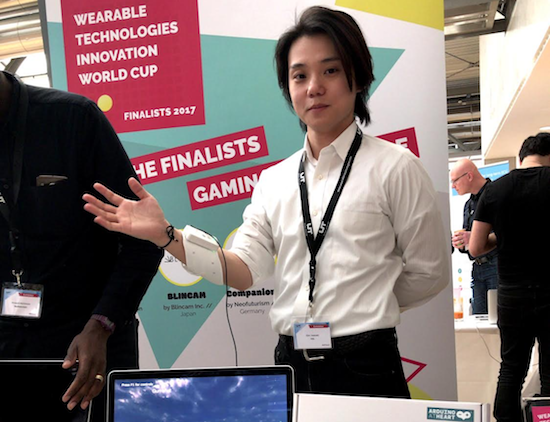
We are excited to announce that UnlimitedHand is now an officially licensed Arduino AtHeart product. Created by Japanese startup H2L, the wearable controller straps around your forearm like an Ace bandage and allows you to actually touch and feel things within the gaming world.
UnlimitedHandconsists of a 3D motion sensor, an array of muscle sensors, a multi-channel electronic muscle stimulator, and a vibration motor, which together, enable you to interact with objects and characters in VR. It does this by syncing the movement of a user’s hand and fingers with its virtual counterpart, and contracting the muscles on the wearer’s forearm to simulate haptic feedback.
With UnlimitedHand, not only will you be able to experience the ricochet of a gunshot or pet animals, but also hack various customized gestures thanks to its full compatibility with the Arduino IDE.
According to H2L:
Arduino, with their commitment to open-source, has reached out with their technology to muster a great force of Makers and inventors. This omni-present community has no doubt supported us in many ways during the development of UnlimitedHand. By joining the program, we can now present our results back to the community.
UnlimitedHand–which surpassed its Kickstarter goal in less than a day–is now available for purchase on Amazon and its website, as well as in retail stores throughout Japan.
[mfaust] wakes up in the morning like a regular person, goes to work like a regular person, types in tedious commands for his software versioning utilities like a regular person, and then, as a reward, gets his coffee, just like rest of us. However, what if there was a way to shorten the steps, bringing us all closer to the wonderful coffee step, without all those inconvenient delays? Well, global industry is trying its best to blot out the sun, so mornings are covered there. [Elon Musk’s] thinktank proposed the hyperloop, which should help with the second step. [mfaust] built a control station for his versioning software. Raise your cup of joe high for this man’s innovative spirit.
He first laid out all the buttons, LED lights, and knobs he’d like on a panel to automate away his daily tasks. Using photoshop he ended up with a nice template. He laminated it to the top of a regular project box and did his best to drill holes in the right places without a workshop at his command. It’s pretty good looking!
Since this is the sort of thing an Arduino is best at he, in a mere two tries, wired everything up in such a way that it would all cram into the box. With everything blinking satisfactorily and all the buttons showing up on the serial out, he was ready for the final step.
Being a proficient and prolific enough developer to need a control panel in the first place, like a sort of software DJ, he wrote a nice interface for it all. The Arduino sits and waits for serial input while occasionally spitting out a packet of data describing its switch status. A Java daemon runs in the background of his computer. When the right bits are witnessed, a very nicely executed on screen display reports on the progress of his various scripts.
Now he can arrive at the hyperloop terminal during the appropriate work time slot in Earth’s perpetual night. After which he simply walks up to his computer, flips a few switches, glances quickly at the display for verification, and goes to drink some nice, hydroponically grown, coffee. Just like the rest of us.
Planet Arduino is, or at the moment is wishing to become, an aggregation of public weblogs from around the world written by people who develop, play, think on Arduino platform and his son. The opinions expressed in those weblogs and hence this aggregation are those of the original authors. Entries on this page are owned by their authors. We do not edit, endorse or vouch for the contents of individual posts. For more information about Arduino please visit www.arduino.cc
You are currently browsing the archives for the controller category.


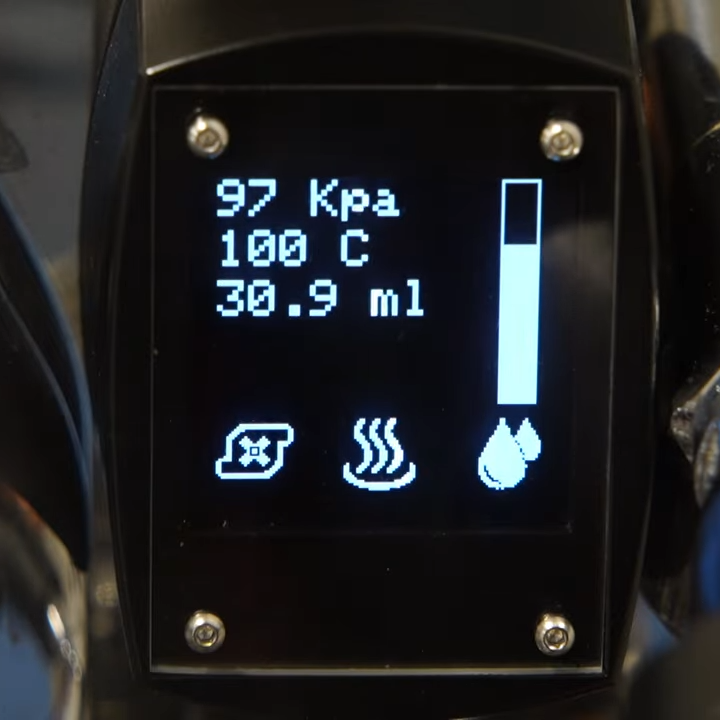 Smart Coffee isn’t free, it costs 16 NZD (about 10 USD) but there is a free demo version. There is no official support, but there are wiring guides and sources aplenty from which to purchase the various optional parts. It runs on an Arduino MEGA 2560 PRO (or similar microcontroller) and supports a wide array of additional hardware including pressure transducer, water level sensor, flow meter, OLED display, and more.