Posts | Comments

Planet Arduino

Archive for the ‘controller’ Category

[mfaust] wakes up in the morning like a regular person, goes to work like a regular person, types in tedious commands for his software versioning utilities like a regular person, and then, as a reward, gets his coffee, just like rest of us. However, what if there was a way to shorten the steps, bringing us all closer to the wonderful coffee step, without all those inconvenient delays? Well, global industry is trying its best to blot out the sun, so mornings are covered there. [Elon Musk’s] thinktank proposed the hyperloop, which should help with the second step. [mfaust] built a control station for his versioning software. Raise your cup of joe high for this man’s innovative spirit.

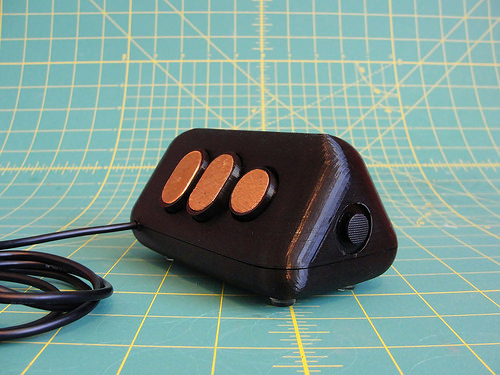
He first laid out all the buttons, LED lights, and knobs he’d like on a panel to automate away his daily tasks. Using photoshop he ended up with a nice template. He laminated it to the top of a regular project box and did his best to drill holes in the right places without a workshop at his command. It’s pretty good looking!

Since this is the sort of thing an Arduino is best at he, in a mere two tries, wired everything up in such a way that it would all cram into the box. With everything blinking satisfactorily and all the buttons showing up on the serial out, he was ready for the final step.

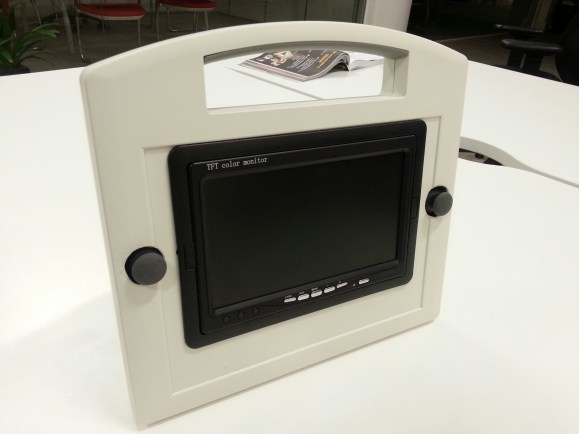
Being a proficient and prolific enough developer to need a control panel in the first place, like a sort of software DJ, he wrote a nice interface for it all. The Arduino sits and waits for serial input while occasionally spitting out a packet of data describing its switch status. A Java daemon runs in the background of his computer. When the right bits are witnessed, a very nicely executed on screen display reports on the progress of his various scripts.

Now he can arrive at the hyperloop terminal during the appropriate work time slot in Earth’s perpetual night. After which he simply walks up to his computer, flips a few switches, glances quickly at the display for verification, and goes to drink some nice, hydroponically grown, coffee. Just like the rest of us.


Filed under: Arduino Hacks
May
11

Arduino DMX 512 Tester/Controller

arduino, controller, DMX-512, tester Comments Off on Arduino DMX 512 Tester/Controller 

Hardware v00

daniel3514 writes:

A tool to control and test light show controlled by the protocol DMX-512, ideal for quick tests on fixed or temporary installations of lighting. This project arises from the need to have a portable system for rapid testing in lighting installations, without the need to install lighting consoles, interfaces or computers in environments outside, hostile or difficult to access.

Arduino DMX 512 Tester/Controller – [Link]

Mar
13

Rocket Controls Fit for a Kerbal

arduino, arduino hacks, controller, Gaming, kerbal space program, LCD, space Comments Off on Rocket Controls Fit for a Kerbal 

Kerbal Space Program is a space simulation game. You design spacecraft for a fictional race called Kerbals, then blast those brave Kerbals into space. Sometimes they don’t make it home.

If controlling spacecraft with your WASD keys isn’t immersive enough for you, [marzubus] has created a fully featured KSP control console. It sports a joystick, multiple displays, and an array of buttons and switches for all your flight control needs. The console was built using a modular approach, so different controls can be swapped in and out as needed.

Under the hood, three Arduinos provide the interface between the game and the controls. One Arduino Mega runs HoodLoader2 to provide joystick data over HID. A second Mega uses KSPSerialIO to communicate with the game over a standard COM port interface. Finally, a Due interfaces with the displays, which provide information on the current status of your spacecraft.

All of the parts are housed in an off the shelf enclosure, which has a certain Apollo Mission Control feel to it. All [marzubus] needs now is a white vest with a Kerbal badge on it.


Filed under: Arduino Hacks
Jan
24

Fighting games like Mortal Kombat provide you with a variety of different available moves. These include kicks, punches, grabs, etc. They also normally include various combination moves you can perform. These combo moves require you to press the proper buttons in the correct order and also require you to time the presses correctly. [Egzola] realized that he could just hack his controller to simulate the button presses for him. This bypasses the learning curve and allows him to perform more complicated combinations with just the press of a single button.

[Egzola] started by taking apart his Playstation 3 controller. There were two PCB’s inside connected by a ribbon cable. Luckily, each individual pad for this cable was labeled with the corresponding controller button. This made it extremely simple to hack the controller. [Egzola] soldered his own wires to each of these pads. Each wire is a different color. The wires then go to two different connectors to make them easier to hook up to a bread board.

Each wire is then broken out on the breadboard. The signal from each button is run through a 4n25 optoisolator. From there the signal makes its way back to various Arduino pins. The 4n25 chips keeps the controller circuit isolated from the Arduino’s electrical circuit. The Arduino also has two push buttons connected to it. These buttons are mounted to the PS3 controller.

Now when [Egzola] presses one of the buttons, the Arduino senses the button press and simulates pressing the various controller buttons in a pre-programmed order. The result is a devastating combination move that would normally require practice and repetition to remember. You might say that [Egzola] could have spent his time just learning the moves, but that wasn’t really the point was it? Check out the video below for a demonstration.


Filed under: Arduino Hacks

[Patrick] was looking for an easier way to control music and movies on his computer from across the room. There is a huge amount of remote control products that could be purchased to do this, but as a hacker [Patrick] wanted to make something himself. He calls his creation, “Dial” and it’s a simple but elegant solution to the problem.

Dial looks like a small cylindrical container that sits on a flat surface. It’s actually split into a top and bottom cylinder. The bottom acts as a base and stays stationary while the top acts as a dial and a push button. The case was designed in SOLIDWORKS and printed on a 3D printer.

The Dial runs on an Arduino Pro mini with a Bluetooth module. The original prototype used Bluetooth 2.0 and required a recharge after about a day. The latest version uses the Bluetooth low energy spec and can reportedly last several weeks on a single charge. Once the LiPo battery dies, it can be recharged easily once plugged into a USB port.

The mechanical component of the dial is actually an off-the-shelf rotary encoder. The encoder included a built-in push button to make things easier. The firmware is able to detect rotation in either direction, a button press, a double press, and a press-and-hold. This gives five different possible functions.

[Patrick] wrote two pieces of software to handle interaction with the Dial. The first is a C program to deal with the Bluetooth communication. The second is actually a set of Apple scripts to actually handle interaction between the Dial and the various media programs on his computer. This allows the user to more easily write their own scripts for whatever software they want. While this may have read like a product review, the Dial is actually open source!


Filed under: Arduino Hacks, peripherals hacks
Aug
08

A game controller that’s mondo customizable with Lego and Android

arduino, controller, Fun & Games, Gaming, LEGO Comments Off on A game controller that’s mondo customizable with Lego and Android 

Strange Meadowlark’s Lego/Arduino Game Controller: because one size does not fit all.Strange Meadowlark’s Lego/Arduino Game Controller is a collection of off the shelf parts and surplus that fit together perfectly.

Read more on MAKE

Jul
05

The Rabbit H1 is a Stationary Mouse Replacement

3D printing, arduino, arduino hacks, CNC, controller, mouse, openscad, Teensy Comments Off on The Rabbit H1 is a Stationary Mouse Replacement 

rabbit h1

[Dave] has some big plans to build himself a 1980′s style computer. Most of the time, large-scale projects can be made easier by breaking them down into their smaller components. [Dave] decided to start his project by designing and constructing a custom controller for his future computer. He calls it the Rabbit H1.

[Dave] was inspired by the HOTAS throttle control system, which is commonly used in aviation. The basic idea behind HOTAS is that the pilot has a bunch of controls built right into the throttle stick. This way, the pilot doesn’t ever have to remove his hand from the throttle. [Dave] took this basic concept and ran with it.

He first designed a simple controller shape in OpenSCAD and printed it out on his 3D printer. He tested it out in his hand and realized that it didn’t feel quite right. The second try was more narrow at the top, resulting in a triangular shape. [Dave] then found the most comfortable position for his fingers and marked the piece with a marker. Finally, he measured out all of the markings and transferred them into OpenSCAD to perfect his design.

[Dave] had some fun with OpenSCAD, designing various hinges and plywood inlays for all of the buttons. Lucky for [Dave], both the 3D printer software as well as the CNC router software accept STL files. This meant that he was able to design both parts together in one program and use the output for both machines.

With the physical controller out of the way, it was time to work on the electronics. [Dave] bought a couple of joysticks from Adafruit, as well as a couple of push buttons. One of the joysticks controls the mouse cursor. The other joystick controls scrolling vertically and horizontally, and includes a push button for left-click. The two buttons are used for middle and right-click. All of these inputs are read by a Teensy Arduino. The Teensy is compact and easily capable of emulating a USB mouse, which makes it perfect for this job.

[Dave] has published his designs on Thingiverse if you would like to try to build one of these yourself.


Filed under: Arduino Hacks
Jun
18

Reflow Oven Controller with graphics TFT

arduino, control, controller, JD-T1800, Oven, PID, Reflow, ST7735R, TFT Comments Off on Reflow Oven Controller with graphics TFT 

CycleWithOverflow

0xPIT @ github.com writes:

This Reflow Oven Controller relies on an Arduino Pro Micro, which is similar to the Leonardo and easily obtainable on eb*y for less than $10, plus my custom shield, which is actually more like a motherboard.

As I believe it is not wise to have a mess of wiring and tiny breakout-boards for operating mains powered equipment, I’ve decided to design custom board with easily obtainable components.

The hardware can be found in the folder hardware, including the Eagle schematics and PCB layout files. It should fit the freemium version of Eagle

Reflow Oven Controller with graphics TFT - [Link]

Feb
15

Robot Controller More Fun Than an Actual Wii-U

arduino hacks, controller, robots hacks, Wii U controller Comments Off on Robot Controller More Fun Than an Actual Wii-U 

wii-u-bot-controller

Okay, that’s probably not fair since we never gave the Wii-U a try at all. But doesn’t this seem like a much better idea for controlling a robot than playing a gaming console?

The photo above is a bit deceiving because the unit actually has quite a bit of depth. Despite that, the cleanliness of the build is very impressive. [Alec Waters] started off with a backup monitor meant for automotive use (we’d estimate 7″). There’s a radio receiver, two analog joysticks where your thumbs line up when holding the controller, and an Arduino to pull it all together. If you haven’t figured it out already, this displays the wireless video from the robot he’s controlling. He’s also include an auxiliary port which lets you bypass the radio receiver and plug in a video feed directly.

Still convinced you need Nintendo’s consumer controller with a built-in screen. Yes, that can be hacked to work with all your projects. But seriously, this is way more fun.


Filed under: Arduino Hacks, robots hacks


  • Newsletter

    Sign up for the PlanetArduino Newsletter, which delivers the most popular articles via e-mail to your inbox every week. Just fill in the information below and submit.

  • Like Us on Facebook